The previous article we implemented the first service in our distributed architecture. The first service functioning as the producer, published messages to our RabbitMQ instance on CloudAMQP. In this article, we will use the second service that will serve as the consumer of messages in our architecture.
As mentioned earlier, the GetMeHired-consumer will consume and process the messages published to our RabbitMQ instance on CloudAMQP. A message in this case is the job search query, and processing a message here entails grabbing the relevant jobs from the web and emailing those jobs to the users.
This service essentially does all the heavy lifting in our architecture.
With regards to the implementation details, we will define an APIRequeuestHelper class that will encapsulate the logic of making requests to the Linkedin job search API to grab relevant jobs.
Furthermore, we will again define the
CloudAMQPHelper
class that will streamline interfacing with our RabbitMQ instance on
CloudAMQP. Additionally, we will also have the
TwilioHelper
class that will encompass the logic of working with Twilio Sendgrid
in our project.
We will also define the
send_email
function that uses the
TwilioHelper
class to forward relevant jobs to users. Lastly, we will implement
the main process that uses the
CloudAMQPHelper
class to grab messages from CloudAMQP, the
APIRequestHelper
class, to grab relevant jobs, and the
send_email
function to do what its name implies.
Also, note that the completed code for this project is hosted on GitHub. You can refer to it if you get stuck at any point. To begin, let's set up our development environment.
Setting up the project
Take the following steps to set up your development environment and subsequently the project:
Step 1: Creating a virtual environment
Even though we already created a virtual environment for the first service, we are still going to create a new virtual environment for the second service. This is major because the second service is meant to be a self-reliant application with its own set of dependencies.
-
In your terminal, run
python3 -m venv get-me-hired-consumer-envon Unix and macOS orpython -m venv get-me-hired-consumer-envon Windows to create a virtual environment namedget-me-hired-consumer-env. -
Run
source get-me-hired-consumer-env/bin/activateon Unix and macOS or.\get-me-hired-consumer-env\Scripts\activateon Windows to activate the virtual environment.
Step 2: Create a FastAPI project
With your virtual environment activated, take the following steps to bootstrap a FastAPI project.
- In your terminal run, code mkdir get-me-hired-consumer to create a new directory for our project.
-
In your terminal run
cd get-me-hired-consumer && touch __init__.py main.py requirements.txtEssentially, this command would navigate into theget-me-hired-consumer folder and create three files in it:__init__.py, main.py, and requirements.txtIf you are on Windows, the
touchcommand will not work. In that case, only run the first part of the command to navigate into the newly created folder:cd get-me-hired-consumer.You can then open the folder in the IDE you are working with and manually create the three files. -
If not done already, open the
get-me-hired-consumerfolder in your favorite IDE, and then copy and paste the snippet below into yourrequirements.txtfile.
These are the external dependencies we will need in our project for now.fastapi==0.75.0 pika==1.1.0 uvicorn[standard] python-dotenv requests sendgrid -
In your terminal, run
pip install -r requirements.txtThis command will install all the dependencies listed in therequirements.txtfile. Also, ensure that you are in the project directory in the terminal before running that command. -
Next, copy the snippet below and paste it into the
main.pyfilefrom fastapi import FastAPI app = FastAPI() # create a function which is called on incoming messages def callback(ch, method, properties, body): """ The logic for grabbing jobs and sending an email will be invoked here """ pass def main(): print("\n main function invoked \n") @app.on_event("startup") def startup_event(): """ Code to run during startup """ main() @app.on_event("shutdown") async def shutdown_event(): """Code to run during shutdown""" pass
Step 3: Running the development server
In your terminal run
uvicorn main:app --reload
In the output in your terminal, you should see this line
INFO: Uvicorn running on http://127.0.0.1:8000 (Press CTRL+C to quit)
It shows the URL where your app is being served on your local machine.
You should see
main function invoked
logged to your console
With our project now set, we will proceed to implement the business logic. To begin we will implement the CloudAMQP and the APIRequest helper classes in that order.
But before implementing these classes, remember to create a .env file in your project and add your CloudAMQP credentials to the file - we demonstrated how to do this in the previous post.
Implementing the CloudAMQP helper class
The CloudAMQP helper class will encapsulate the logic of connecting to CloudAMQP, declaring queues & exchanges, and publishing messages. We will use this class in some parts of the project to consume messages from our CloudAMQP’s RabbitMQ instance.
Create a file cloudamqp_helper.py in the project directory and add the snippet below to it.
import os
from typing import Callable
import pika
# from pika.exchange_type import ExchangeType
from dotenv import load_dotenv

# Load the .env file
load_dotenv()

class CloudAMQPHelper:
  """ The interface between this project and CloudAMQP """

  QUEUE_NAME = "get_me_hired_queue"

  def __init__(self) -> None:
    """ Sets up a connection and a channel when this class is instantiated """
    url = os.environ["CLOUDAMQP_URL"]
    params = pika.URLParameters(url)

    self.__connection = pika.BlockingConnection(params) # Connect to CloudAMQP
    def __create_channel(self) -> pika.BlockingConnection:
    channel = self.__connection.channel() # start a channel
    return channel

  def __create_queue(self) -> None:
    """ Declares a queue - always good to create the same queue
        from the consumer side as well since the action is idempotent
    """
    # Get channel
    channel = self.__create_channel()
    # Create a queue
    channel.queue_declare(queue=self.QUEUE_NAME)

  def consume_message(self, callback: Callable) -> None:
    """ Reads a message published to a queue it's bound to """
    self.__create_queue()
    # Get channel
    channel = self.__create_channel()
    channel.basic_consume(
        self.QUEUE_NAME,
        callback,
        auto_ack=True
    )
    # start consuming (blocks)
    channel.start_consuming()
    self.connection.close()

# Create an instance
cloudamqp: CloudAMQPHelper = CloudAMQPHelper()
In the snippet above, we, first of all, used the python-dotenv to load our .env file just so it’s accessible in our project. Next, we created the CloudAMQPHelper class that exposes one public method, consume_message.
Next, let’s create our APIRequest helper class.
Implementing the APIRequest helper class
As its name implies, we will use this helper class to make API calls to the third-party API, relying on the Linkedin Jobs Search API. To use this API, signup for RapidAPI, if you haven’t already.
Now take the following steps to implement the helper class.
Step 1: Add your RapidAPI’s API key to the .env file
To be able to make API calls to the Linkedin API, you will need your account’s API key.
When logged into RapidAPI, go to the Linkedin Jobs Search page and click on the Subscribe to Test button, and then subscribe to the basic/free plan. Once subscribed, the Subscribe to Test button will be replaced with the Test Endpoint button.
Free users are only entitled to 15 API calls/month for the Linkedin job search API, so keep that in mind when trying to test the endpoints. I will advise that you do so sparingly.
Now that you are subscribed to the API, you can grab your API key. To do that, go to the page of any of the APIs above and copy the value of the X-RapidAPI-Key headers variable in the Code Snippets tab. See the image below:
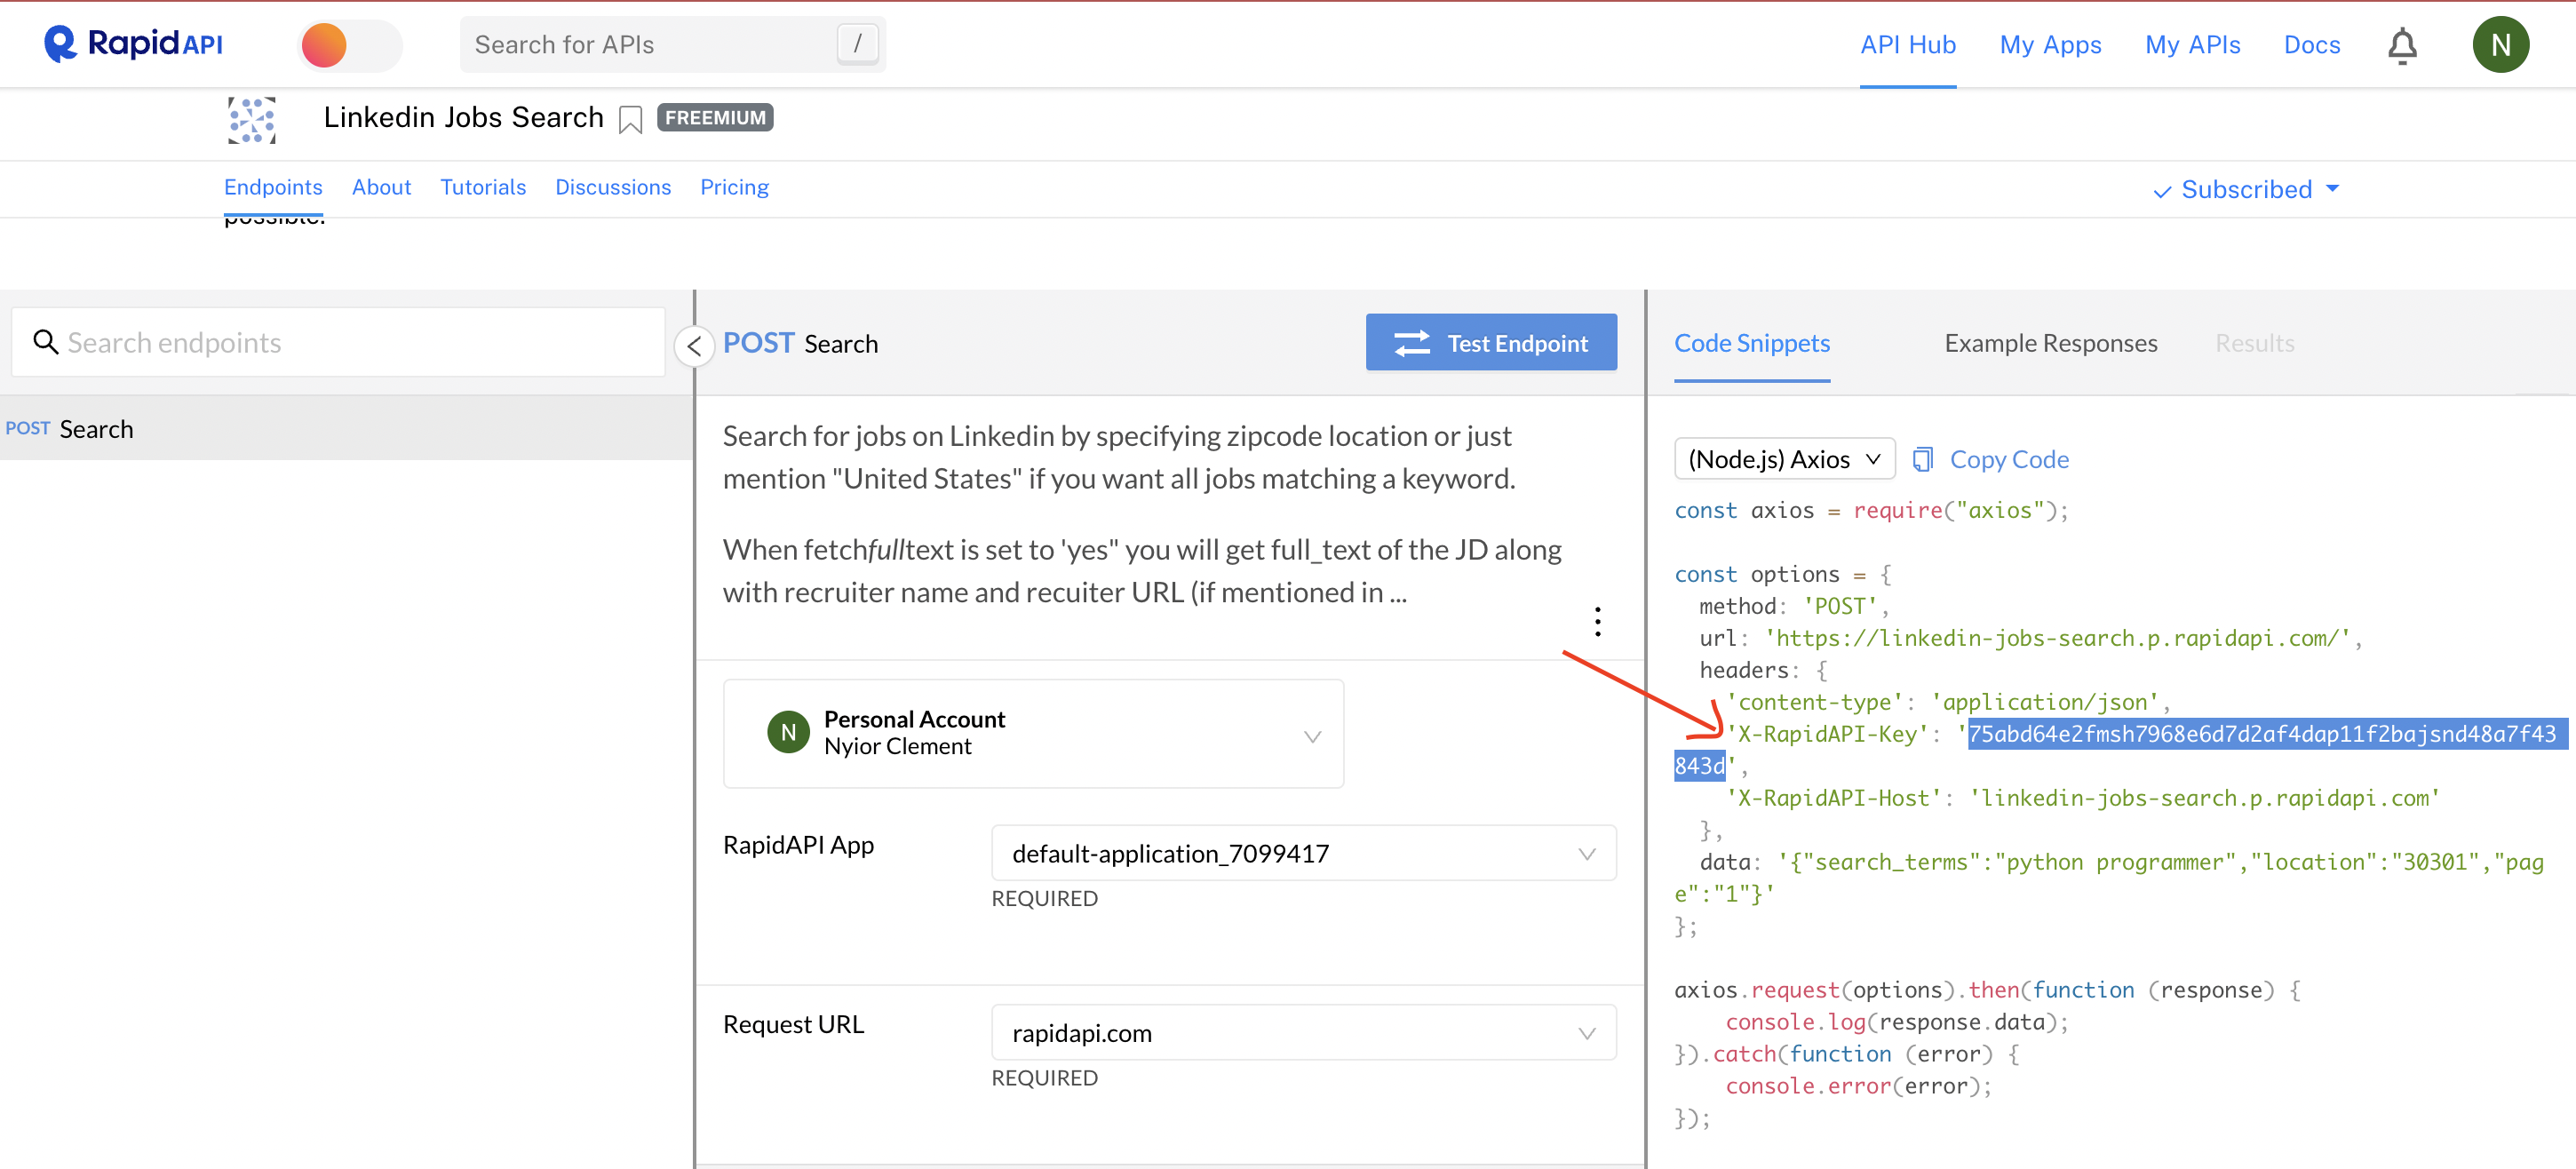
Figure 1 - RapidAPI Key
Next, add the entry
RAPID_API_KEY = axx…
to your .env file, where axx… is the API key you just copied on RapidAPI.
Next, let’s create the helper class.
Step 2: Create the helper class.
Create a file
api_helper.py
in your project directory, then copy and paste the
code snippet here
in the new file.
Great! Now we have all we need to connect to CloudAMQP and to send http requests to the Linkedin job search API. Next, we will implement the logic needed to consume messages from CloudAMQP and, subsequently, send requests to the Linkedin API based on the search term in the message consumed.
Connecting to CloudAMQP and the Linkedin job search API
Here, the first goal is to grab messages published to our RabbitMQ instance on CloudAMQP by the first service. Second, we will use the content of the message, more specifically the “search_term” and “location” params to make a request to the Linkedin API.
First, go to the main.py file and add these imports to the list of import statements at the very top of the file.
from cloudamqp_helper import cloudamqp
from api_helper import jobs_api
import json
Essentially, we just imported our helper classes and the built-in json function into the file. Next, update the callback() function defined in the main.py file with the snippet below.
body = json.loads(body.decode('utf-8'))
search_term = body.get("search_term")
location = body.get("location")
email = body.get("email")


payload = {
  "search_terms": search_term,
  "location": location
}

jobs = jobs_api.get_jobs(payload=payload)
Next, update the print statement in the main() function with the line below.
cloudamqp.consume_message(callback=callback)
In the snippet above, the consume_message() function will grab messages from CloudAMQP. Once a message is received, the callback() function will then be invoked. The callback function is responsible for making an API call to the Linkedin job search API and returning all relevant jobs.
You can now run your first service and publish a message to CloudAMQP - alternatively, you can do that from the management interface. Once you’ve published a message, you then run this second service.
If everything works well, you will see a list of all the relevant jobs displayed on the console, and that’s it. Next, we will implement the logic that will then email these jobs to the user. At this point, your main.py should look like this.
Now that we are able to grab relevant jobs from the Linkedin jobs search API, we need to use Twilio Sendgrid to email those jobs to the user.
Email relevant jobs to a user
Take the following steps to implement the logic that emails the link of a job posting to a user. Even though the Linkedin job search API returns lots of job postings, to simplify things, we will only email one job posting to the user.
Step 1: Create a Twilio account
To begin here, sign up for a free SendGrid account if you haven't already.
Step 2: Grab the API key
Once logged in, go to the Settings section of the SendGrid UI and click the Create API Key button. Give your API key a name on the next screen and proceed to create it.
Once done, copy the API Key displayed on your screen and create a new
entry in your .env file with the value of the API Key as shown below.
SENDGRID_API_KEY=your api key here
Step 3: Create a Twilio Sender Identity
Next, we need to create a Single Sender Identity. A Sender Identity represents your 'From' email address—the address your recipients see as the sender of your emails.
If you are yet to create a Sender identity, you’d be greeted with the page shown in the image below. Click on the Create a Single Sender button on that page.
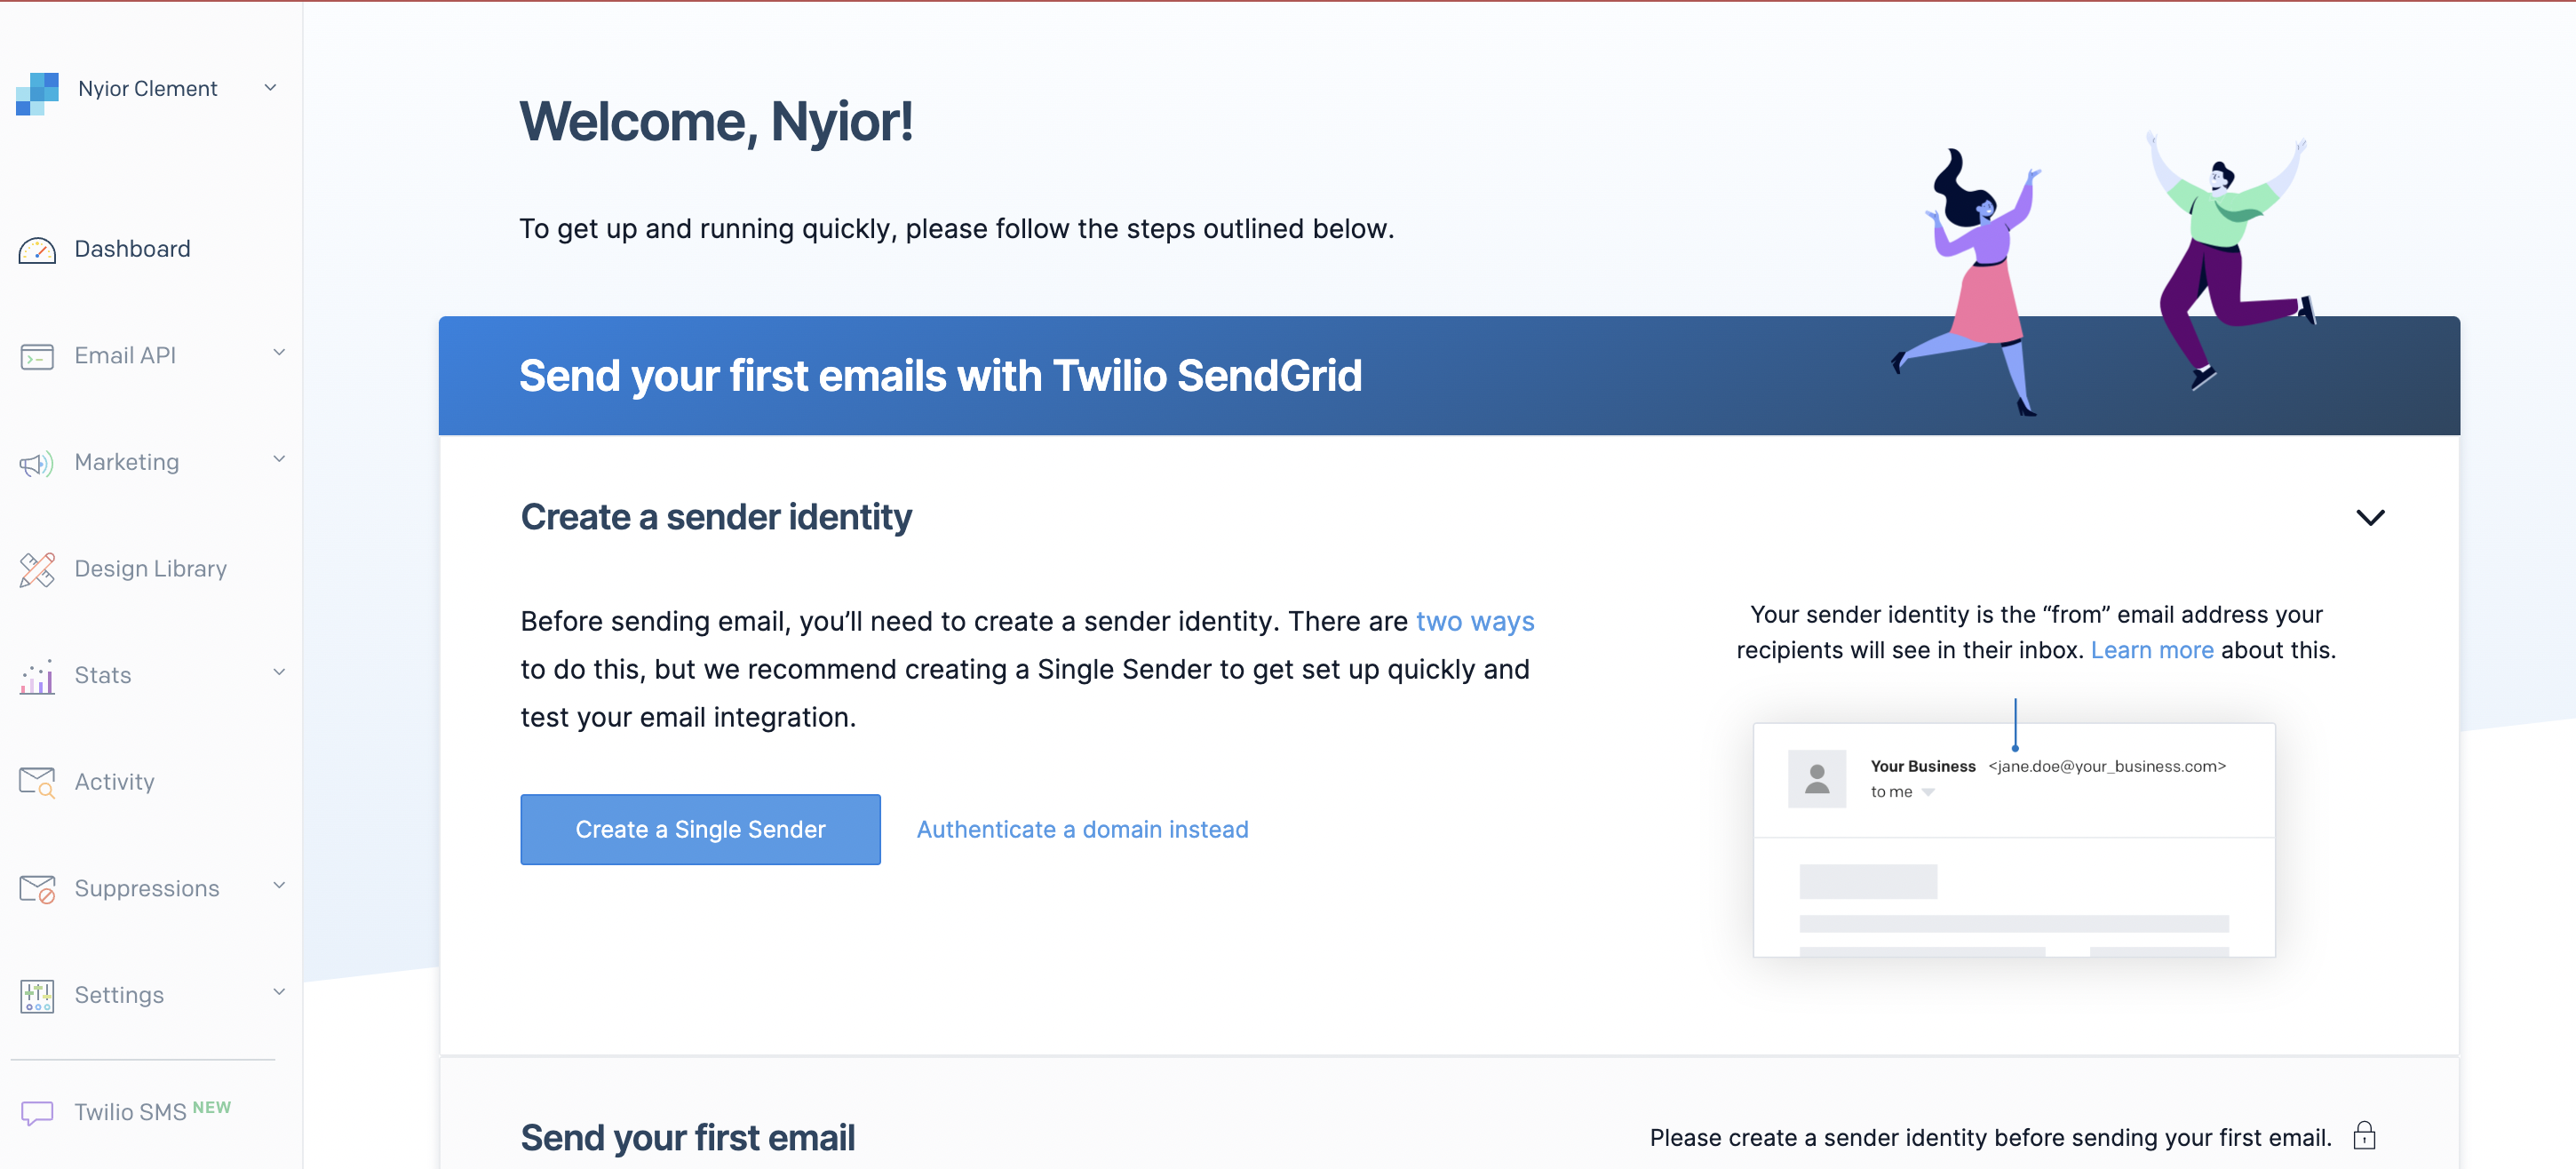
Figure 2 - Single Sender identity
Next, fill in all the required information on the next page and click the create button. You will get an email verification link in your inbox. Click on the link to verify your email address.
Step 4: Create the Twilio helper class
Here, we will create the helper class that we will use to connect to
Twilio and email the link to a job posting to the end user. Create a file
twilio_helper.py
in your project directory, and add the snippet below to it.
import os
from sendgrid import SendGridAPIClient
from sendgrid.helpers.mail import Mail, To
from dotenv import load_dotenv

# Load the .env file
load_dotenv()

class TwilioHelper:
  FROM_EMAIL = “your single sender email address”

  def __Send_email(self, message: Mail):
    """ Send an email to the provided email addresses"""

    try:
      sg = SendGridAPIClient(os.environ.get("SENDGRID_API_KEY"))
      response = sg.send(message)
      code, body, headers = response.status_code, response.body, response.headers
      print(f"Response Code: {code} ")
      print(f"Response Body: {body} ")
      print(f"Response Headers: {headers} ")
      print("Email Sent!")
    except Exception as e:
      print("Error: {0}".format(e))
    return str(response.status_code)

  def email_job_listing(self, to_email: str, job: dict):
    TO_EMAILS = [
      To(
        email=to_email,
        substitutions={
          "-job_url-": job.get("linkedin_job_url_cleaned"),
          "-company_name-": job.get("company_name"),
          "-job_location-": job.get("job_location"),
          "-date_posted-": job.get("posted_date")
        }
      )
    ]

    html_content=(
      "Hello there from GetMeHired! We've got new job posting for you :)"
      "Job URL: -job_url-"
      "Company Name: -company_name-"
      "Job Location: -job_location-"
      "Date Posted: -date_posted-"
    )

    message = Mail(
      from_email=self.FROM_EMAIL,
      to_emails=TO_EMAILS,
      subject="New Job Posting - GetMeHired",
      html_content=html_content
    )

    self.__Send_email(message)

twilio_api: TwilioHelper = TwilioHelper()
The class above would essentially allow us to connect to Twilio.
Additionally, it exposes the
email_job_listing
function that forwards job postings to a user’s inbox.
Next, we will invoke that function in our main.py file.
Step 5: Send email to users
Here, we will invoke the Twilio helper function that forwards jobs to users via email. To do that first, add the snippet below to the list of imports in your main.py file at the very top of the file.
from twilio_helper import twilio_api
Next, go to the callback() function in the main.py file, and add the line below to the end of the function.
twilio_api.email_job_listing(to_email=email, job=jobs)
In the end, your main.py file should look like this.
To test the entire project you can run the first service, the producer, and then publish some messages to the RabbitMQ instance on CloudAMQP. After that you can then run the second service, the consumer - once the consumer is up, it will grab all relevant jobs and email the first one to t he email submitted.
That’s it!
Conclusion
In this article, we built a minimal python server with FastAPI. Overall, we are seeking to implement a distributed architecture with two services, and this is the second service. The goal of this service is to have a consumer that grabs messages from CloudAMQP.
This service is also responsible for processing the messages it receives. Processing a message here entails making an API call to the Linkedin jobs search API to grab relevant jobs matching the user’s search query. Additionally, this service also connects to Twilio and uses it to email jobs to users.
With this service completed, we are pretty much done with the implementation of our distributed architecture. That notwithstanding, we are still going to have one more article in this series to wrap things up.
This next article will cover some ways to extend/modify our rudimentary project to fit a real-world scenario.
We’d be happy to hear from you! Please leave your suggestions, questions, or feedback in the comment section below or get in touch with us at contact@cloudamqp.com.