Update 2018-07-24: Important notice
As of RabbitMQ version 3.7.7 the feature outlined in this blog post is no longer supported. Please visit our Documentation and our Blog for up to date information.
Learn MoreRabbitMQ supports communicating using WebSockets, in this post we'll look at how it works and what you can do with them
RabbitMQ is a multi-protocol message broker. Sometimes I feel that protocols such as Web-Stomp, MQTT and STOMP get left in the shadow behind the AMQP protocol. In this blog post we'll explore the Web-Stomp protocol and how it can be used with RabbitMQ to build interactive web applications.
What are WebSockets? It's a way to send real time data between a client (such as a web browser) and a web server, allowing for highly interactive user experiences with data stored or computed on a server.
WebSockets and RabbitMQ
To use WebSockets with RabbitMQ in CloudAMQP you simply enable the
rabbitmq_web_stomp
plugin in the CloudAMQP Control Panel. This will enable the "Rabbit WEB-STOMP - WebSockets to Stomp adapter".
The adapter makes it possible to communicate with exchanges, queues, etc in RabbitMQ over the STOMP (Simple Text Oriented Messaging Protocol) protocol. STOMP is a very simple protocol similar to HTTP. STOMP is then carried over WebSockets (given the name Web-Stomp), enabling in-browser applications. This can be compared with typical AMQP that is usually carried over TCP.
We recommend that you create a unique user for the Web-Stomp access. This can be done by creating a user in the RabbitMQ Management Interface, and give it a virtual host (vhost) that only has access to a certain queue. Note: The Web-STOMP plugin is only available on dedicated plans.
Sample application
Let's build a sample chat application that uses queues and Web-STOMP to communicate with a web page, where we'll send and display chat messages. We'll start by loading sock.js and stomp.js:
<script src="//cdnjs.cloudflare.com/ajax/libs/sockjs-client/0.3.4/sockjs.min.js"></script>
<script src="//cdnjs.cloudflare.com/ajax/libs/stomp.js/2.3.3/stomp.min.js"></script>
To connect:
// Create a WebSocket connection. Replace with your hostname
var ws = new SockJS("https://blue-horse.rmq.cloudamqp.com/stomp");
var client = Stomp.over(ws);

// RabbitMQ Web-Stomp does not support heartbeats so disable them
client.heartbeat.outgoing = 0;
client.heartbeat.incoming = 0;

client.debug = onDebug;

// Make sure the user has limited access rights
client.connect("webstomp-user", "webstomp-password", onConnect, onError, "vhost");
Now we can write our functions that will be called to send messages and write out messages.
//Start subscribing to the chat queue
function onConnect() {
  var id = client.subscribe("/exchange/web/chat", function(d) {
    var node = document.createTextNode(d.body + '\n');
    document.getElementById('chat').appendChild(node);
  });
}

//Send a message to the chat queue
function sendMsg() {
  var msg = document.getElementById('msg').value;
  client.send('/exchange/web/chat', { "content-type": "text/plain" }, msg);
}

function onError(e) {
  console.log("STOMP ERROR", e);
}

function onDebug(m) {
  console.log("STOMP DEBUG", m);
}
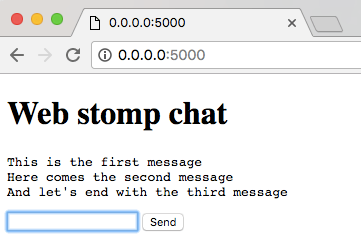
If we add a small base of HTML around this and run it as an application it will look like this when you run it:

The full source code for this project can be found here: Web-Stomp example application
I hope you've enjoyed learning about WebSockets and Web-Stomp. It can really bring out new possibilities and ideas that were not available before the introduction of this plugin.
Further reading
CloudAMQP Web-Stomp documentation
Chapter 4 of the WebSocket book
Please email us at contact@cloudamqp.com if you have any suggestions, questions or feedback.


