Slack is where the work happens – it is where the content team deliberates on potential articles or YouTube video concepts, while the development team chooses the technology and architecture to adopt.
Now, picture ChatGPT joining these daily discussions that occur on Slack. Think ChatOps – bringing the tools we work with (in this case ChatGPT) into a central place where the conversations happen, eliminating the need to switch between platforms. Cool, right?
This article will walk you through how to create a Slack bot that integrates ChatGPT into your Slack workspace. The image below demonstrates what’s possible with this bot within a Slack channel.
Figure 1 - ChatGPT on Slack Demo
Let’s call our bot SlackGPT – we will be building the bot with the ChatGPT API, LavinMQ and Python. You probably already know ChatGPT and Python, but you are wondering…
What is LavinMQ?
LavinMQ is an open-source message broker with a focus on ease of use, performance, and efficient use of computing resources.
Message brokers, or message queues, buffer messages by accepting them from producers and lining them up in the order they arrive. Consumers then connect and process the messages.
By enabling asynchronous communication, brokers like LavinMQ decouple systems and that makes them ideal for microservice architectures where services are meant to be autonomous.
For our bot, SlackGPT, we've chosen a scalable and fault-tolerant microservice architecture with two services, making LavinMQ a perfect fit. Curious about what this architecture entails? Let's explore.
SlackGPT: Project High-Level Architecture
The image below depicts the high-level architecture of our project.
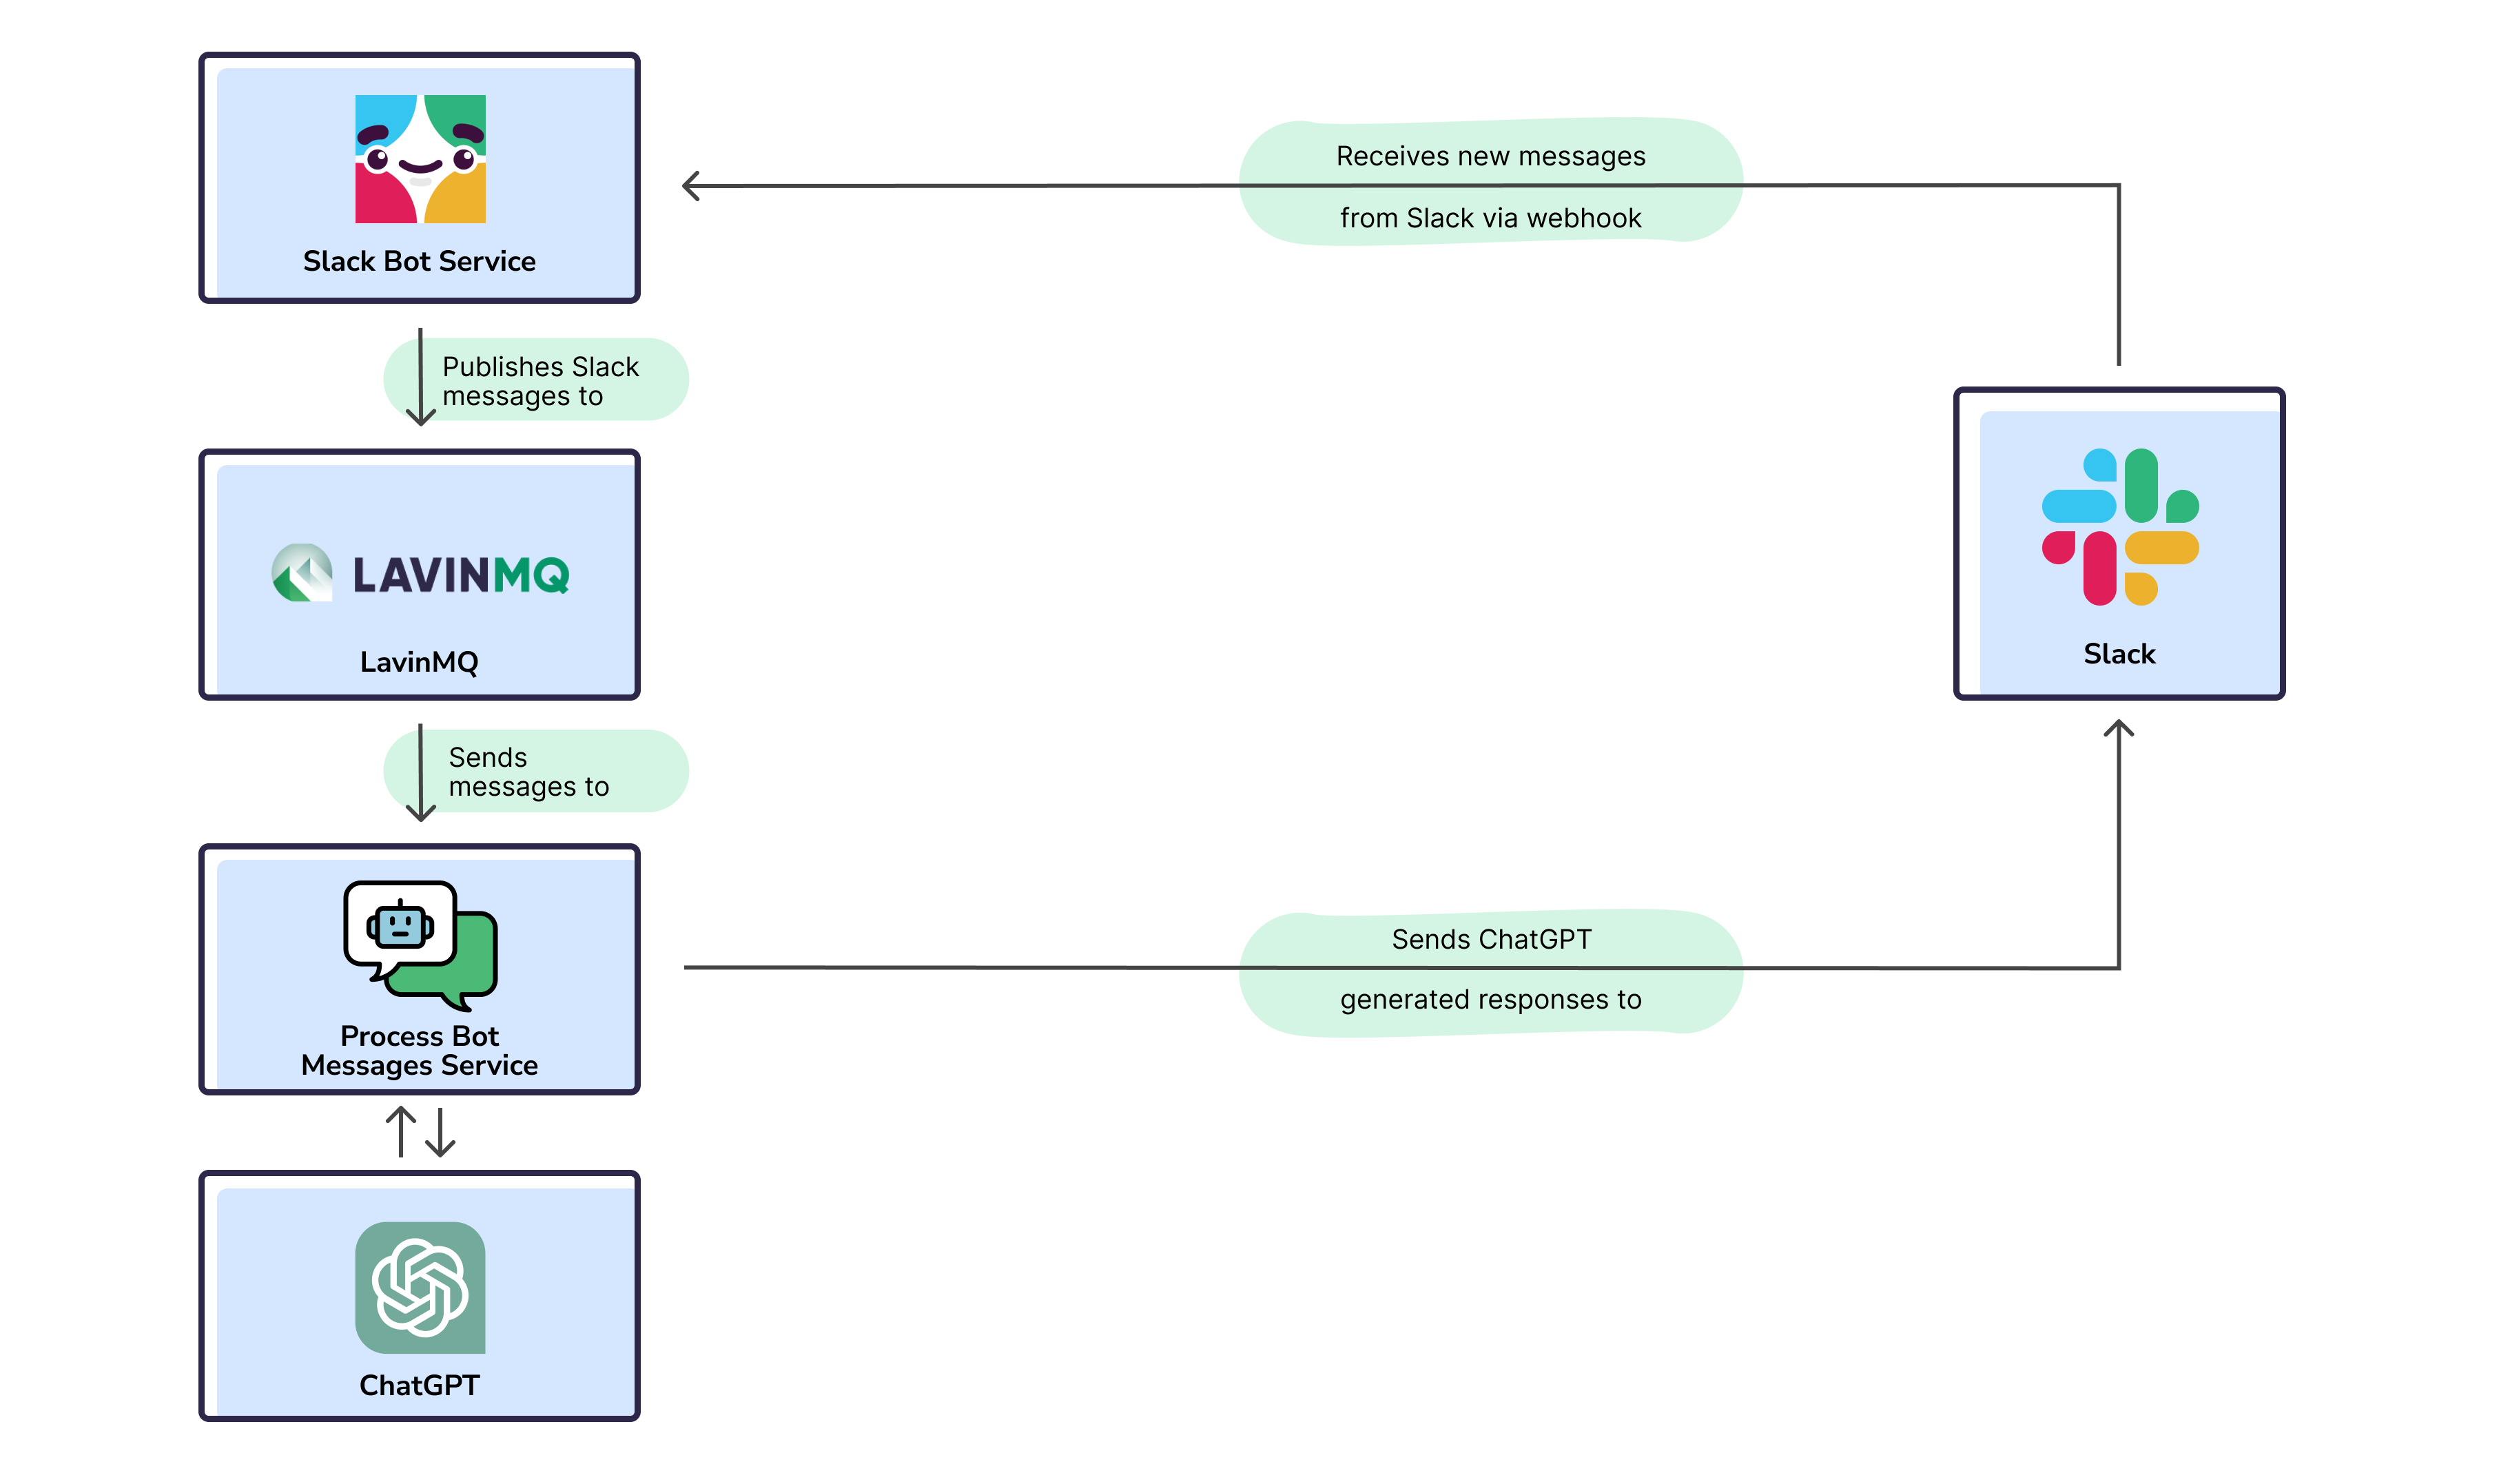
Figure 2 - SlackGPT Project Architecture
From the image above, our project has two services: the Slack Bot Service (producer) and the Process Bot Messages Service (consumer). The Slack Bot Service receives new messages from Slack and publishes them to LavinMQ, where the Process Bot Messages Service retrieves and processes them.
This architecture ensures that LavinMQ decouples the services and enables asynchronous communication, rather than direct REST API communication. But why decouple the services?
The ingenuity of this approach lies in the following:
- In case of an unexpected failure of the Process Bot Messages Service, the Slack Bot Service will continue to accept messages and add them to the queue, ensuring fault tolerance by enabling processing once the service is back online.
- Imagine SlackGPT being used in thousands of workspaces resulting in millions of requests/sec. To scale in that situation, we’d just add more queues and create more copies of the Process Bot Messages Service to process messages faster – think scalability.
- Lastly, if the Slack Bot Service experiences a spike in traffic, the Process Bot Messages Service won’t even notice because it only picks up requests from the queue at its own pace
If you’d like to learn more about message queues and microservices, check out this detailed 7-part beginner’s guide on message queues and microservices.
With all that being said, let’s build our bot.
SlackGPT: Building the Bot
Here, we will build our Slack bot. To begin, let’s look at what we need to successfully follow through with this tutorial.
Prerequisites
To smoothly follow the steps in the subsequent sections, you'd need:
- Python3 installed
- A Slack workspace where you won’t disrupt any important work done – you can create a new one for free
- Git setup locally and a GitHub Account
- OpenAI Developer Account – to be able to access the ChatGPT API
- CloudAMQP Account – to manage our LavinMQ instance on the cloud
- Download ngrok – to be used as our local proxy
To help you easily walk through the subsequent sections, I’ve broken everything down into steps.
Step 1: Creating a Slack App
I’ve seen the Slack Apps vs Slack Bots question come up every now and then, so let’s clarify that before we proceed.
Generally, Slack Apps connect third-party applications to your Slack workspace – for example, the Google Calendar Slack App connects Slack with your calendar.
Bots, on the other hand, are Slack apps that have been extended to behave like regular users – they can be mentioned, take part in conversations, send DMs, etc. – depending on how you program them.
Essentially, all Slack bots are apps as well, only that they’ve been designed to take part in conversations. As such, to be able to create a Slack bot, we first need to create a regular Slack app.
Creating the App
- From your Slack apps page, click on Create an App
-
Give your application a name, select a workspace(the one you’ve created) and click
Create App
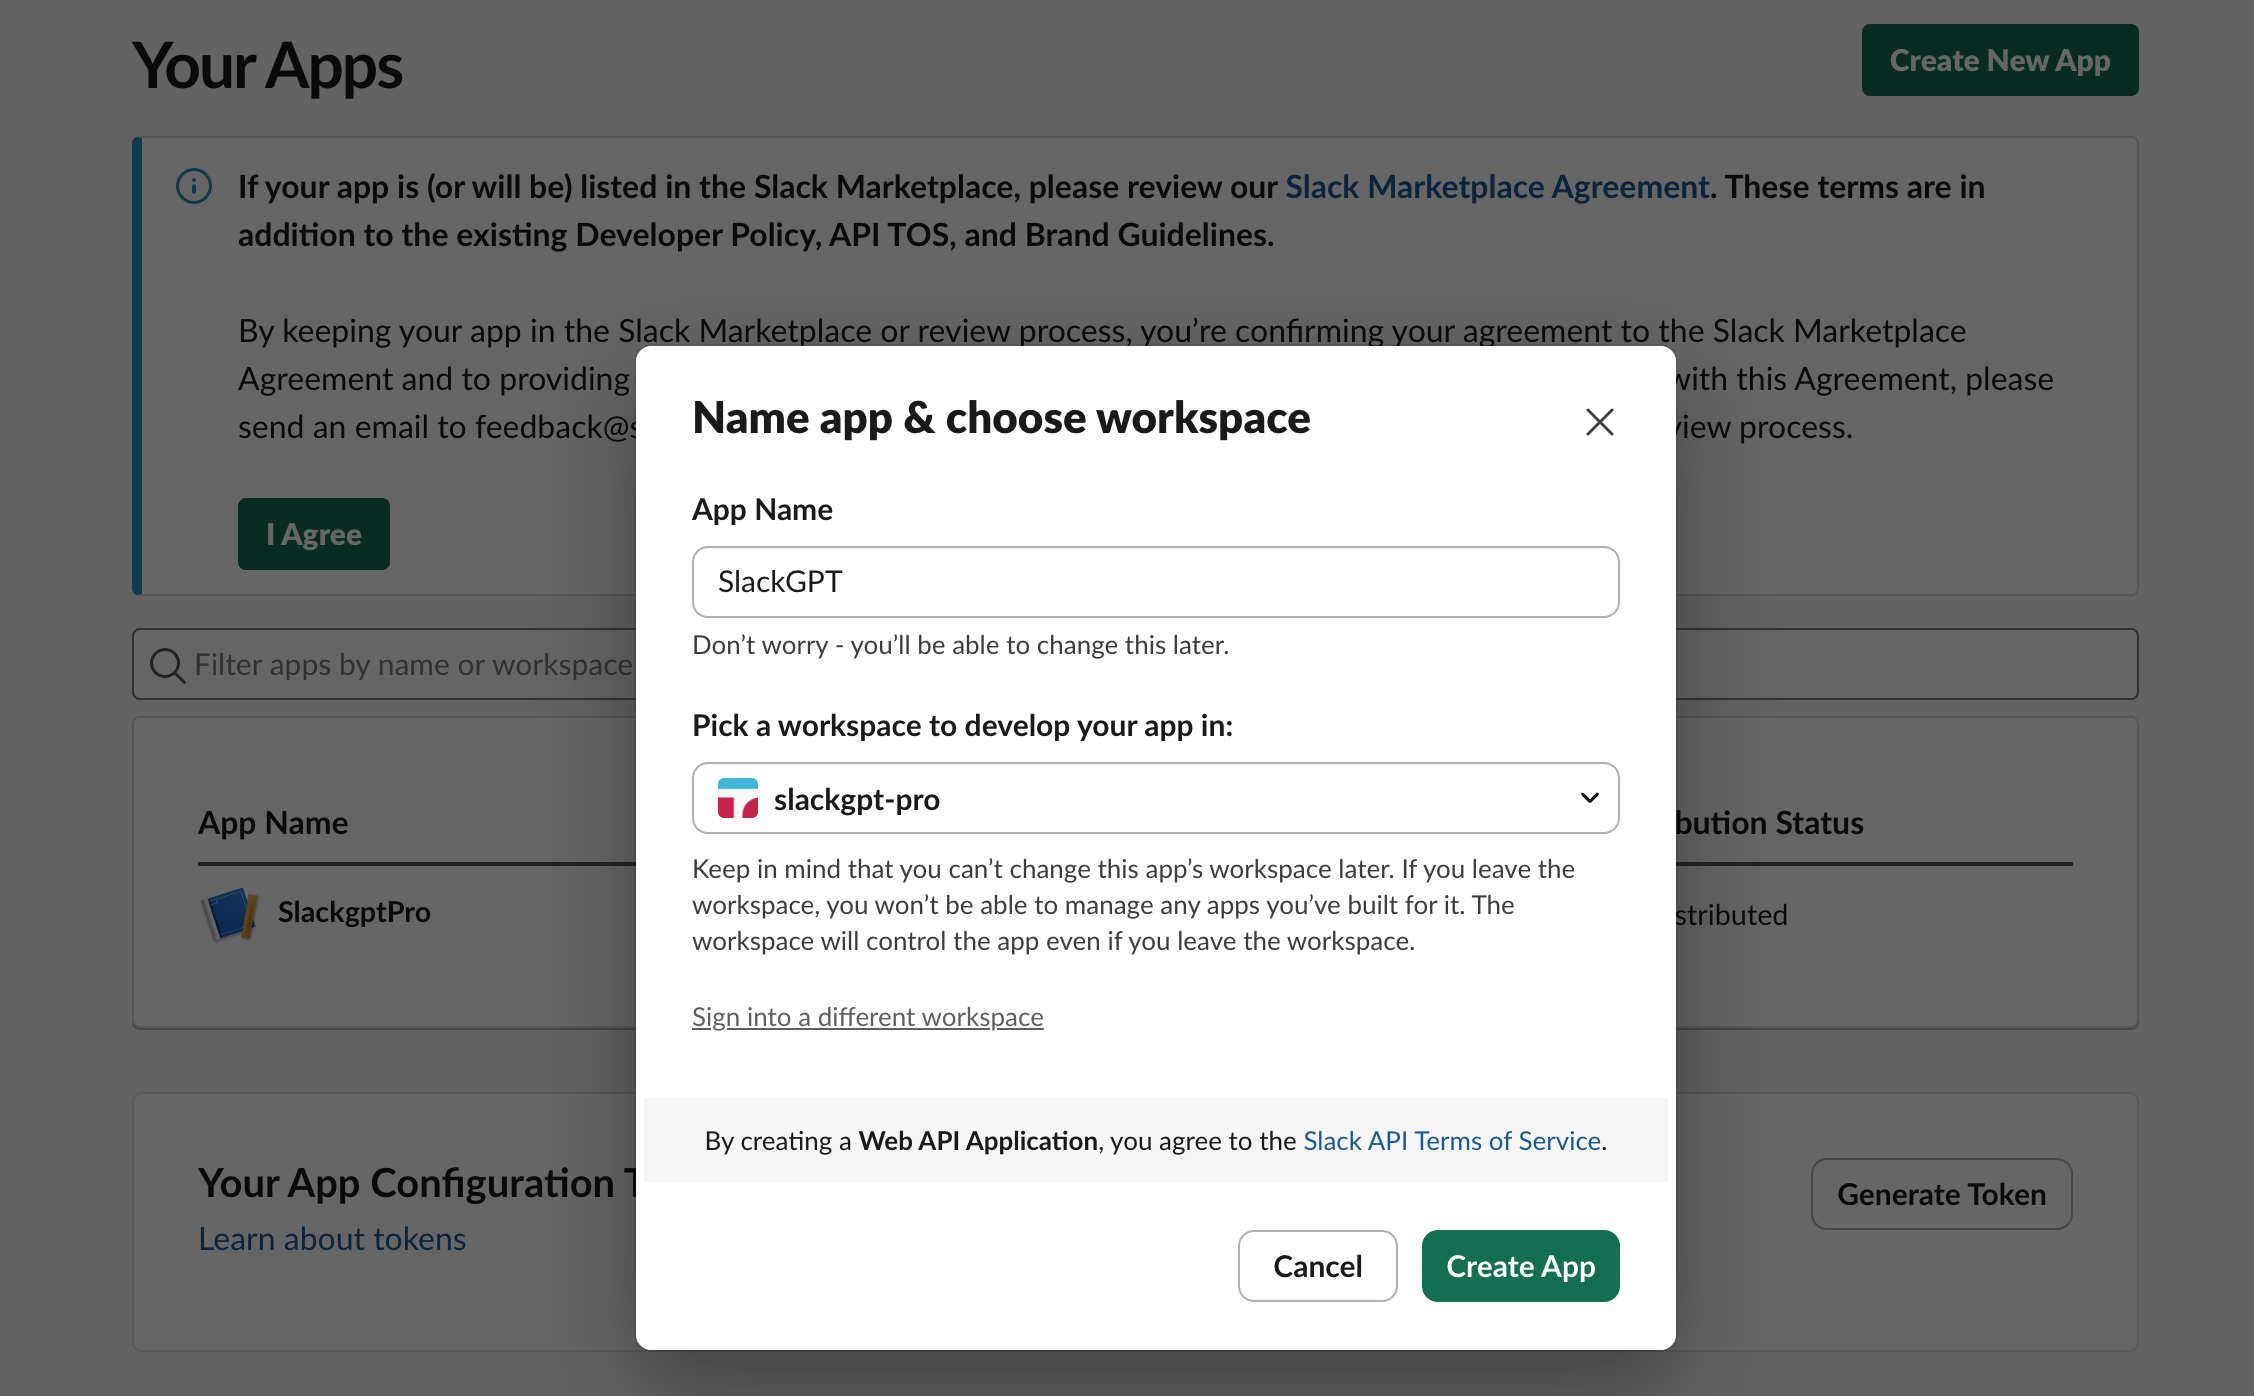
Figure 3 - Create a Slack bot
-
Once the app has been created, you’ll land on its
Basic Information
page as shown in the image below.
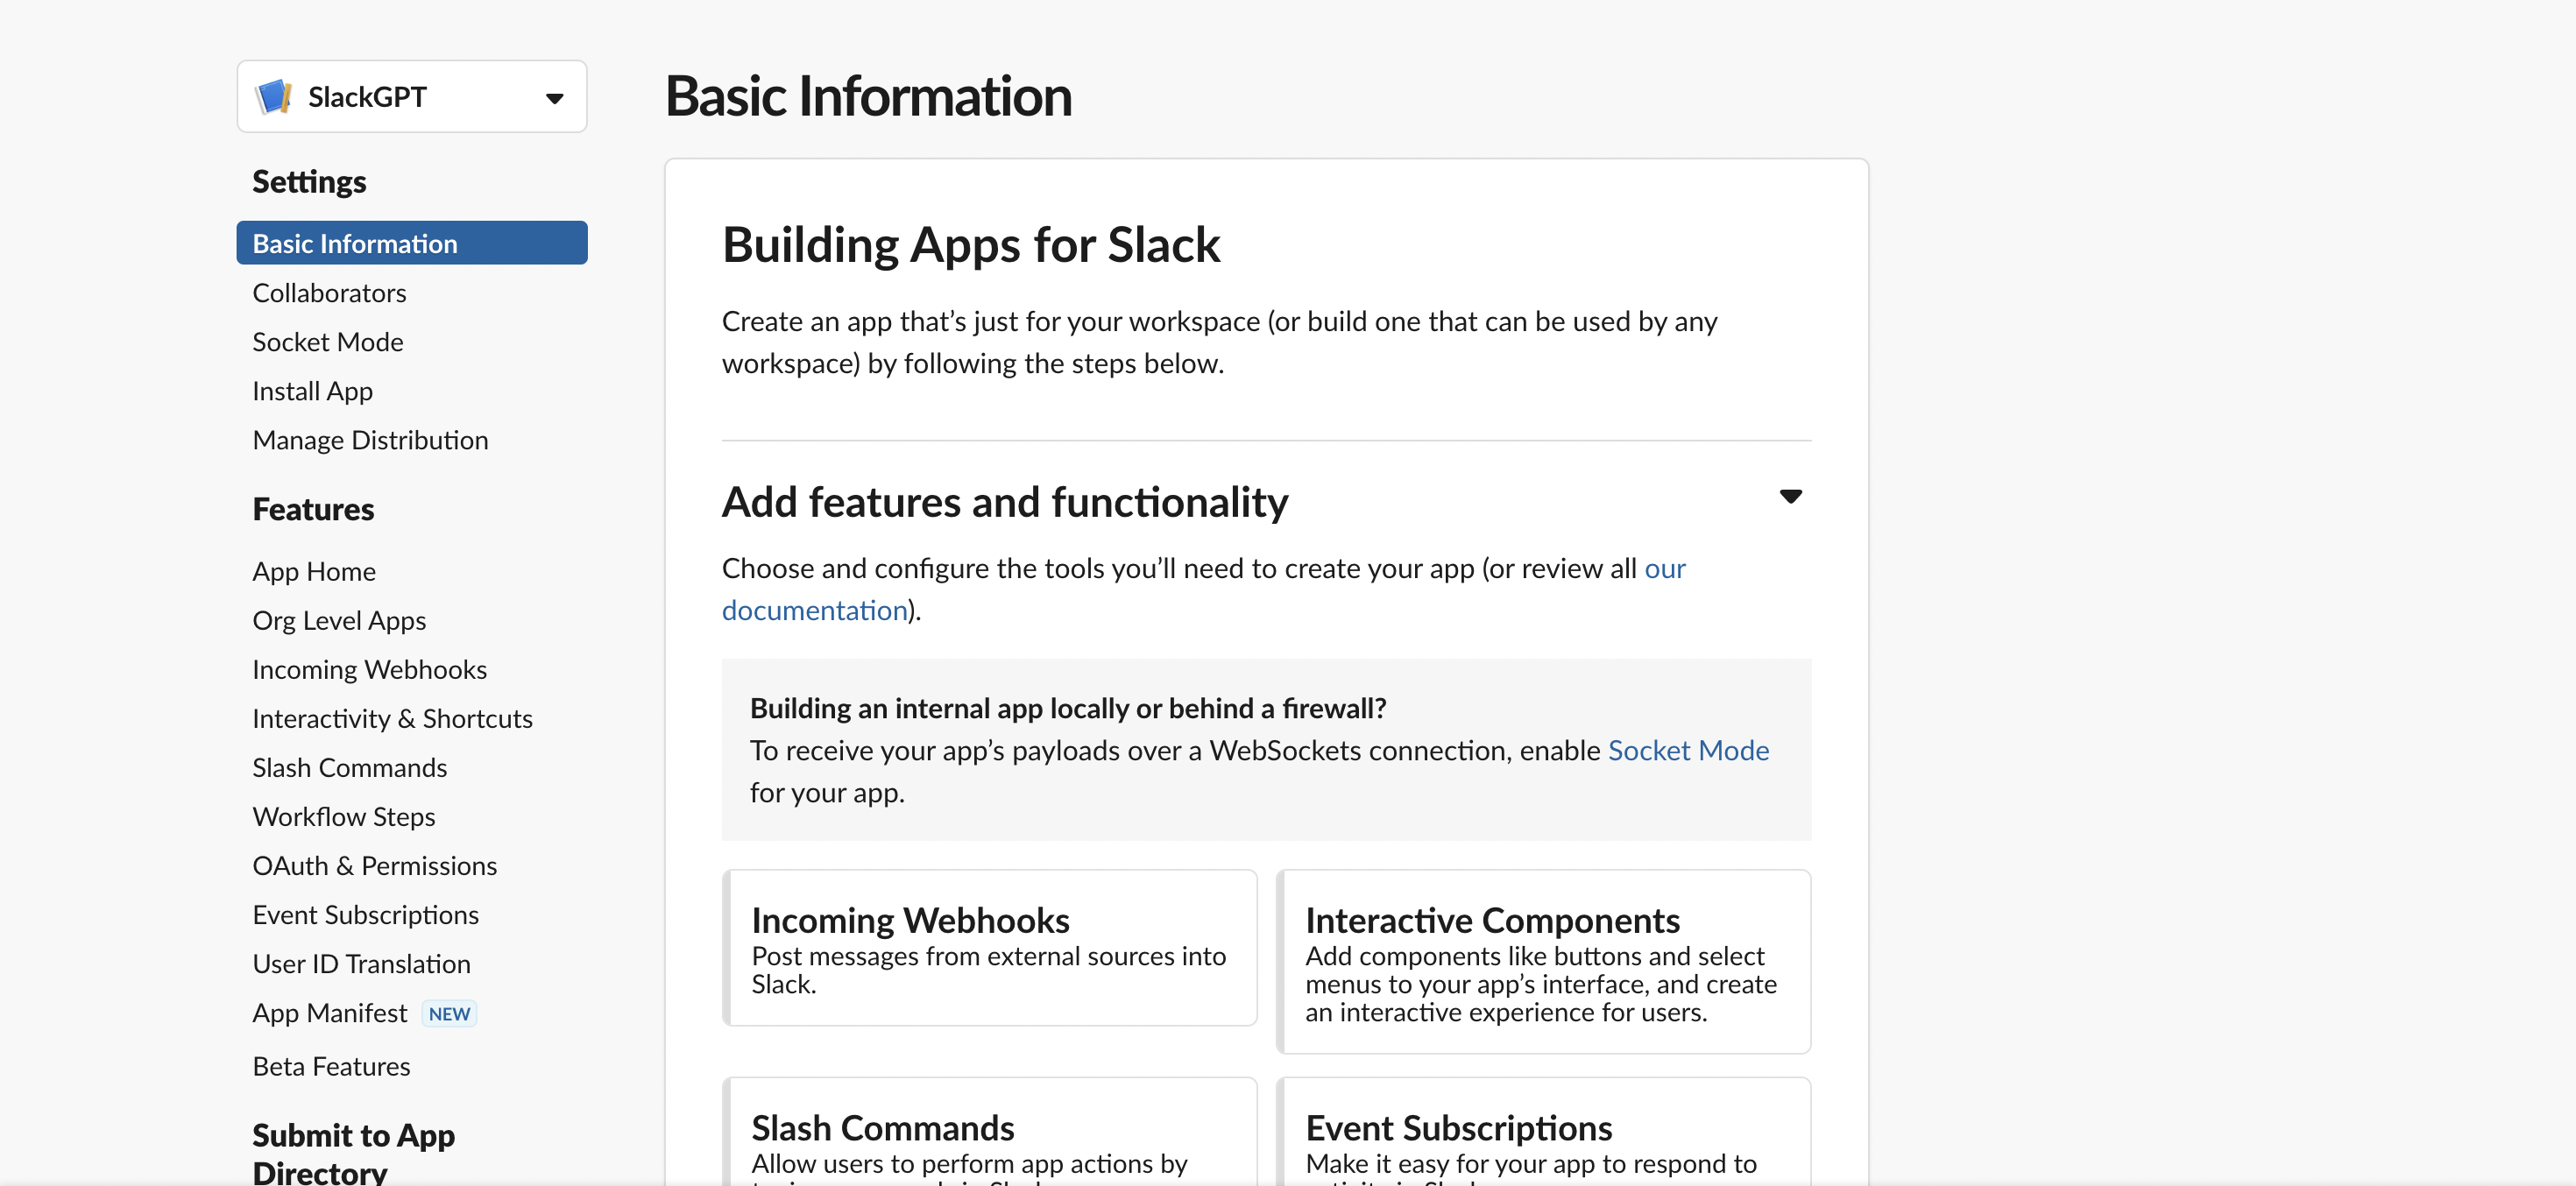
Figure 3 - Slack App Basic Info
- Look around that page and give your app a nice description. While on that page, copy the Signing Secret in the App Credentials section.
Getting the Bot User Token and Installing the App
Slack uses OAuth to authenticate requests to its API endpoints. To have our app invoke the Slack API methods, we’ll need some sort of token – even though Slack offers at least three types of tokens because our app is a bot, we’d need the Bot token.
Take the following steps to generate the Bot token – all these steps would be completed on your app’s Basic Information page.
- To begin, access the OAuth & Permissions from the left sidebar and navigate to the Bot Token Scopes section. Select Add an OAuth Scope
-
For a start, include only three scopes:
chat:write– which would allow our bot to post messages to channels that it’s a member of,chat:write.public– which would allow our bot to post messages to channels that it’s not a member of,app_mentions:read– which would allow our bot to receive messages when it’s mentioned. - Head back to the top of the OAuth & Permissions page and choose Install to Workspace. You’ll be directed through Slack’s OAuth UI, where you can allow your app to be installed in your development workspace
- After authorizing the installation, you’ll be directed to the OAuth & Permissions page, where you’ll find a Bot User OAuth Token. Copy the token and keep it somewhere safe.
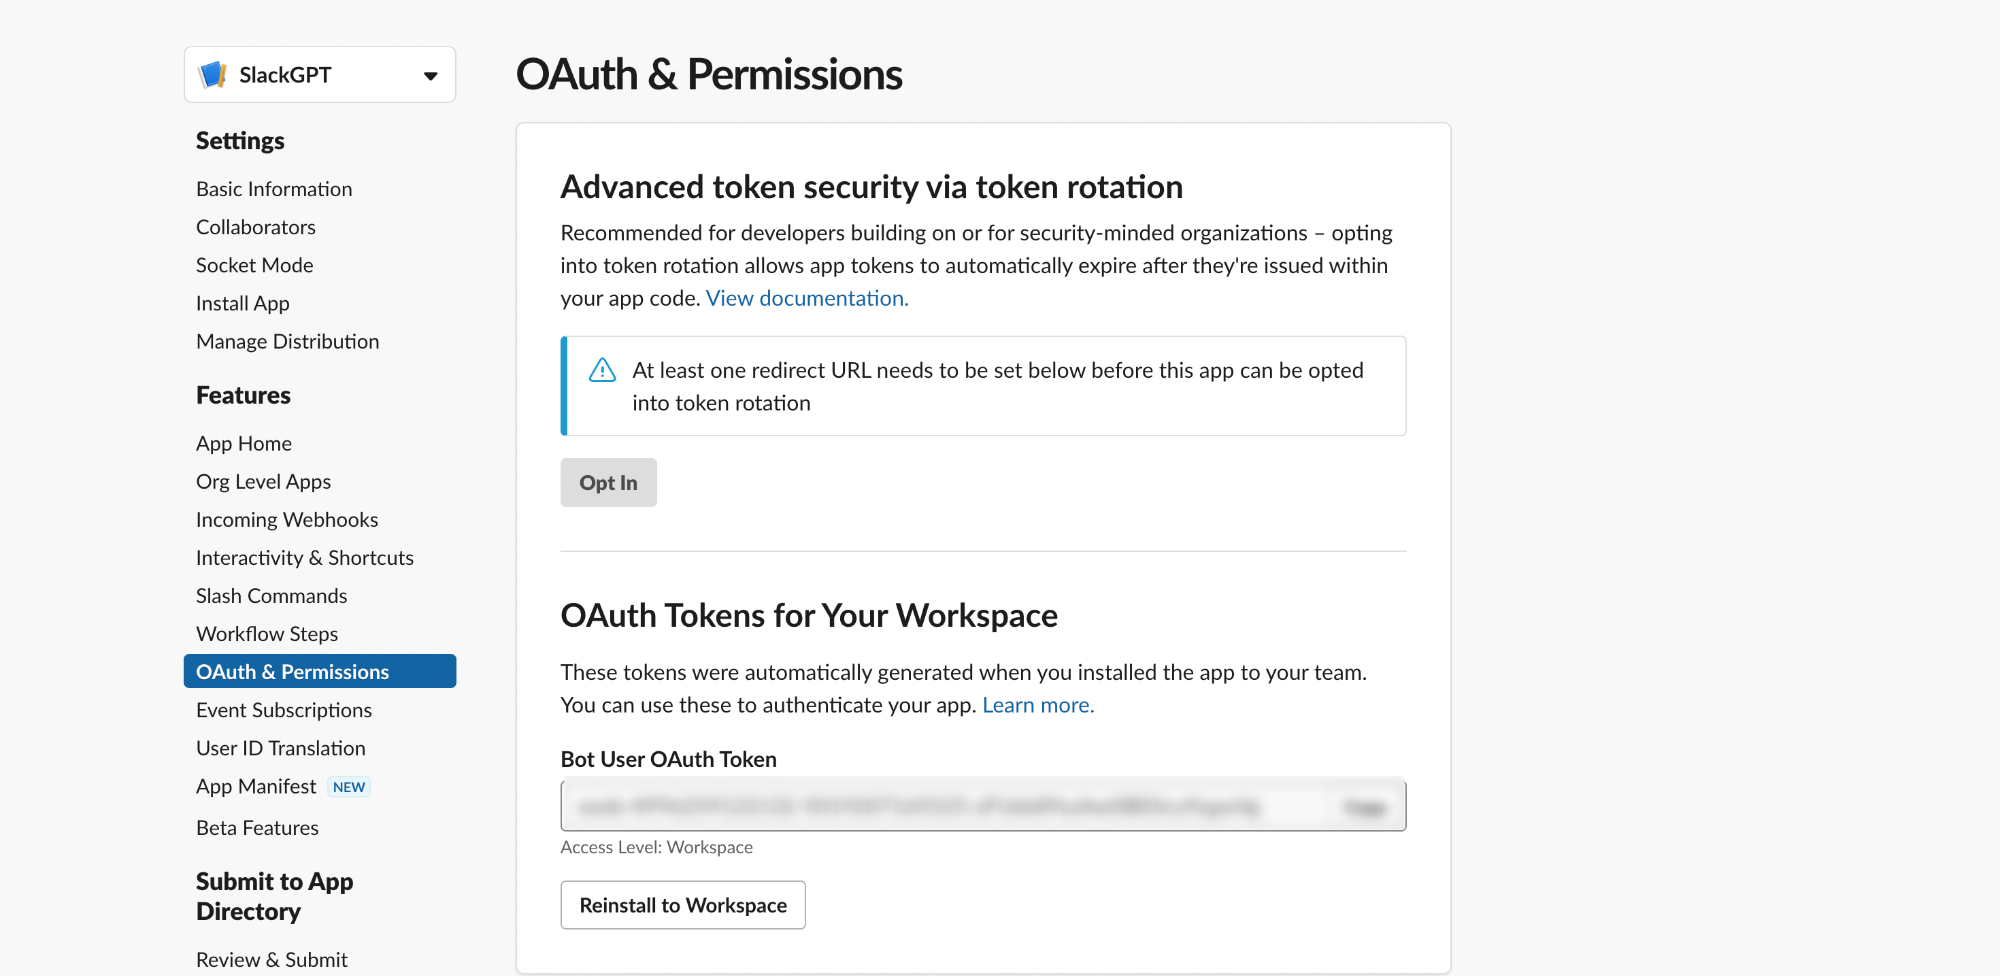
Figure 4 - Bot OAuth Token
With that step completed, you should now see your bot in your Slack workspace under Apps. If at this point you mention your bot in any of the channels, nothing will happen because we haven’t told our bot what to do yet.
Next, let's make our bot functional with code, but before then let’s grab our API key from OpenAI – this will grant you access to the ChatGPT API.
Step 2: OpenAI API Key
Go to the OpenAI API key page and hit the Create new secret key button.Copy the generated API key and keep it somewhere safe, we’d be needing it soon.
Step 3: Creating a LavinMQ instance on CloudAMQP
Remember our first service, the producer will publish messages to LavinMQ, our message queue, and the consumer will receive those messages and process them.
As a result, we need to spin up a LavinMQ instance. Because LavinMQ is open source, you can install it on your machine or server for free, but that would also mean you’d have to maintain it over time – it is why I’d encourage you to set up an instance on the cloud.
- Login to your CloudAMQP account and hit the Create New Instance button
-
Give your instance a name and feel free to go with the LavinMQ Lemming
plan – it’s free
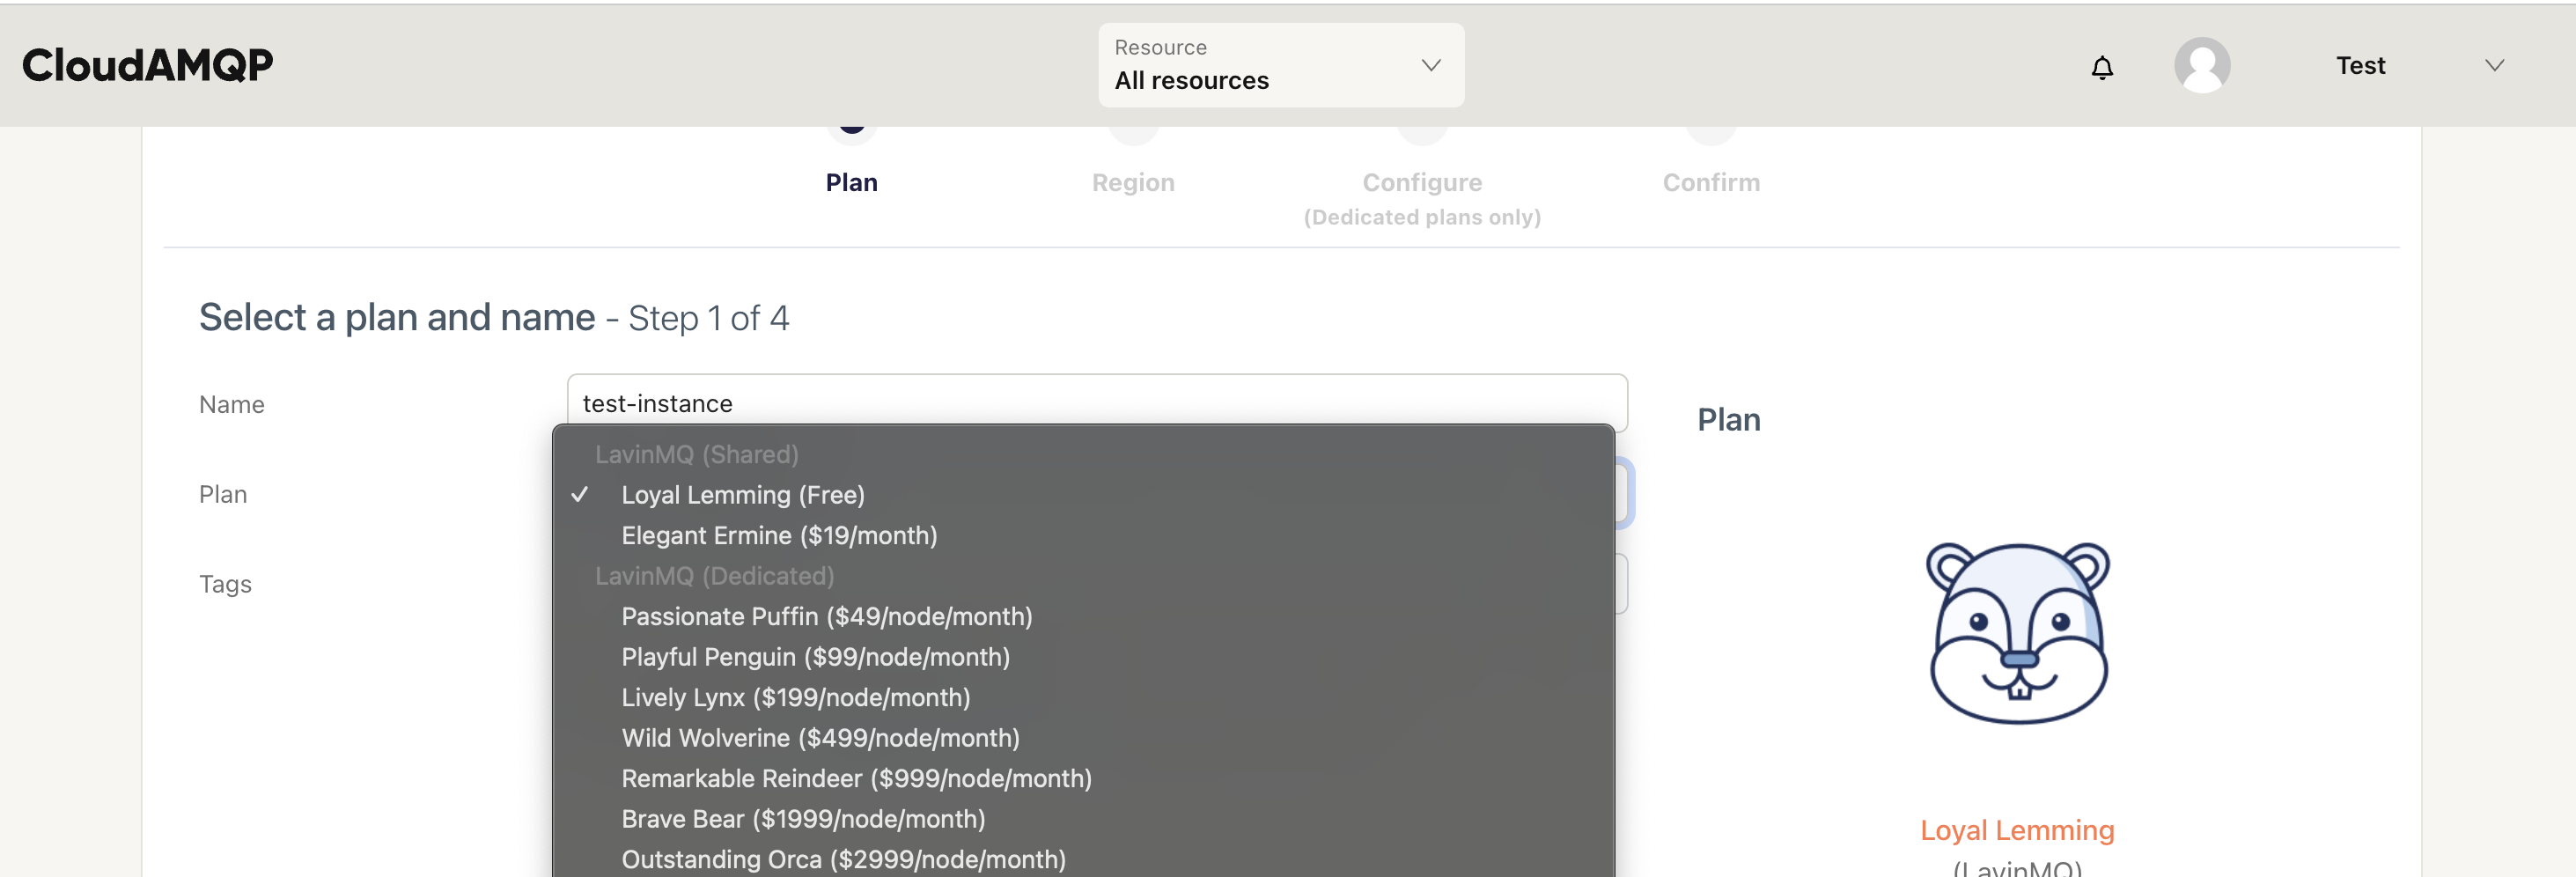
Figure 5 - LavinMQ Plans
- Hit the Select Region button to proceed. Select any of the available regions and hit the Review button to proceed
- Review and hit the Create instance button to confirm. You’ll be redirected to the home page where you can see a list of all the instances you’ve created.
-
Select the instance you just created and, on its overview page, copy
the instance’s URL and keep it somewhere safe we’d need it later.
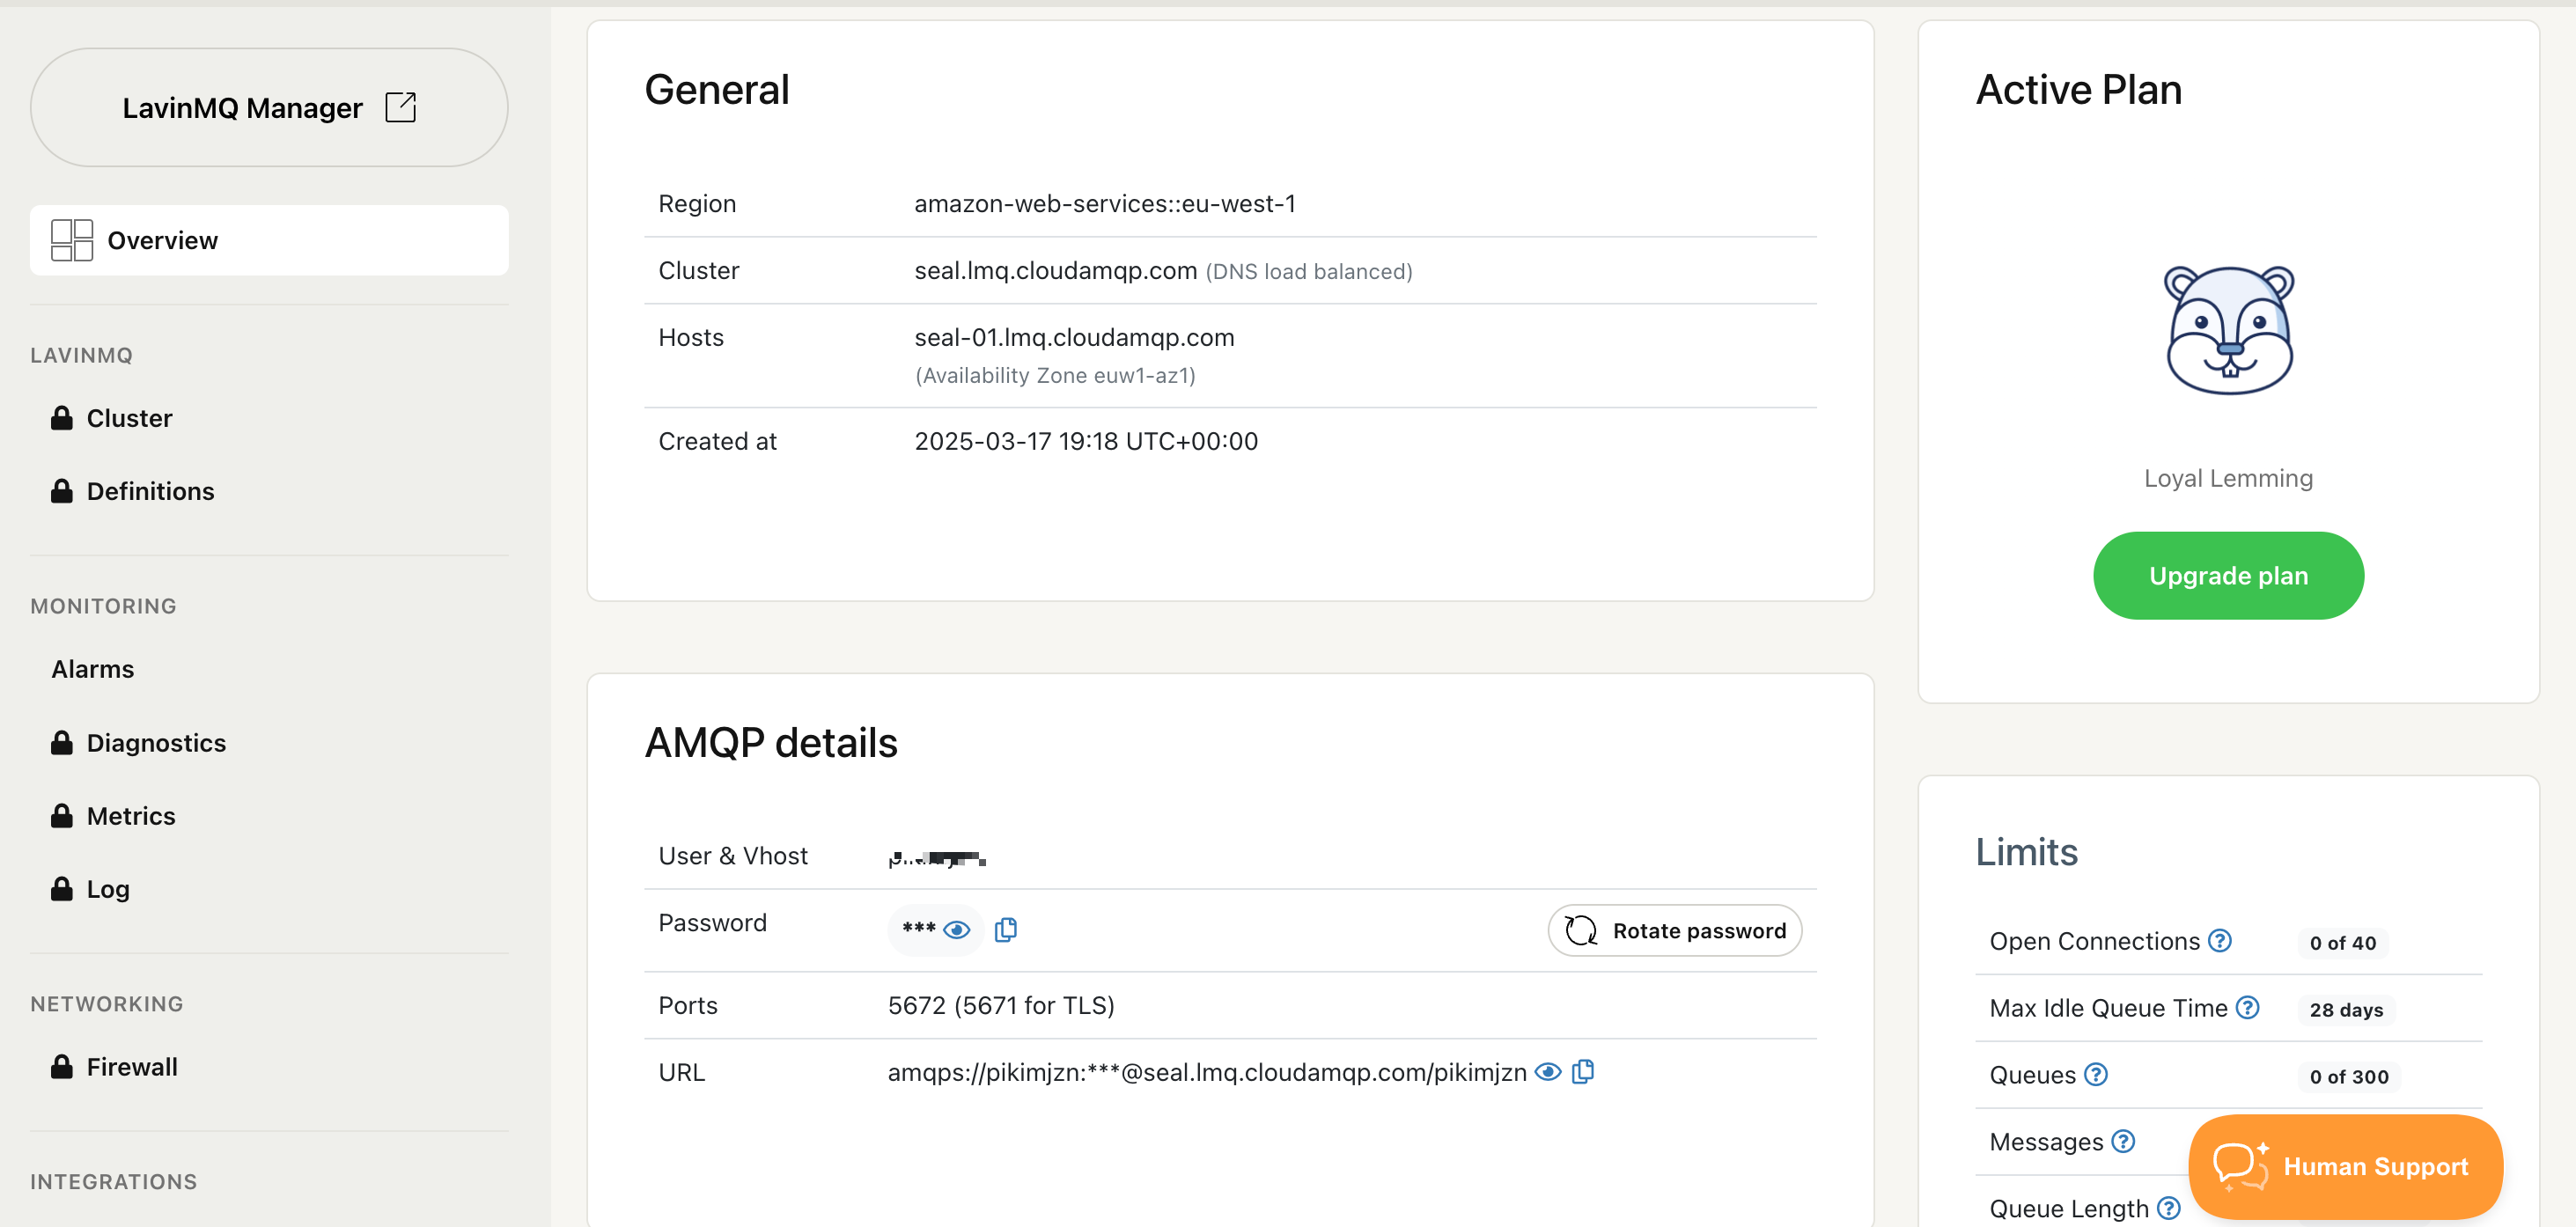
Figure 6 - LavinMQ Instance Credentials
At this point, you should have the following credentials ready: Slack Signing Secret, Bot Token, LavinMQ URL, and OpenAI API Key. With all these credentials available, we can now proceed to implement our custom code.
Step 4: Implementing the Slack Bot Service
This is the first of the two services we will be creating for our project. As mentioned in the architecture overview section, this service will receive messages from Slack via webhook and publish them to our LavinMQ instance.
For brevity’s sake, we are not going to build the service from scratch. Instead, we’ll clone the code for the project, but first, let’s create a virtual environment for this service.
Creating a Virtual Environment
Take the following steps to create a virtual environment:
-
Run
python3 -m venv env-nameon Unix and macOS terminal orpython -m venv env-nameon Windows. Replace env-name with the name you chose for your virtual environment. -
To activate the virtual environment, run
source env-name/bin/activateon Unix and macOS or.\env-name\Scripts\activateon Windows.
Now that we have our virtual environment and we know how to activate it, the next logical step is to clone our project from GitHub, install project dependencies and run our server.
Clone and Run the Service
-
Clone the
slackgpt-producer
repo to your local machine:
git clone https://github.com/nyior/slackgpt-producer.git -
Confirm that the virtual environment you created in the previous
step is activated. Navigate into the project folder:
cd slackgpt-producer -
Install project requirements:
pip install -r requirements.txt -
Create a
.envfile in your project directory copy the content of the.env-examplefile and update it with your correct credentialsSLACK_BOT_TOKEN= SLACK_SIGNING_SECRET= CLOUDAMQP_URL= -
To run the app make sure you are in the project directory:
python3 main.pyon MacOS/Linuspython main.pyon Windows – your app should let you know that it’s up and running. Leave the app running. - We now have our server up and running, and next we need to set up a webhook that receives events containing user messages from Slack. Before we do that, let’s try to make sense of some of the code in the project.
Let’s review the content of the main.py file, which is the entry point to the Bot Service.
import os
from slack_bolt import App
from dotenv import load_dotenv

from broker import cloudamqp

# Load environment variables from .env file
load_dotenv()

# Initializes your app with your bot token
app = App(
  token=os.environ.get("SLACK_BOT_TOKEN"),
  signing_secret=os.environ.get("SLACK_SIGNING_SECRET")
)


@app.event("app_mention")
def handle_app_mention(event) -> None:
  """
    Event handler - Invoked when the bot app is mentioned in a slack channel
    This function publishes the message it receives from Slack to a LavinMQ
    instance on CloudAMQP

    Args:
      - event
      - say
  """
  message = event["text"]
  user = event["user"]
  channel = event["channel"]
  thread_ts = event["ts"]

  # Publish message to the LavinMQ instance on CloudAMQP
  cloudamqp.publish_message(
    message_body= {
      "prompt": message,
      "user": user,
      "channel": channel,
      "thread_ts": thread_ts
    }
  )


@app.event("message")
def handle_message_events(body, logger):
  pass


# Start your app
if __name__ == "__main__":
  app.start(port=int(os.environ.get("PORT", 3000)))
There isn’t really much going on in the snippet above. The first thing you should know is that we are using the Bolt-Python framework to build this service.
To begin we created an instance of the Bolt Python App class, passing it our bot token and signing secret.
Next, we defined two event listeners:
-
handle_app_metion– This handler is invoked whenever our bot is mentioned on Slack. T he event it receives would contain the actual message in which the bot was mentioned, the channel ID, and the thread ID amongst others. The event handler then publishes the message to our LavinMQ instance on CloudAMQP usingpublish_message()utility function defined in the broker.py file -
handle_message_events– This handler is invoked whenever a message is posted in any of the channels our bot has been added to – it doesn’t matter if it was mentioned or not. For now, the handler does nothing, but it is added anyway to make it easier to extend the project.
Lastly, we are starting our application with 3000 as the default port. The only thing left to do to wrap up the implementation of this service is to set up a webhook URL so Slack events can be posted.
Setting up the Webhook
Take the following steps to set up the webhook for this service:
- Download and install ngrok(if you haven’t already). Now we have ngrok, connect it to your ngrok Account. If you don’t have an account sign up (or log in) to the ngrok dashboard and get your Authtoken.
-
Copy the authtoken and run this command to add it to your terminal.
ngrok config add-authtoken "your-token" -
Start a ngrok tunnel with this command:
ngrok http 3000You should get an output similar to what’s shown in the image below. Leave ngrok running.
Figure 7 - Ngrok Running
- To enable events for your app, navigate to the app configuration page - select your app from the app management page. Click on Event Subscriptions in the left sidebar, then, toggle the Enable Events switch.
-
Provide your
Request URL,
where Slack will send HTTP POST requests for events. In Bolt-Python,
this URL follows the format:
/slack/events https://d730-41-217-5-75.eu.ngrok.io/slack/events - Once your Bolt app is running, your URL should become verified.
Next, we need to tell our app what events to listen to.
On the same Events Subscriptions page, go to the
Subscribe to Bot Events
section. Since we only want to get messages where our bot has been
mentioned, add the
app_mention
event and hit the
Save Changes
button.
If everything went well, you should get an output similar to this in your console:
127.0.0.1 - - [29/Mar/2023 10:36:01] "POST /slack/events HTTP/1.1" 200 -
We've now completed our first service, the Bot Service.
To test it, tag your bot in Slack with a message. Slack will send the message to your
service’s webhook, which will create a
slack_bot_queue
on LavinMQ and publish the message there.
For example, if you tag the bot twice, you'll see two messages in the queue. The bot won’t respond yet—that’s what the next service will handle. Let’s move on.
Step 5: Implementing the Process Bot Messages Service
This is the second and last service we need. This service will pick up messages published to LavinMQ, send them to the ChatGPT API, and post ChatGPT’s response to the appropriate Slack channel.
Again, we are not building this service from scratch, instead, we’re going to clone the code for the project, but first, let’s create a virtual environment for this service.
Creating a Virtual Environment
Take the same steps as the ones outlined in step 4 to create and activate a separate virtual environment for this service, making sure to do this in a separate terminal because we will need the first service and ngrok running in their separate terminals to test our entire application later on.
-
Clone the
slackgpt-consumer repo
to your local machine:
git clone https://github.com/nyior/slackgpt-consumer.git -
Install project requirements just as you’ve done in step 4 and create a
.envfile in your project directory. Then copy the content of the.env-examplefile and update it with your correct credentials. -
To run the app, make sure you are in the project directory:
uvicorn --reload main:fastapi_appIf all went well, your app should let you know that it’s up and running. -
Since we now have our second service also up and running,
we can test our application. First, let’s review the content of the
main.pyfile, which is the entry point to this service.import os import json from slack_bolt import App from dotenv import load_dotenv from fastapi import FastAPI from broker import cloudamqp from chatgpt_helper import chagptify_text # Load environment variables from .env file load_dotenv() # Initializes your app with your bot token app = App( token=os.environ.get("SLACK_BOT_TOKEN"), signing_secret=os.environ.get("SLACK_SIGNING_SECRET") ) fastapi_app = FastAPI() def post_response_to_slack(slack_message, slack_channel, thread_ts): message = f"\n {slack_message} \n" app.client.chat_postMessage( channel=slack_channel, text=message, thread_ts=thread_ts ) def callback(ch, method, properties, body): """ The logic for sending messages to Open API and posting the response to Slack """ body = json.loads(body.decode('utf-8')) chatgpt_prompt = body.get("prompt") slack_channel = body.get("channel") thread_ts = body.get("thread_ts") # Generate ChatGPT response to user prompt chatgpt_response = chagptify_text(message=chatgpt_prompt) # Send code recommendation to Slack post_response_to_slack( slack_message=chatgpt_response, slack_channel=slack_channel, thread_ts=thread_ts ) def main(): cloudamqp.consume_message(callback=callback) # Run the app with a FastAPI server @fastapi_app.on_event("startup") def startup_event(): """ Code to run during startup """ main() @fastapi_app.on_event("shutdown") def shutdown_event(): """ Code to run during shutdown """ pass
To begin, we created an instance of the Bolt Python App class(app), passing it our bot token and signing secret. We also created an instance of the FastAPI app(fastapi_app) – but what do we need FastAPI for?
I’m using the FastAPI instance to run our app – I simply needed a way to trigger the function that consumes messages from our LavinMQ instance the moment our app is fired up. FastAPI emits a “startup” event that I could hook into. A similar mechanism could not be found in the Bolt Python framework.
Next, we defined a couple of functions:
-
post_response_to_slack()– As its name suggests, this function is responsible for sending the generated ChatGPT response to the appropriate Slack channel. -
callback()– This function is invoked as soon as a message is received from LavinMQ. On a message received, this function then passes the message to the ChatGPT API using thechagptify_text()utility function defined in the chatgpt_helper.py file. -
main()– this function is invoked once our app starts – this is done in thestartup_event()function. When invoked, the main() function in turn invokes theconsume_message(callback=callback)function defined in the broker.py file.
Now that we have both services as well as ngrok up and running, we can test our bot on Slack.
Step 6: Testing the Bot
First, add your bot to any of the channels in your workspace. Then,
go to channels that mention your bot followed by what you’d like the
bot to do for you. In my case, the image below depicts what the
interaction looks like.
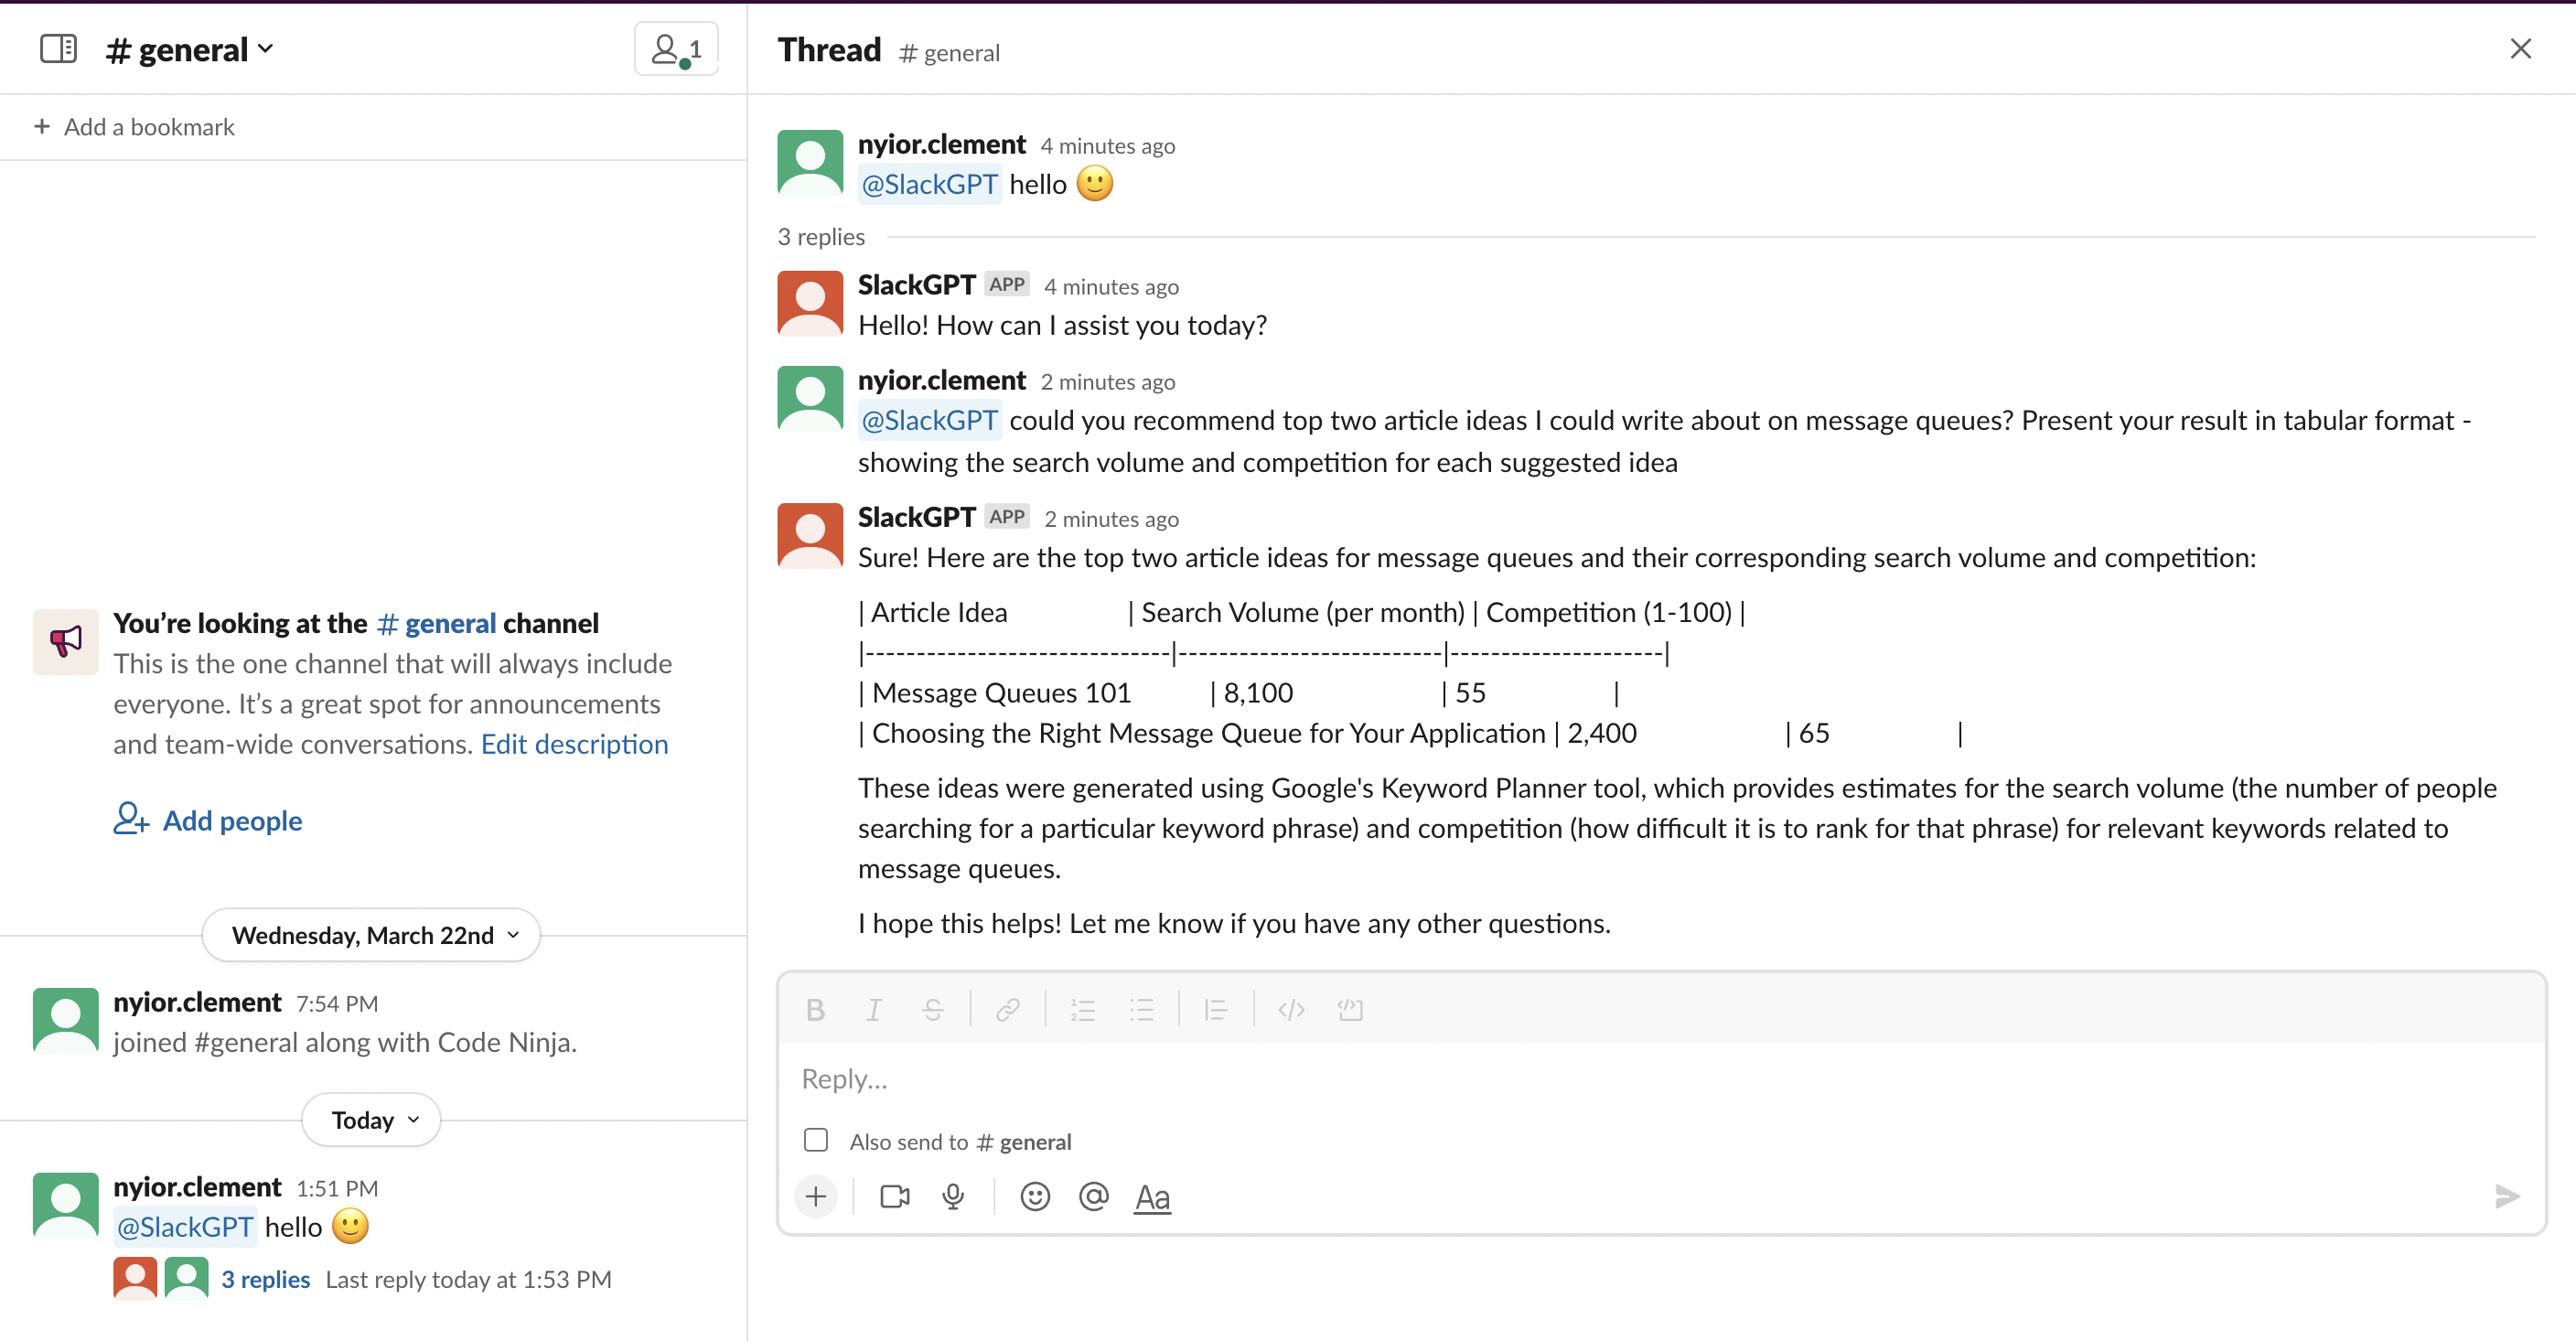
Figure 8 - ChatGPT Output
Note that you must always mention the bot for it to detect your message. And that’s pretty much it!
What’s Next?
In this piece, we’ve seen how LavinMQ helps us implement a scalable and reliable distributed architecture when building a Slack bot. Beyond this, you can also utilize a message queue in a plethora of use cases.
Even though it’s still in beta(at the time of writing this piece), I opted to go with LavinMQ because of its ease of use, performance and efficiency. You can join the LavinMQ Slack workspace to keep up with what’s coming up in the community. You can also reach out to me directly there if you run into any issues while following this tutorial or just to give me some feedback – I hang out there quite often.