How to manage users and permissions in LavinMQ
Imagine a messaging system where unauthorized users or applications can send, read, or delete messages at will. How long would it take before security risks or system instability became a problem? Not long at all.
Securing a message broker is critical. Without proper access control, unauthorized users could access sensitive data. They can even compromise system stability. Allowing the right users and applications access to the right resources is important. It ensures both system reliability and security.
LavinMQ provides built-in authentication and authorization features. These allow you to create users, assign roles, and define fine-grained permissions. In this tutorial, we’ll explore how to manage users and permissions. It covers both the Management UI and the HTTP API.
Understanding LavinMQ Authentication & Authorization
Before diving into user management, it is good to know how authentication and authorization work in LavinMQ. Here are the key concepts:
Users
Accounts that log in and interact with LavinMQ. Each user has a username and password and can have different levels of access based on their role.
Define the role and level of access a user has within LavinMQ. For example:
- Administrator: Full control of LavinMQ, including managing users, permissions, virtual hosts, and policies.
- policymaker: Can create and manage policies, but doesn’t have full administrative privileges.
- Management: Access to the Management UI without administrative rights.
- Monitoring: Provides read-only access to monitoring features (e.g., viewing queues, connections, and statistics).
- Impersonator: Allows a user to log in on behalf of other users (mainly for testing and support scenarios).
- None: No special privileges beyond basic permissions explicitly assigned.
Permissios
Permissions in LavinMQ control what actions a user can perform and on which resources. They are defined per virtual host (vhost) and use regular expressions (regexp) to match resources. Regex patterns allow you to grant fine-grained access without creating separate virtual hosts for each application or user. Each permission has three components:
- Configure regexp: Controls whether the user can create, delete, or modify resources such as queues and exchanges that match the specified pattern.
- Write regexp: Controls whether the user can publish messages to exchanges or queues that match the specified pattern.
- Read regexp: Controls whether the user can consume messages from queues or bindings that match the specified pattern.
You can also set limits to connections and queues.
- Max connections: Limits how many concurrent connections a user can establish.
- Max queues: Limits how many queues a user can create.
Managing users and permissions via the Management UI
In this tutorial, we’ll use CloudAMQP, a popular managed hosting platform for LavinMQ. If you don’t already have a LavinMQ instance on CloudAMQP, create one before proceeding.
In this section, we will look at how to:
- Add users
- Assign permissions
- Modify user permissions
- Delete users
Adding users
- Log in to your CloudAMQP account.
- From the dashboard, click on your LavinMQ instance under the Name column.
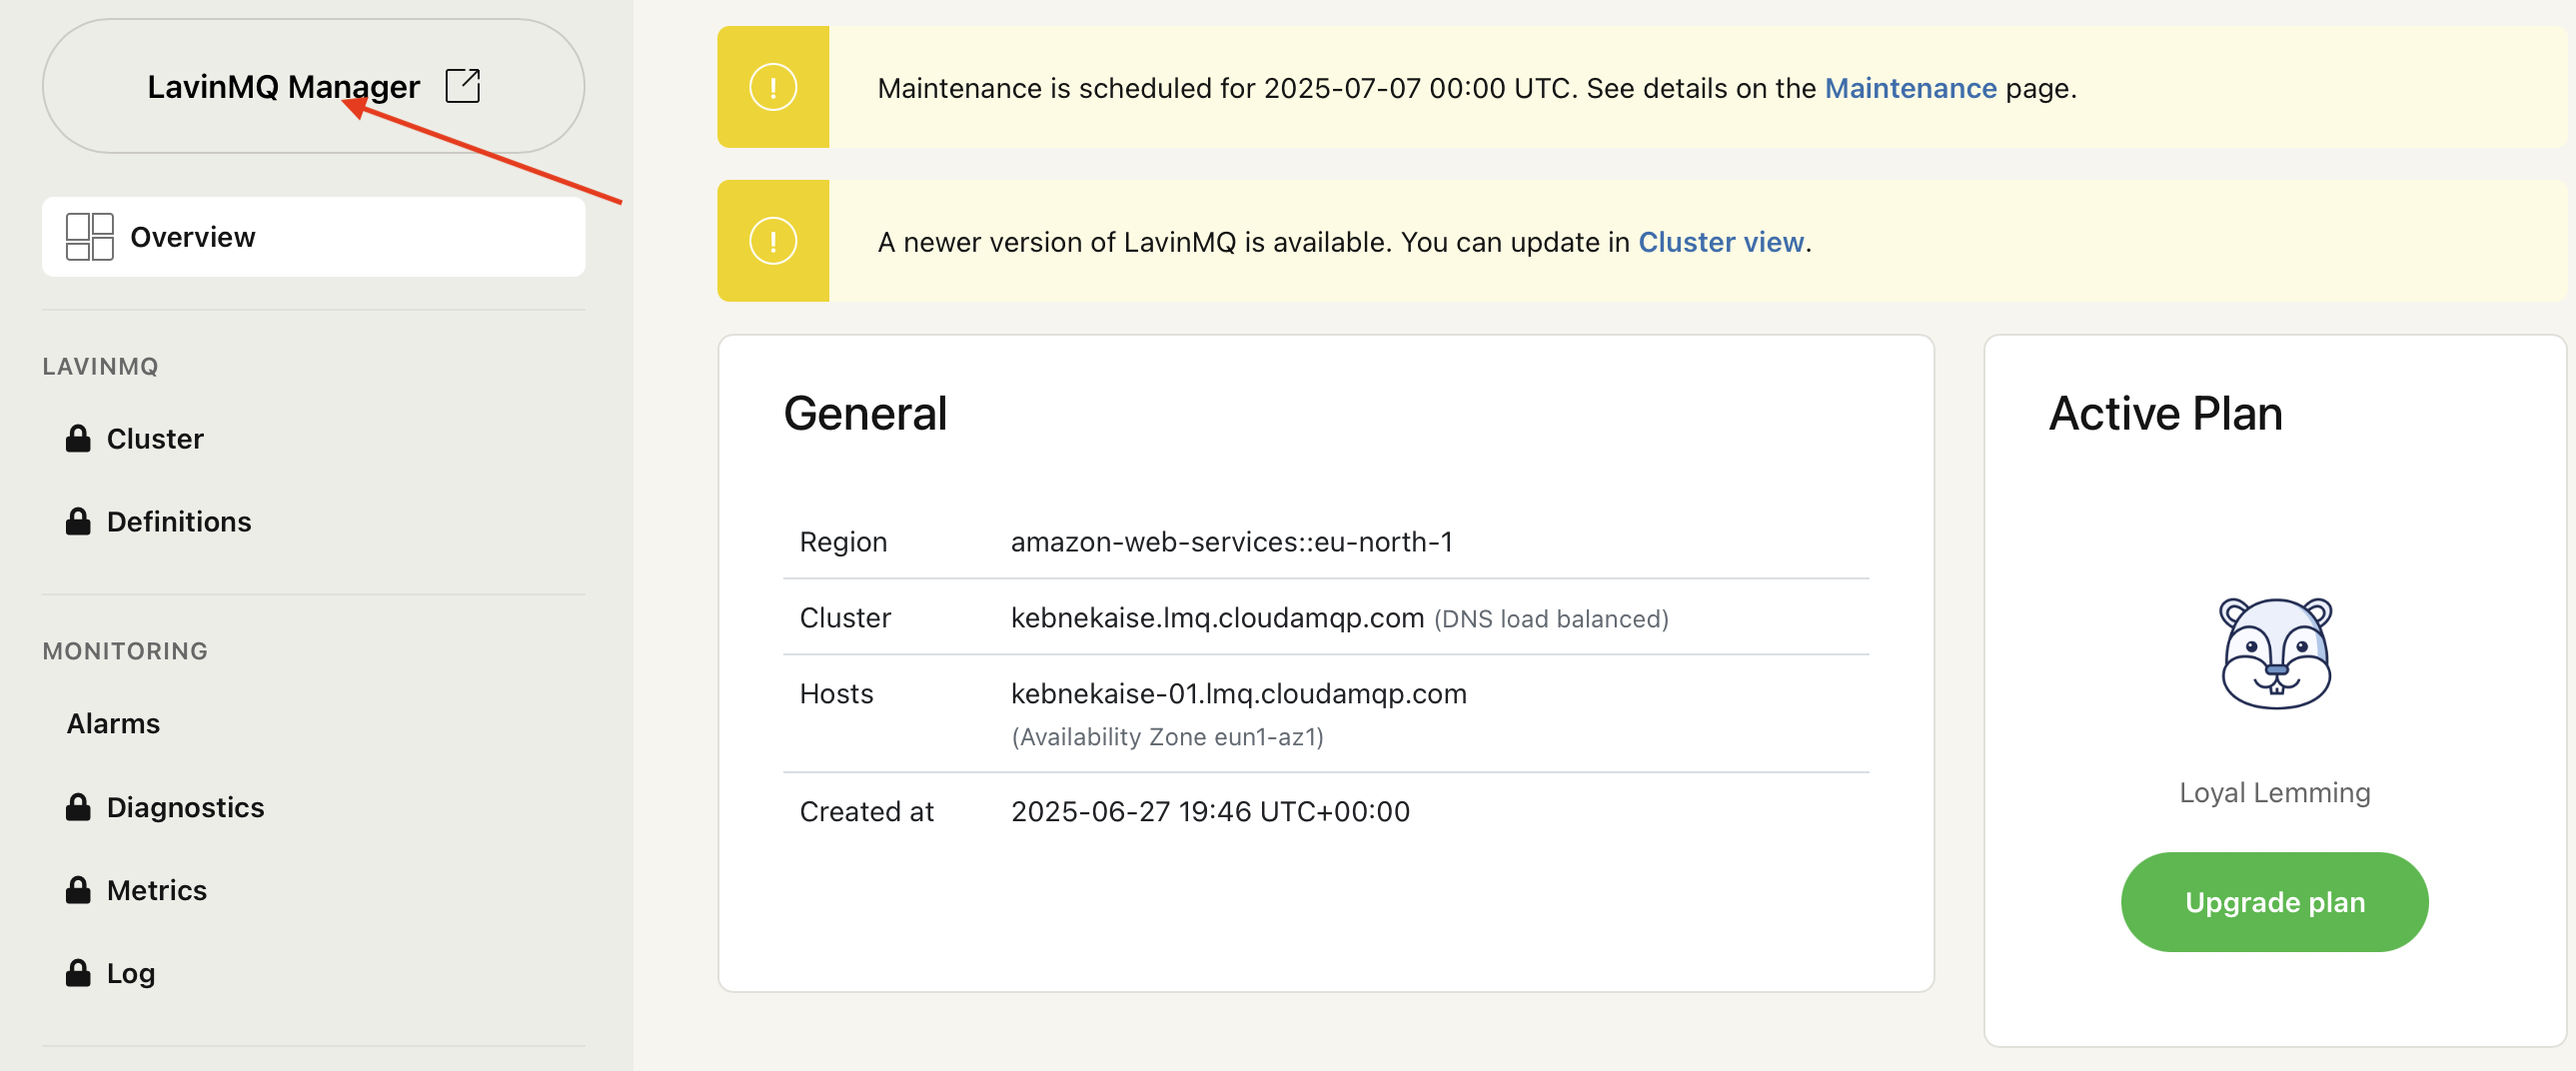
- Click LavinMQ Manager in the top-left corner (highlighted with a red arrow in the screenshot below).
- In the left-hand menu, click Users (highlighted with a red arrow in the screenshot below).
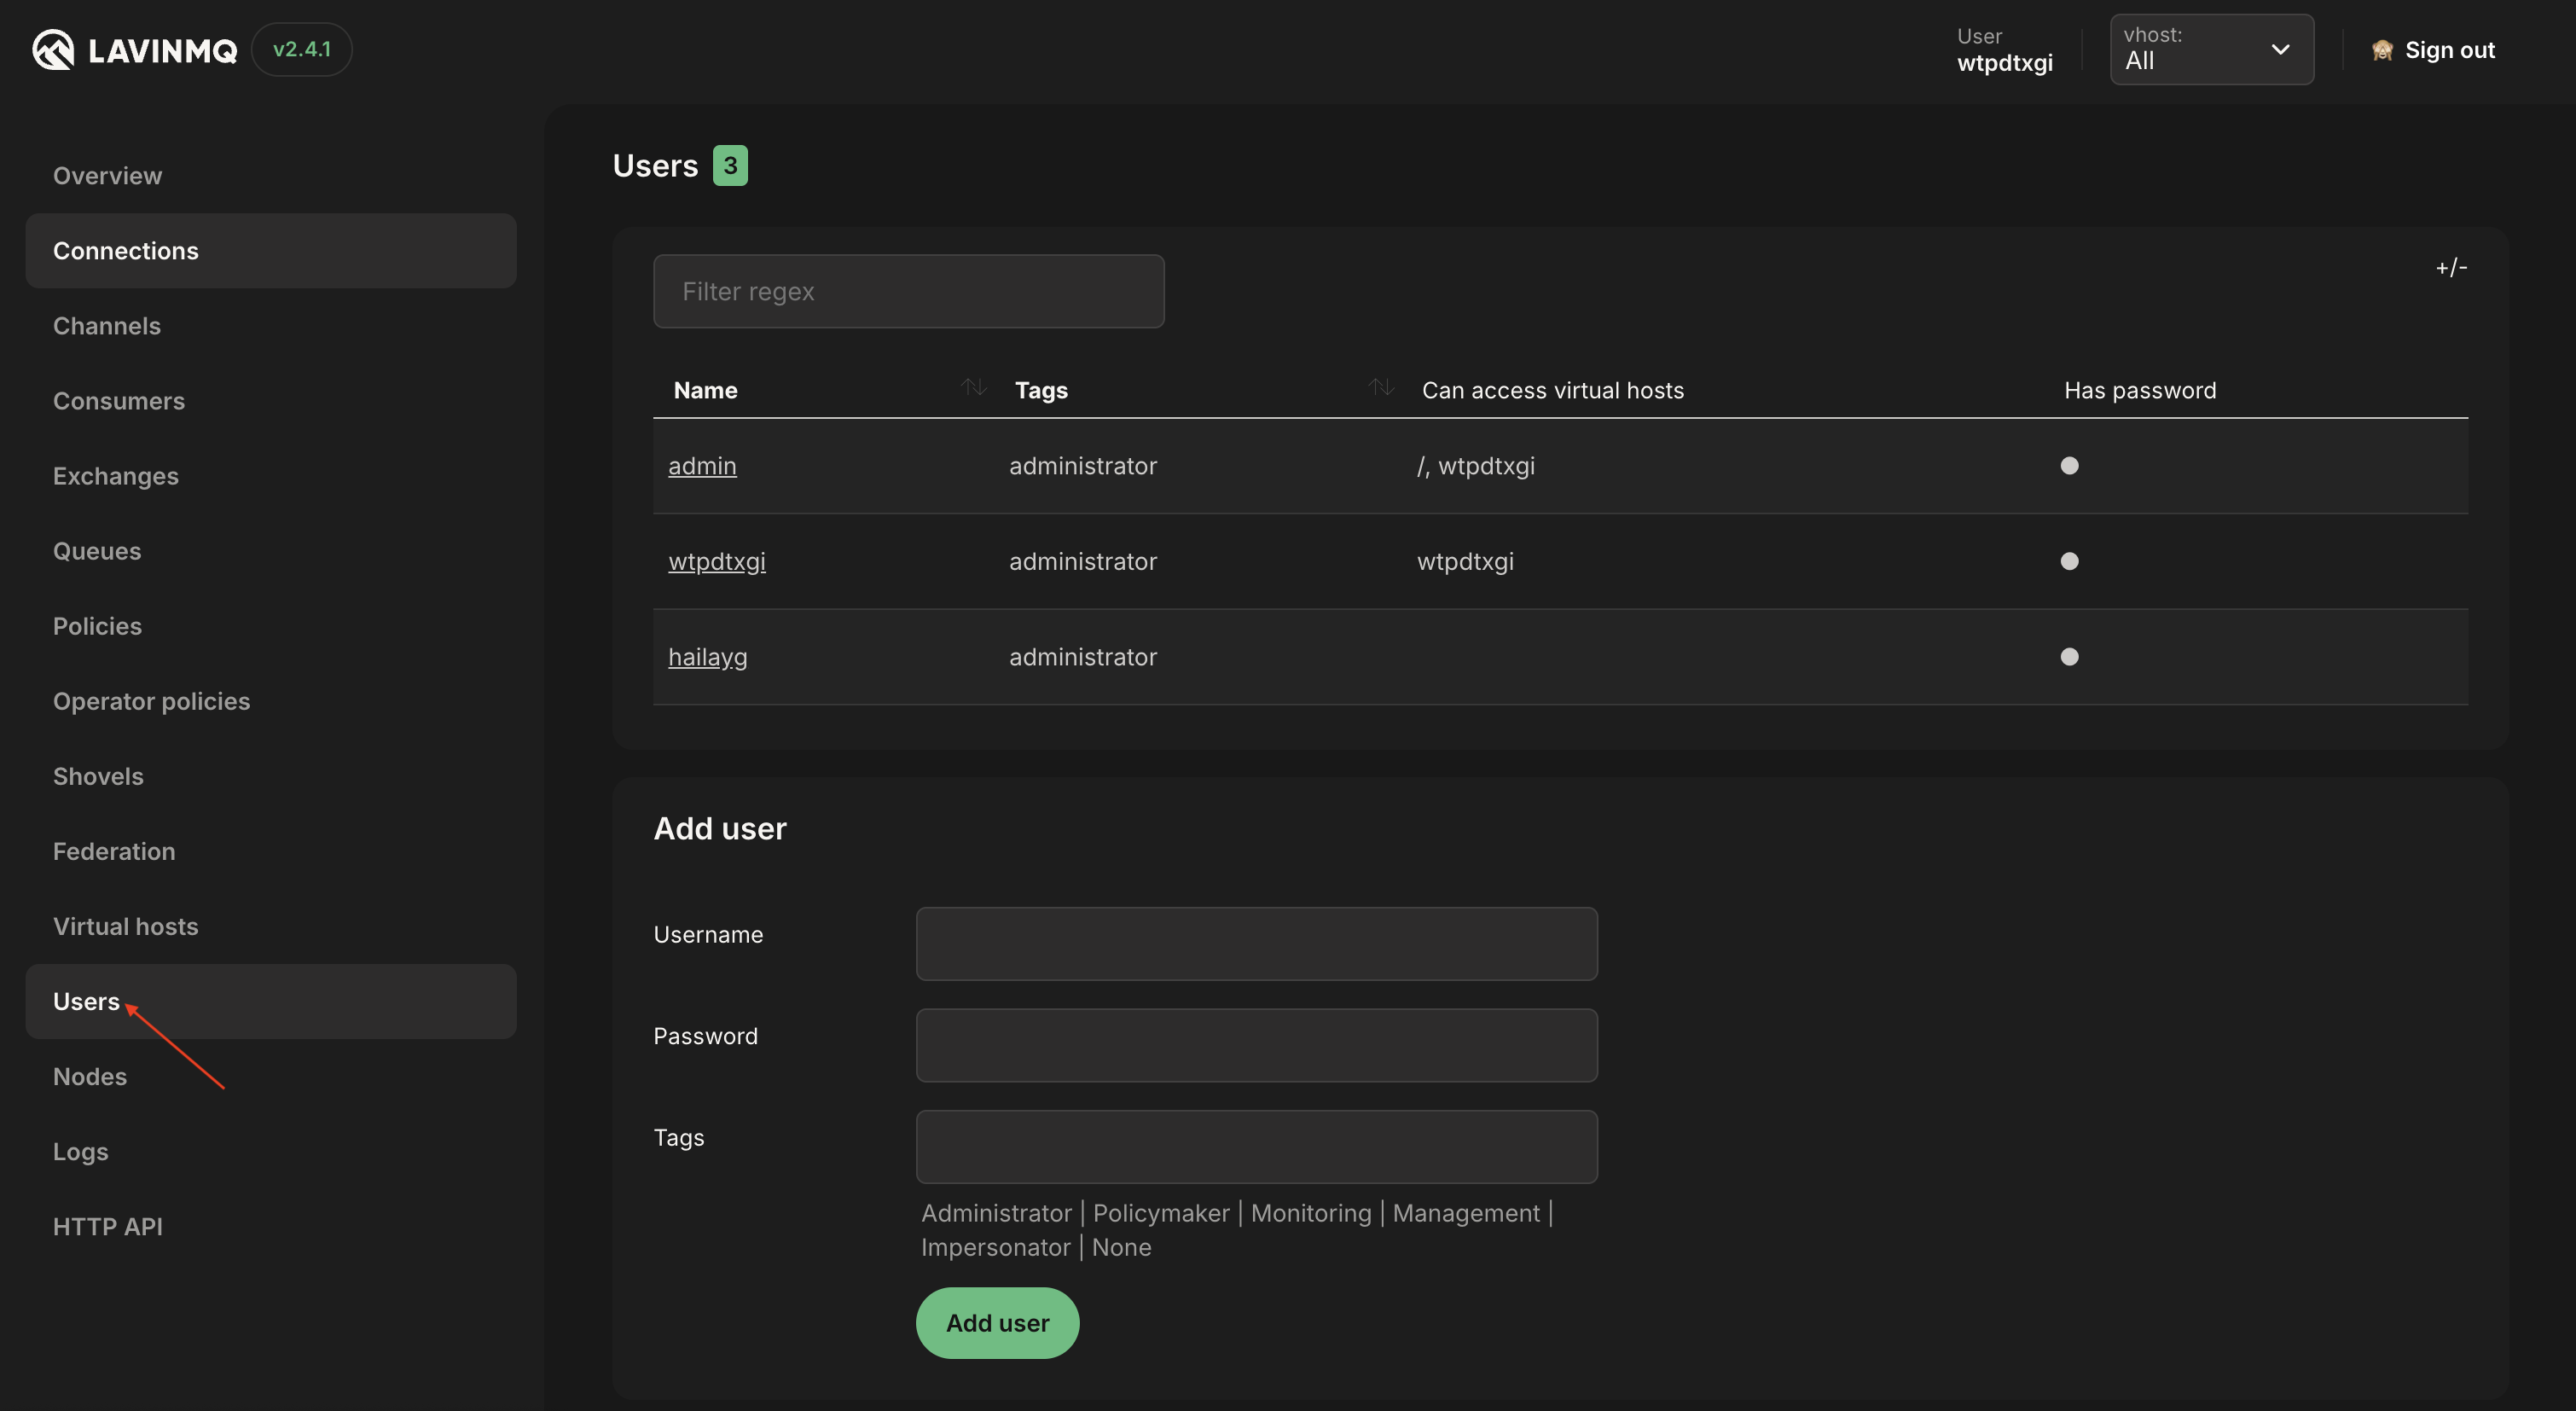
- In the Add users section, enter the Username and Password for the new user.
- Choose an appropriate Tag from the available options (e.g., administrator, management, monitoring).
- Click the Add user button to save.
You should now see the new user listed under the Name column
Assigning permissions
- In the left-hand menu, click Virtual hosts (highlighted with a red arrow in the screenshot below). If you need to create a new vhost, see how to create vhosts.
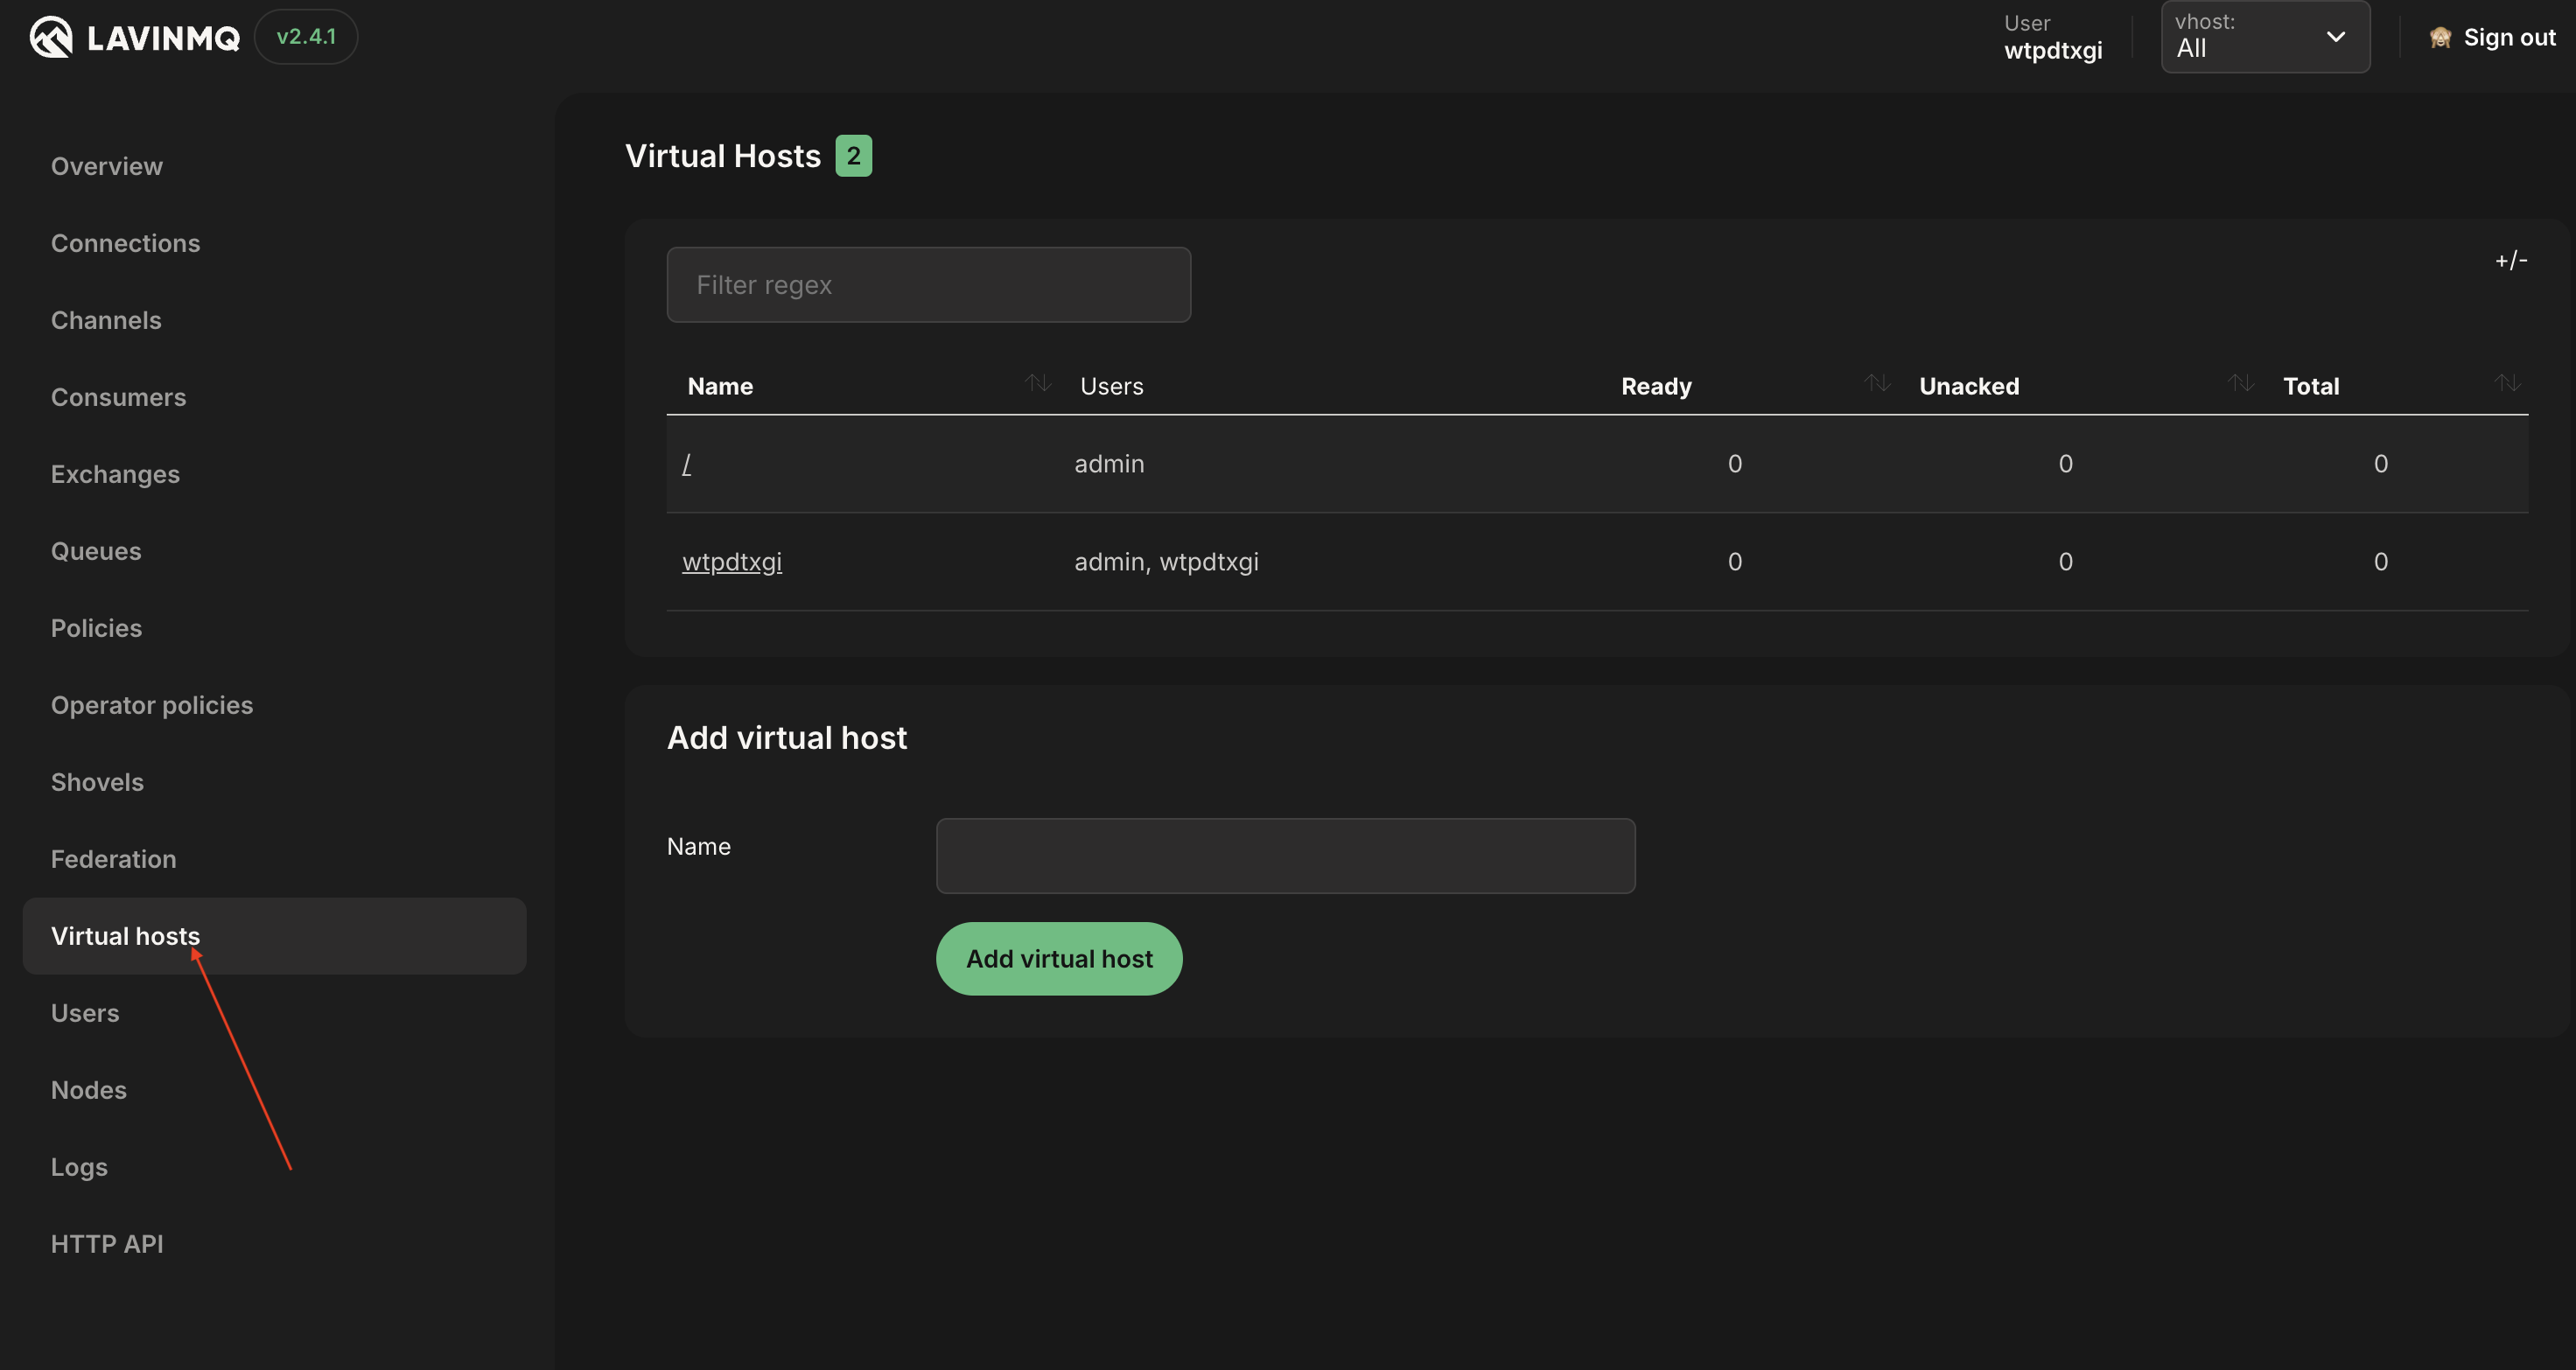
- Click the virtual host name under the Name column, and scroll down to the Set permissions section.
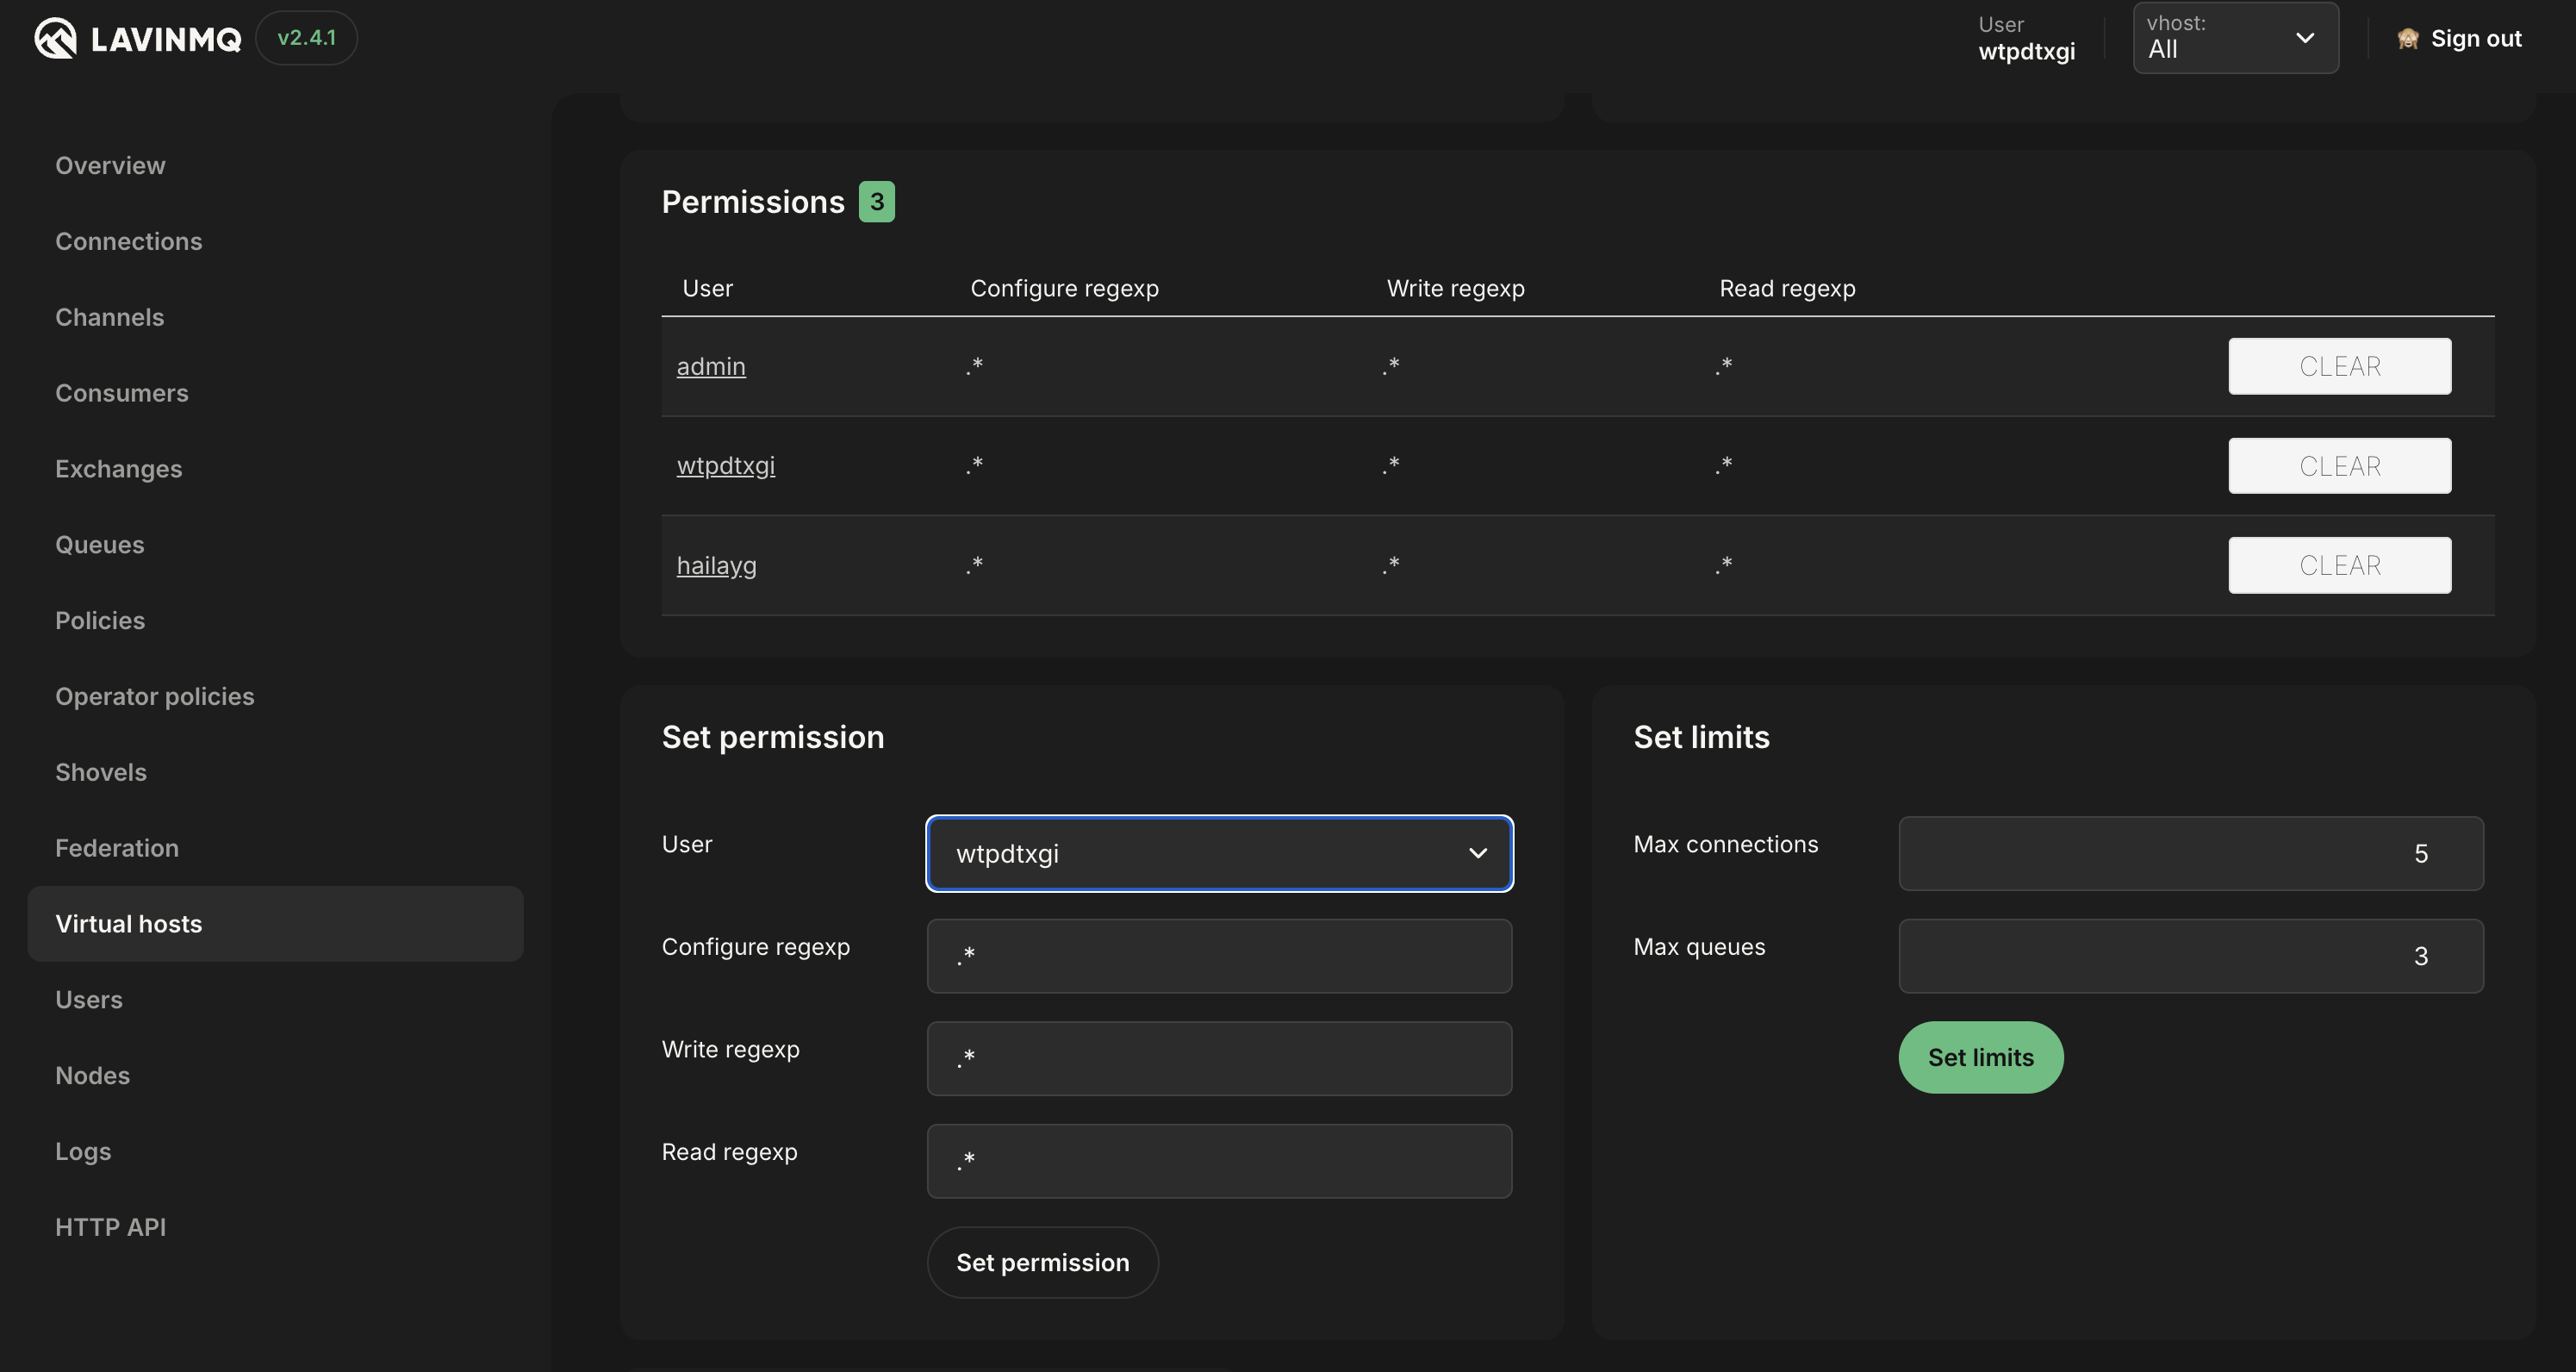
- From the User dropdown, select the user to whom you want to assign permissions.
- Set Configure regexp, Write regexp, and Read regexp using regex patterns.
- Set Max connections and Max queues if you want to limit the number of concurrent connections and queues for the selected user.
- Click the Set Permission button to apply changes.
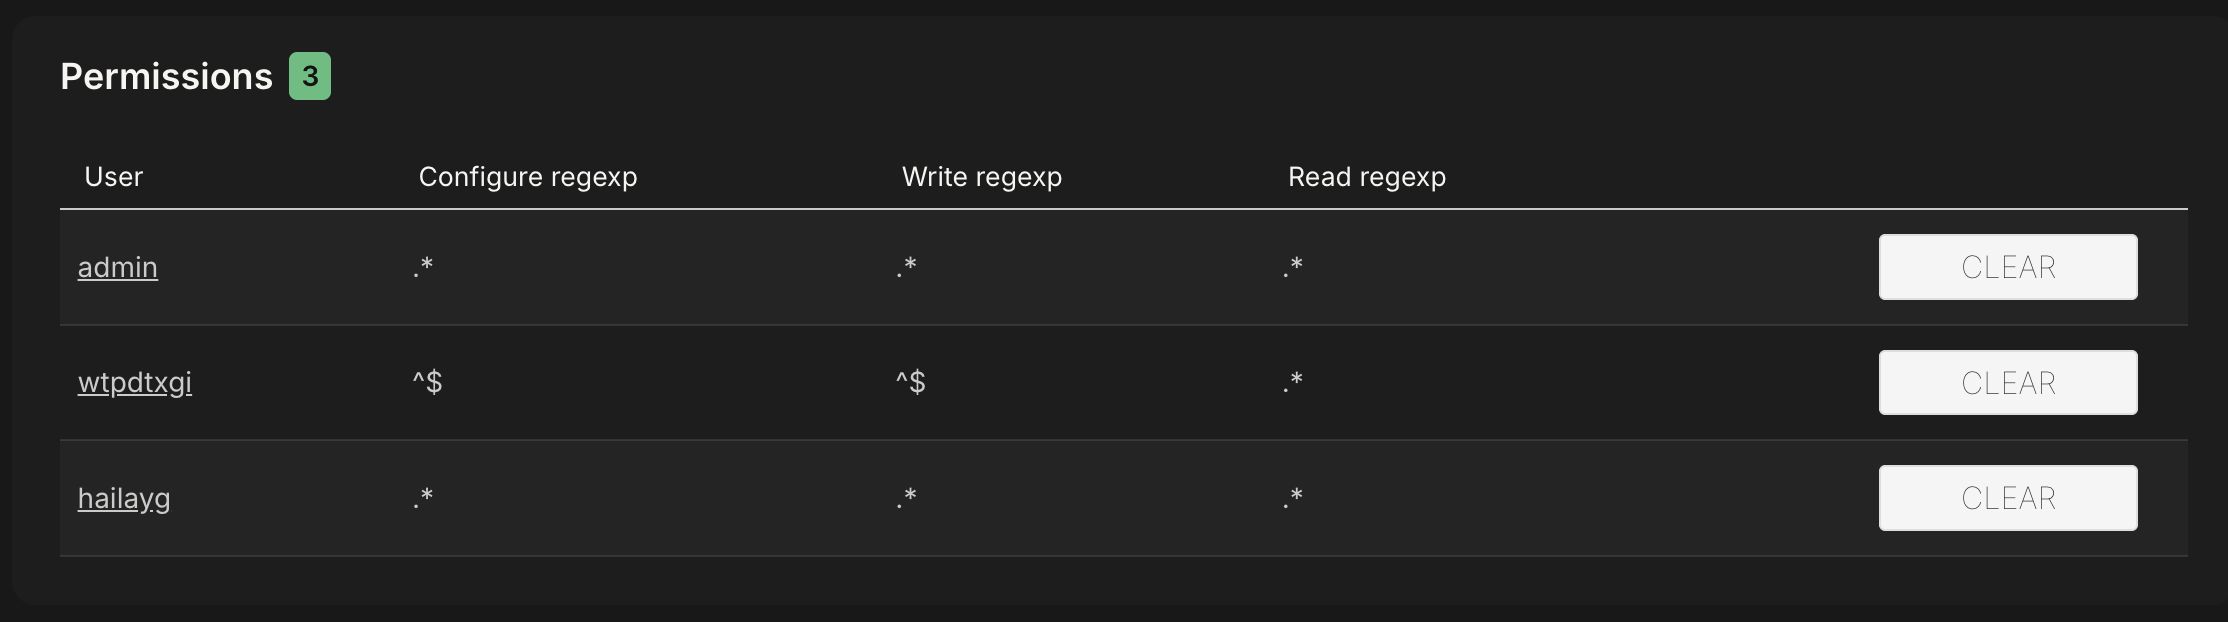
Example: In the screenshot below, the user wtpdtxgi is granted access to all resources (.*) with Max connections set to 5 and Max queues set to 3.
The table below shows examples of valid access types, regex patterns, and their effects:
| Access type | Configure regexp | Write regexp | Read regexp | Effect |
|---|---|---|---|---|
| Full access |
.*
|
.*
|
.*
|
User can configure, write to, and read from all queues and exchanges |
| One exchange only |
^my_exchange$
|
^my_exchange$
|
^$
|
User can configure and publish to only my_exchange, but cannot read from any queue. |
| One queue only |
^my_queue$
|
^$
|
^my_queue$
|
User can configure and read only my_queue, but cannot publish messages. |
| Read-only |
^$
|
^$
|
.*
|
User can not configure or publish but can consume from all queues |
Use
.*
to match everything (grant full access) and
^$
to match nothing (deny access for a specific permission).
Modifying user permissions
There are times when you need to change a user’s access rights or temporarily revoke their permissions without deleting the account.
- In the left-hand menu, click Users (highlighted with a red arrow in Figure 2 above).
- Select the user you want to modify. Under the Name column, click the username and scroll down to the Set Permission section.
- From the Virtual host dropdown, select the virtual host where the user has access.
- Update the Configure regexp, Write regexp, and Read regexp fields using regexp.
- Click the Set Permission button to apply changes.
Example:
In the screenshot below, the user
wtpdtxgi
is granted read-only access to all queues (
.*
) while being denied configure or write permissions (
^$
). Figure 4 above shows the same user with full access.
If you want to keep the user account but remove all their access:
-
Set
Configure regexp, Write regexp,
and
Read regexp
fields to
^$(empty regex, meaning no access). - Click the Set Permission button to apply changes. The user account remains, but they can no longer perform any actions.
You can also update user credentials and roles:
- Remove password: tick the checkbox to remove the existing password.
- Change password: enter a new password in the Password field.
- Tags: select a different tag (e.g., administrator, monitoring, management).
Deleting users
When a user is no longer needed, you can delete their account entirely. In LavinMQ, deleting a user immediately revokes all their permissions and terminates any active connections.
Steps to delete a user
- In the left-hand menu, click Users (highlighted with a red arrow in Figure 2).
- Select the user you want to delete. Under the Name column, click the username and scroll down to the Danger Zone section.
- Click the Delete user button.
- Click OK when prompted to confirm. This action permanently deletes the user.
Before deleting a user:
- Check for other administrators: If you are deleting an admin user, ensure another administrator account exists to avoid losing administrative access.
- Verify active connections: applications (e.g., microservices, IoT devices) often connect to LavinMQ using specific usernames and passwords. Deleting a user will immediately close any active connections using that account.
- To check, click Connections in the left-hand menu (under Overview in Figure 2) and look for active sessions associated with that username (shown in the User column).
Managing users and permissions via the HTTP API
You can also manage users and permissions using the LavinMQ HTTP API. This is particularly helpful for CloudAMQP-hosted LavinMQ instances, where scripting and automation are often required.
In this section, we will look at how to:
- Add users
- Assign permissions
- Modify user permissions
- Delete users
Adding users
You can add a new user to LavinMQ using the HTTP API. The following curl command creates a new user and assigns a tag:
curl -u <username>:<password> -H "Content-Type: application/json" -X PUT -d '{"password":"<your_password>","tags":"administrator"}' https://<Hosts>/api/users/<name>You can assign any tag supported by LavinMQ. See the Tags above.
To confirm the user was created successfully, run:
response=$(curl -s -o /dev/null -w "%{http_code}" -u <username>:<password> https://<Hosts>/api/users/<name>)
if [ "$response" -eq 200 ]; then
  echo "User found"
elif [ "$response" -eq 404 ]; then
  echo "User not found"
else
  echo "Unexpected response: $response"
fi- Returns User found if the user exists
- Returns User not found if the user does not exist
- Any other response indicates an unexpected issue
Assigning permissions
You can assign permissions to a user in LavinMQ using the HTTP API. The example below grants the user configure, write, and read access to a specific virtual host:
curl -u <username>:<password> -H "Content-Type: application/json" -X PUT -d '{"configure":".*","write":".*","read":".*"}' https://<Hosts>/api/permissions/<vhost>/<name>You can customize the regex patterns for configure, write, and read permissions to control user access. See example valid regexp patterns in the table above.
To check the permissions assigned to a user, run:
curl -u <username>:<password> https://<Hosts>/api/permissions/<vhost>/<name>This returns a JSON response similar to:
{
  "user": "<name>",
  "vhost": "<vhost>",
  "configure": "<regexp pattern>",
  "read": "<regexp pattern>",
  "write": "<regexp pattern>"
}
Modifying user permissions
Updating user permissions using the LavinMQ HTTP API follows the same process as assigning them. The main difference is that you send a new set of permission patterns to replace the old ones.
For example, the following command updates an existing user’s permissions from full access to read-only:
curl -u <username>:<password> -H "Content-Type: application/json" -X PUT -d '{"configure":"^$","write":"^$","read":".*"}' https://<Hosts>/api/permissions/<vhost>/<name>To remove all permissions without deleting the user account, run:
curl -u <username>:<password> -H "Content-Type: application/json" -X PUT -d '{"configure":"^$","write":"^$","read":"^$"}' https://<Hosts>/api/permissions/<vhost>/<name>To verify the updates, run the permission check command shown earlier.
Deleting users
You can permanently delete user accounts using the LavinMQ HTTP API. Deleting a user not only removes their account but also revokes all associated permissions and terminates any active connections.
Before deleting a user, check if they have any active connections using the command below.
curl -u <username>:<password> https://<Hosts>/api/connections | jq '.[] | select(.user=="<name>")'- If the result is empty, it’s safe to delete the user.
- If there are active connections, you can either wait for them to disconnect or manually close them using:
curl -u <username>:<password> -X DELETE https://<Hosts>/api/connections/<connection-name>Once there are no active connections, run the following command to delete a user:
curl -u <username>:<password> -X DELETE https://<Hosts>/api/users/<name>Replace the placeholders:
-
<username>and<password>With your LavinMQ HTTP API credentials -
<Hosts>with your instance’s API URL -
<your_password>with the password you’d like to use -
<vhost>with the virtual host (for the default, use%2f) -
<connection-name>with the displayed connection name -
<name>with the name you would like to use for the user
You will find all of these details on your CloudAMQP instance’s overview page.
Managing users and permissions is not allowed on shared plans in LavinMQ.
Try LavinMQ today — follow our quick start guide.