Welcome to LavinMQ for beginners! This article is the second in a series of LavinMQ and will take you through code examples with Ruby, steps to set up your own LavinMQ instance, and a relatable example of a working LavinMQ system to follow for yourself. The guide goes on to explain the steps to set up a connection and the basics of publishing/consuming messages from a queue.
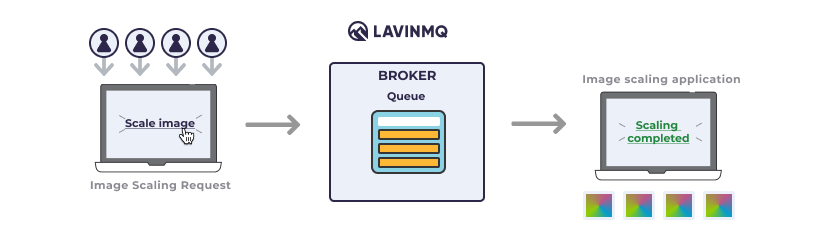
The example follows a web application that allows users to upload a profile picture. Once the image is uploaded the user can traditionally decide what part of the image they want to show, scale it up or down and move it around.
The web application takes these instructions and the image and sends a request to the part of the system that is responsible for "Image Processing", which usually includes downsizing and web optimization.
The website handles the information, scales the image, and saves it in the new format. In the example, the entire scaling process will take several seconds. Let’s get started.
 The full code can be seen at
https://github.com/cloudamqp/library-demo-ruby
The full code can be seen at
https://github.com/cloudamqp/library-demo-ruby
Getting started with LavinMQ and Ruby
The following example will use the synchronous client Bunny to publish a message and to consume it.
We begin by adding the environment variableCLOUDAMQP_URL
to our
.env
file.
➜ vim .env
CLOUDAMQP_URL="amqps://user:password@host/user"
~
Then, we add these gems to our
Gemfile
if they are not yet added.
➜ vim Gemfile
source 'https://rubygems.org'
gem 'bunny'
gem 'dotenv'
~
Further, we create a script and name it
publish.rb.
In the
publish.rb
script
we will write down a simple example on how to publish a message.
Full code
require "bunny"
require "dotenv/load"

connection = Bunny.new ENV['CLOUDAMQP_URL']
connection.start # Start a connection with the CloudAMQP server
channel = connection.create_channel # Declare a channel
queue = channel.queue("image_queue") # Declare a queue

# Declare a default direct exchange which is bound to all queues
exchange = channel.exchange("")

# Publish a message to the exchange which then gets routed to the queue
exchange.publish("Image processing information", :key => queue.name)

connection.close # Finally, close the connection
Then, we create another script and name it
subscribe.rb.
In the
subscribe.rb
script we will write down a simple example on how to consume a message.
require "bunny"
require "dotenv/load"

connection = Bunny.new ENV['CLOUDAMQP_URL']
connection.start  # Start a connection with the CloudAMQP server
channel = connection.create_channel # Declare a channel
queue = channel.queue("image_queue") # Declare a queue

begin # Consume messages
  puts ' [*] Waiting for messages. To exit press CTRL+C'
  queue.subscribe(block: true) do |_delivery_info, _properties, body|
    puts " [x] Consumed message: []"
end
rescue Interrupt => _
  connection.close # Close the connection
  exit(0)
end
Tutorial source code - Publisher
Set up a connection
require "bunny"
require "dotenv/load"

connection = Bunny.new ENV['CLOUDAMQP_URL']
connection.start # Start a connection with the CloudAMQP server
Bunny.new
returns a connection instance. Use the
CLOUDAMQP_URL
as connection URL,
it can be found in the details page for your CloudAMQP instance. The
CLOUDAMQP_URL
is a string including data for the instance, such as username, password,
hostname and vhost. The connection is established when start is called
conn.start
Create a channel
channel = connection.create_channel # Declare a channelA channel needs to be created in the TCP connection. A channel is a virtual connection inside a connection and it is used to send AMQP commands to the broker. When you are publishing or consuming messages or subscribing to a queue is it all done over a channel.
Declare a queue
queue = channel.queue("image_queue") # Declare a queue
channel.queue
is used to declare a queue with a particular name, in this case, the queue
is called image_queue. The queue in this example is marked as durable,
meaning that LavinMQ never loses our queue.
Bind the queue to an exchange
exchange = channel.exchange("")Declare a default direct exchange which is bound to all queues.
Publish a message
exchange.publish("Image processing information", :key => queue.name)Publish a message to the exchange which then gets routed to the queue.
connection.close
Finally, close the connection.
connection.close automatically close all channels in the connection.
Tutorial source code - Consumer
Sample code for image processing
begin # Consume messages
  puts ' [*] Waiting for messages. To exit press CTRL+C'
  queue.subscribe(block: true) do |_delivery_info, _properties, body|
    puts " [x] Consumed message: []"
    puts " [x] Start image processing"
  end
rescue Interrupt => _
  connection.close # Close the connection
  exit(0)
end
A function can be called that handle the image processing. More information about Ruby and CloudAMQP can be found here.
Please email us at contact@cloudamqp.com if you have any suggestions or feedback.