In this article, we help you gain access to a fully managed RabbitMQ instance through CloudAMQP that can scale with your needs, using AWS VPC and a firewall for security.
How to setup a RabbitMQ cluster in AWS
Creating a CloudAMQP instance takes minutes. You need to login to your CloudAMQP account since the broker is provided as Software as a Service. Fill in any missing information that the service asks for before proceeding.

To start a new instance, click the green Create New Instance button to the right of the page. CloudAMQP will prompt you to name your instance, select a plan, and provide any tags you wish to use to identify your instance.

We named our instance Getting Started with AWS under the cheapest dedicated plan. The getting_started_article tag will help us manage resources. Next, you will choose a region for your broker. Try to pick a location closest to your end-users and services to optimize speed.

Here is the region closest to users is US-West-2 (Oregon) selected. If our users were on the east coast of the United States, we might choose to set up the instance in Virginia.
More configuration options are available for anyone on a dedicated plan, found in the Plan drop-down from our first step. Click the configure button and choose the number of nodes to start as well as a VPC subnet if desired. A VPC is a private subnet that encrypts communications in the cloud much like a virtual private network (VPN) does.

We created a subnet on 10.56.72.0 using the latest version of RabbitMQ, 3.8.3. Click Review, check that the information is correct, and click Create Instance in the bottom right corner of the screen. The instance should appear on your homepage.

The Getting Started with AWS instance appears under the tag getting_started_with_aws. Click the link to explore your new cloud broker. You can also find your new broker under the drop-down next to the CloudAMQP logo.
Upgrade your RabbitMQ Cluster
The broker's detail page shows basic information. The free tier offers plenty of room to explore with 1,000,000 message transfers per month, 100 free queues, up to 20 connections, and a maximum queue length of 10,000 messages.
You may need to configure more space as you grow. You can do this using the Upgrade Instance link on the right side of the details page. The host, username, and password are visible as well. We will use this information to connect to the broker later.
Securing RabbitMQ on the Cloud with a VPC
A virtual private cloud or VPC avoids giving users unwanted access to your RabbitMQ resources. The AWS VPC service creates a virtual network within Amazon that is, by default, only accessible to users with the proper credentials. Amazon supports the IPSec protocol, encrypting all communication with your applications.
CloudAMQP offers VPC peering for dedicated plans, found in the configuration section when creating a new instance. Note your subnet IP address as we did. You will need this to connect to your broker. You must perform additional steps to connect to your VPC.
Setting up a VPC on your desktop
If you created a VPC, you need to perform additional setup before connecting to your broker. Make sure to download the relevant configuration information from your amazon web services console and use this information to setup a VPN on your desktop or server:
Do not use the subnet provided by CloudAMQP as the IP address for your VPC. This is the internal address of your broker, used once you are connected to your network.
Setting an alarm in RabbitMQ
With our broker secured, we should create a resource-based alarm. RabbitMQ does not contain built-in alarms, offering only a web-based API to help you create your own. These alarms help you track broker health and avoid exceeding usage limits. You can query the API for everything from queue usage to cluster partitions.
CloudAMQP supplies metrics-based alarms sent to any or all specified recipients. It is a good idea to set an alarm to ensure that the number of messages in your queues does not exceed the number allowed on the free plan.
Configure this alert through the Alarms section on the left side of the page.
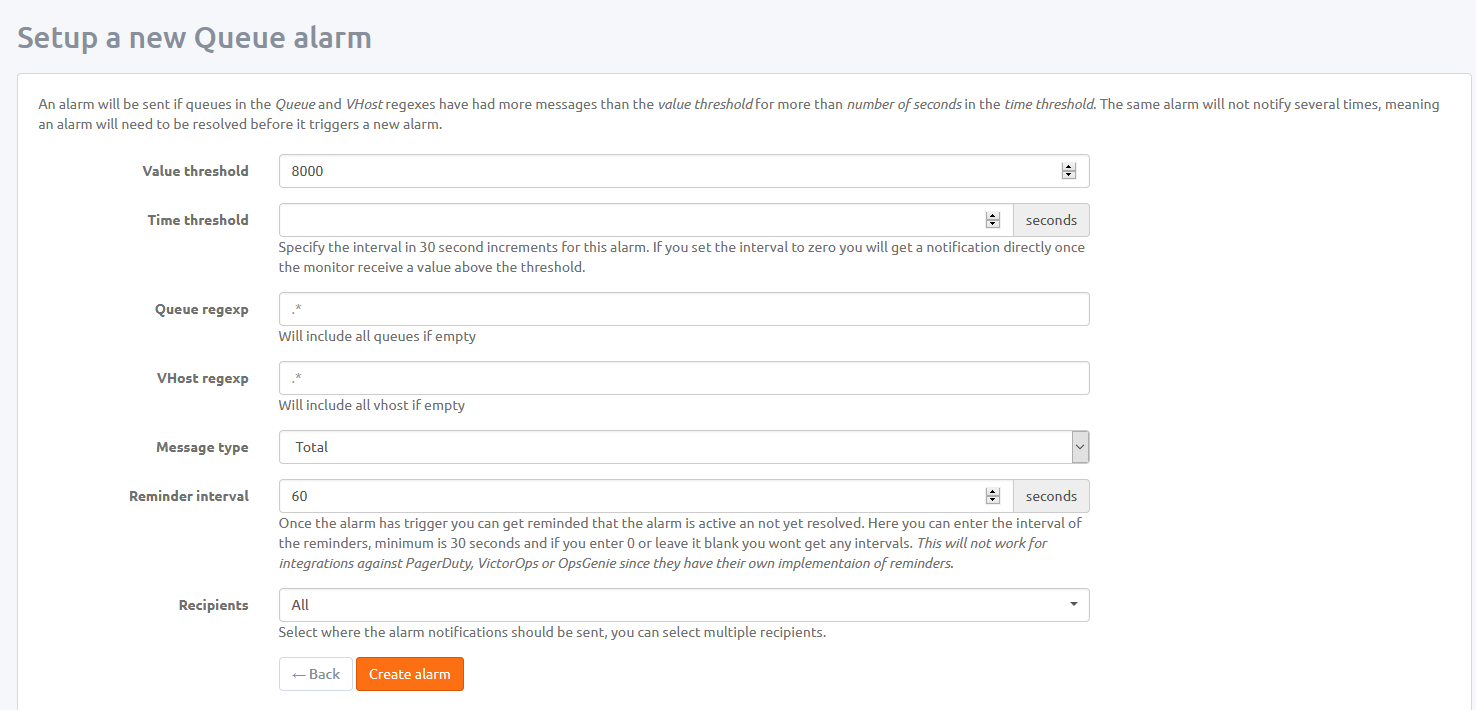
We set the alarm to trigger once the number of messages in any queue exceeds 8000. CloudAMQP sends alerts to every available email address but this can be limited using the Recipients dropdown. Viewing Information on AWS Cloudwatch CloudAMQP dedicated plans integrate fully with Amazon Cloudwatch. The Amazon service lets you create dashboards and view metric information without being inundated by email alarms but you will need to set up access through the Integrations tab from your broker homepage.
Viewing Information on AWS Cloudwatch
CloudAMQP dedicated plans integrate fully with Amazon Cloudwatch. The Amazon service lets you create dashboards and view metric information without being inundated by email alarms but you will need to set up access through the Integrations tab from your broker control panel.
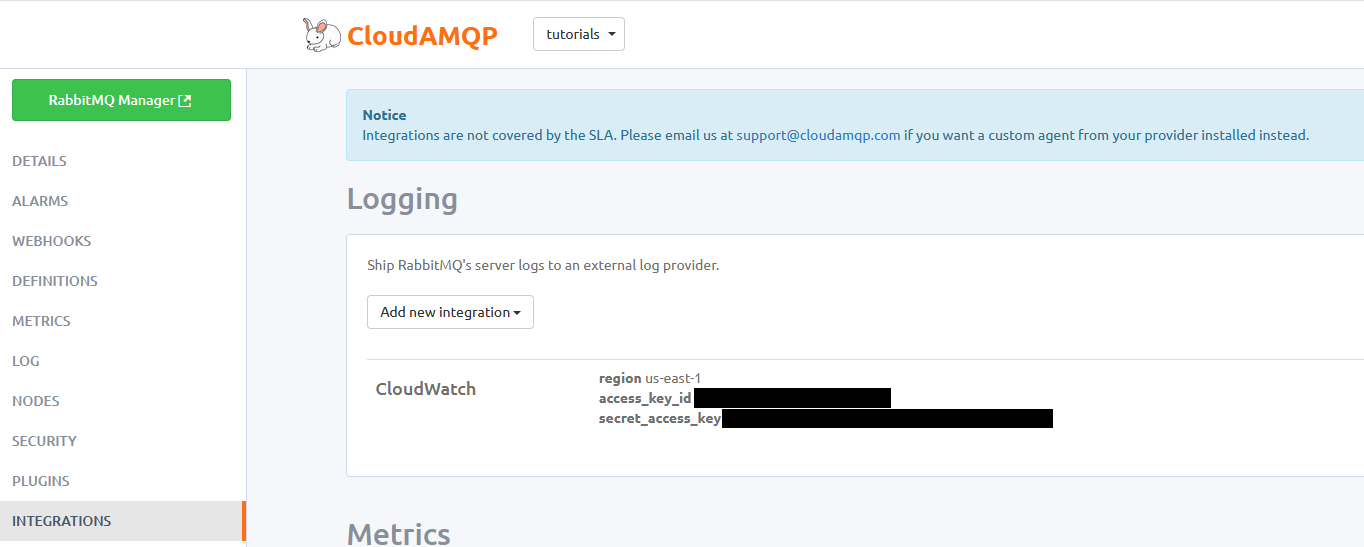
Cloudwatch requires an
IAM
user with specific permissions as explained under
Integrations. You can filter for the appropriate
Read more about AWS Cloudwatch and CloudAMQP.
Accessing the RabbitMQ management console
Before testing a connection to your new broker, try reaching it from the management console. You must access the console through the RabbitMQ Manager tab, found in the top left of the broker page, or from your instance list. Make sure to start any VPN connection, if used, beforehand.
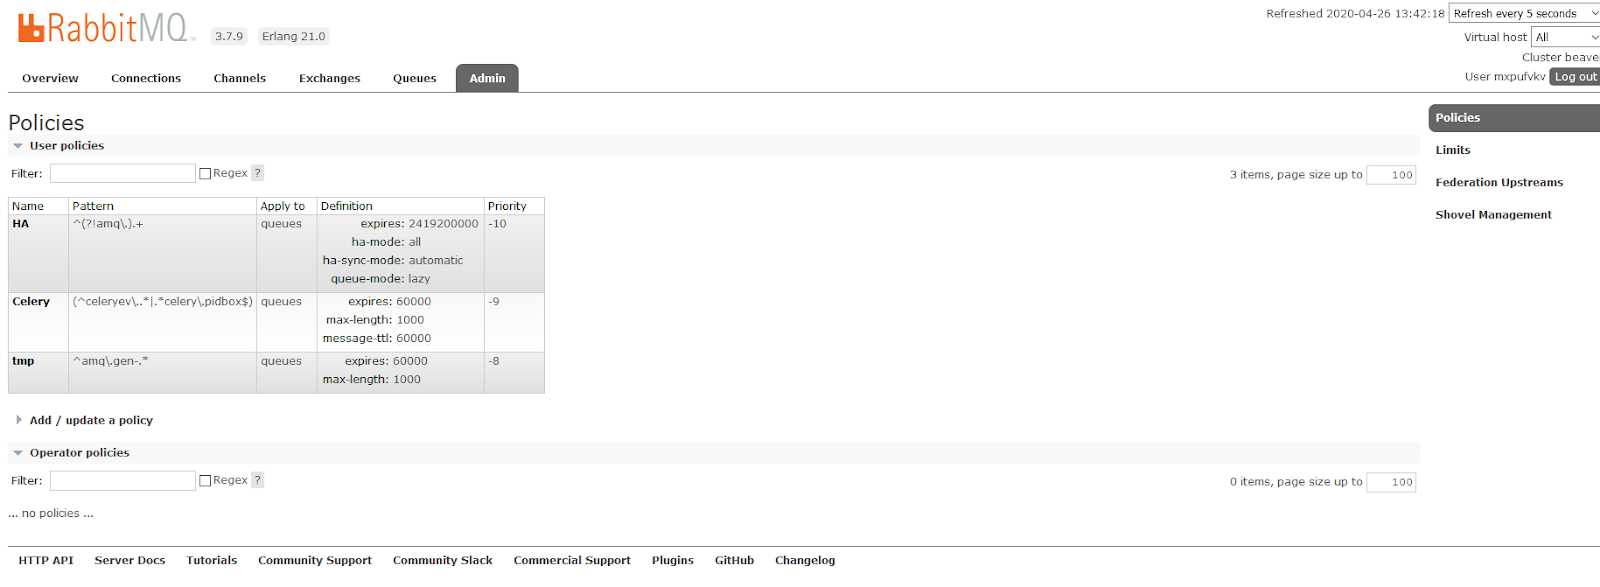
The management console allows you to create new queues and exchanges, start virtual hosts, and perform other tasks. As shown, CloudAMQP presets policies for Celery as well as high-availability and temporary queues. Dedicated users can create virtual hosts.
Connect to your broker for the first time
After becoming acquainted with your broker, try programmatically creating a queue and sending a message to an exchange. We will use Python to connect to our instance through pika.
Using pip for Python3, install pika with the following command:
pip install pikaThen, open your favorite text editor or IDE, create a python file, and try connecting to the broker:
credentials = pika.PlainCredentials(user, pwd)
parameters = pika.ConnectionParameters(host, port, vhost, credentials)
conn = pika.BlockingConnection(parameters=parameters)
Attempt to create an exchange and a queue bound to the exchange:
channel = conn.channel()
channel.exchange_declare('test_exchange')
channel.queue_declare('test_queue')
channel.queue_bind('test_queue', 'text_exchange', 'test_route')
Publish a test message to the exchange:
msg = "Hello World!"
msg_bytes = bytes(msg, 'utf-8')
props = pika.BasicProperties()
channel.basic_publish(
    'test_exchange', 'test_queue', body=msg_bytes, properties=props)
You will need to change the host, port, virtual host, username, and password. Run the code to make sure that there is no error. We created and published to the test_exchange and test queue which should be available from the management console.
Navigate to your Queues view and open test_queue to check that the test_queue received the test message.
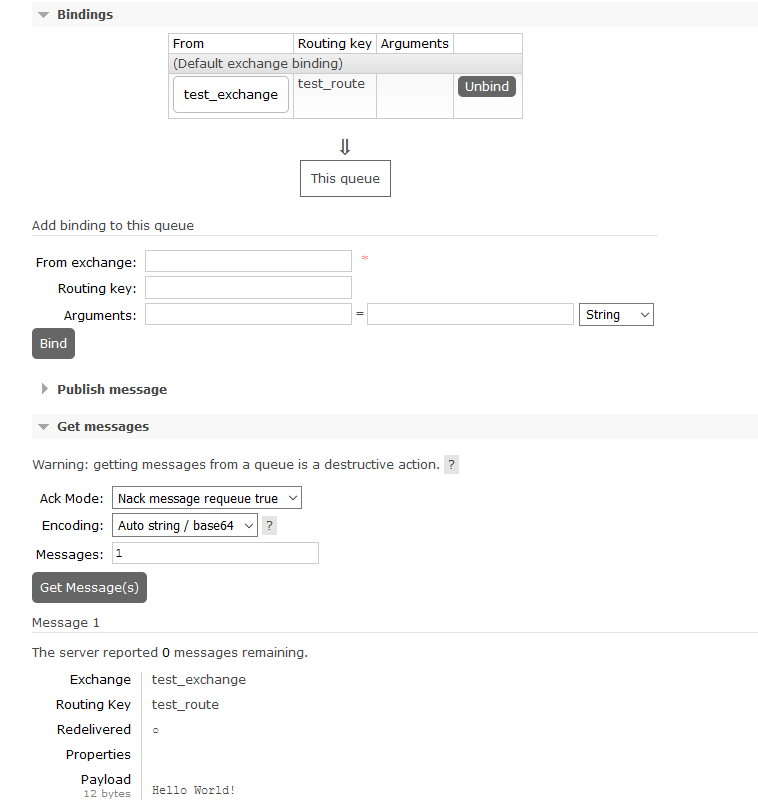
Notice that we pushed a single message to the test_queue through the test_exchange using the routing key test_route. You are now ready to use your new cloud messaging platform.
Get started with RabbitMQ using AWS Marketplace
RabbitMQ on the cloud offers the advantage of scale without an army of system administrators. Work from anywhere deemed safe over trusted hardware with a virtual network and robust firewall. CloudAMQP offers every feature an organization of any size needs to start and scale on an affordable pay-for-use basis, from a generous free tier to enterprise scale.
CloudAMQP is also available though AWS marketplace via this link: https://aws.amazon.com/marketplace/pp/84codes-CloudAMQP/B07B6G7K5G
As always, we love hearing from you on contact@cloudamqp.com with your suggestions, questions, or feedback!