Migrate between plans
Migrating between CloudAMQP plans can be done in different ways depending on requirements and the current plan.
Change between shared plans
Go to the CloudAMQP Console and click Edit to change the plan seamlessly. This will not lead to any changes in connection details, and there will be no downtime. The things that will change are the price, the max number of queues, the number of messages per month, the number of connections, and the maximum number of messages in queues.
Change between dedicated plans
To scale a cluster, go to the CloudAMQP Console and click Edit Follow the steps to change the plan and/or change the number of nodes. You can add or remove nodes and change the plan at the same time.
If you are running a multi-node cluster and are changing the plan, we will change one node at a time. It means they stay connected to the cluster during the plan change.
If you are running a single-node cluster and are changing the plan, it will require some downtime. Keep your queues short to make the process of changing the plan faster.
Change from shared to dedicated plan
The recommended process is to use rolling migration or queue federation for seamless migration, as described below
Rolling migration
If seamless migration is not required, create a new instance and move your clients:
- Create a new instance
- Export definitions from old instance (if on a dedicated instance)
- Import definitions to new instance (if on a dedicated instance)
- Point your publishers to the new instance
- Allow consumers to empty the queues on the old instance
- Move consumers to the new instance
- Finish up by deleting the old instance
Copy settings
Settings such as definitions, alarms, integrations for metrics and logs, firewall rules, plugins, and RabbitMQ configuration can be copied from one dedicated instance to another. When creating a new dedicated instance you will get the option to copy from an existing instance in step three of the process.
Select the instance you want to copy from and what configurations you would like to copy. When the new instance is bootstrapped, it will copy the configuration automatically.
Note that you will get a new connection string since the new instance will be on a different host with another hostname.
Note that it will not copy messages. A queue federation or shovel can be used to move messages.
More details on the copy functionality can be found in our blog post: Copy your CloudAMQP configurations from one dedicated instance to another
Seamless migration with RabbitMQ queue federation
The RabbitMQ Federation plugin is used when migrating to another cluster without stopping all producers and consumers. Make sure the plugin is enabled on upstream and downstream servers.

Queue federation connects an upstream queue and transfers messages to the downstream queue when consumers have capacity on the downstream queue.
- Upstream servers are the servers on the message side where they are originally published.
- Downstream servers are where the messages get forwarded to.

Consumers and publishers can be moved in any order. Messages are transferred to downstream queues when consumers are there. The messages will be moved downstream when:
- Downstream Queue has run out of messages
- Downstream Queue has consumers who need messages
- Upstream Queue has "spare" messages that are not being consumed and/or when the upstream queue has "spare" messages that are not being consumed.
How to move messages with Queue Federation
- Start by setting up the new instance which will be the downstream server.
-
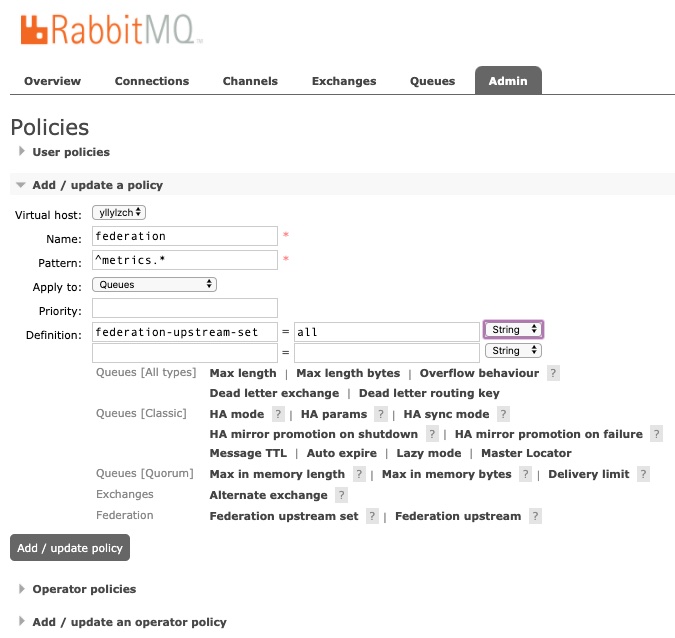
On the downstream server, create a policy * that matches the queues to be federated.
* A policy is a pattern that queue names are matched against. The pattern is a regular expression used to match queue (or exchange) names.
In this example, we are going tell the policy to federate all queues whose names begin with metric.
In the RabbitMQ Management Interface: Navigate to Admin -> Policies and click Add / update a policy to create the policy. A policy can apply to an upstream set or a single upstream of exchanges and/or queues. In this example we apply to all upstreams, federation-upstream-set is set to all
NOTE: Policies are matched every time an exchange or queue is created.

-
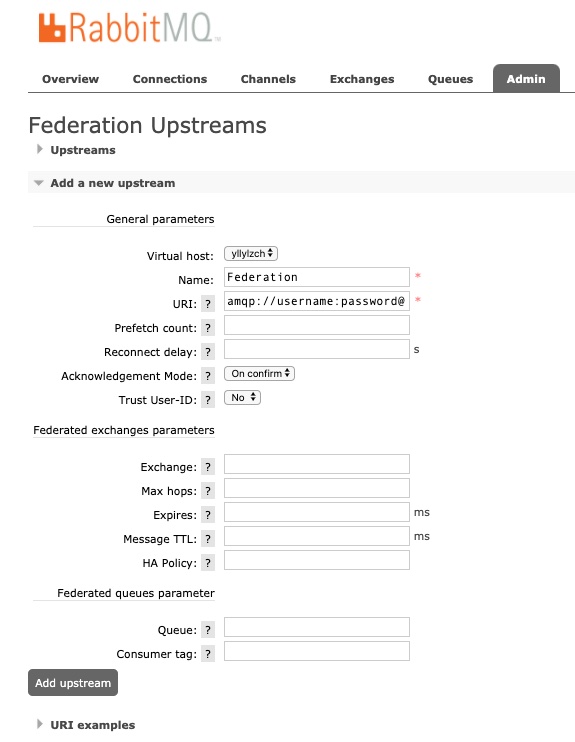
Set up the federation to the upstream server.
Open the RabbitMQ Management Interface on the downstream server and go to the Admin -> Federation Upstreams screen and press Add a new upstream Fill in all information needed, the URI should be the URI of the upstream server. Leave expiry time and TTL blank. Leaving this blank means that it will stay "forever".

-
Set up the queues that should be federated.
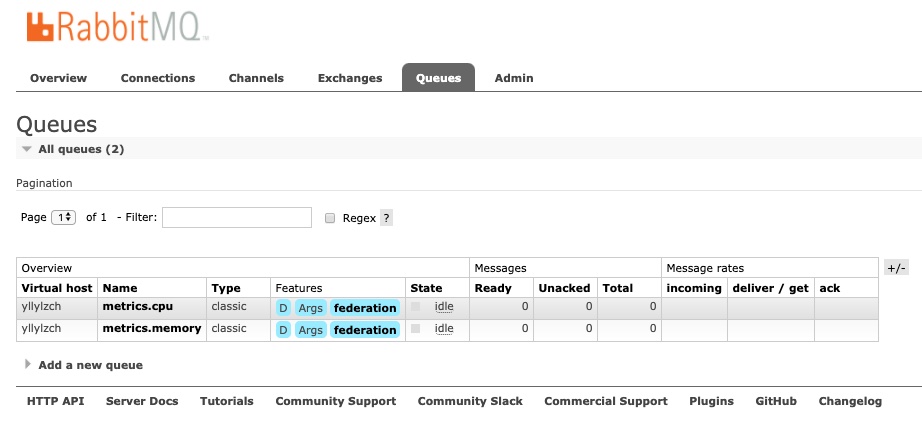
The queues can be created as always, manually from the management interface or the application code. The queues should be marked as federated if the policy is applied, as shown in the image below. If the queues are not marked as federated, make sure that the regexp is working.

-
Move consumers and publishers
Everything is set up, and it is time to move publishers and/or consumers to the new cluster. Publishers and/or consumers can be moved in any order. The federated queue will only retrieve messages when it has run out of messages locally, when it has consumers that need messages, or when the upstream queue has "spare" messages that are not being consumed.
-
Verify that the downstream works as intended
Verify that messages published to the upstream server are consumed by the downstream server once consumers have moved to the downstream server.
Read more about cluster migration in our blog post: Cluster migration with RabbitMQ Queue Federation.