Are you using Eclipse instead of Android Studio? Check out Get started with RabbitMQ on Android (Eclipse) instead.
In the code given, messages will first be added to an internal queue and the publisher will send messages from the internal queue to RabbitMQ when there is a connection established. The message will be added back to the queue if the connection is broken.

This guide assumes that you have downloaded, installed and set up everything correct for Android Studio.
Start by creating a new Android project, open Android Studio and go to File -> New -> New Project..
1. Configure your new project
-
Enter project information as specified below.

-
Select the form factor your app will run on

-
Select if you like to add an activity to
your app or not. In this example we choose
Blank Activity
to get autogenerated files for the project.

-
Customize the Activity

2. Add Java AMQP library to project
RabbitMQ has developed an excellent Java AMQP library. The full API documentation for the library can be found here.
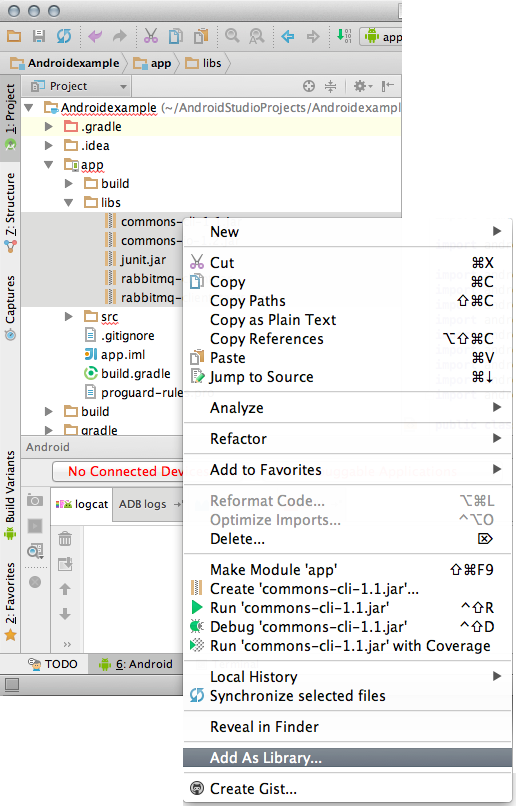
We need to include the RabbitMQ Java Client Library and reference the jar files into the project. In Android Studio you can create a libs folder in the same level as the app. Copy and past the jars in to this libs folder. Mark all the jar files and press "Add As Library..." as seen in the image below.
You can confirm that the libs has been added as library by opening build.gradle and check under dependencies, all files should seen be there.
dependencies {
  ...
  compile files('libs/rabbitmq-client.jar')
  ...
}
NOTE: Only if you are using Android Gradle plugin 0.7.0 and do get the error "Duplicate files copied in APK" when you later run your application, you need to add packagingOptions to your build.gradle file as specified in here.
android {
  packagingOptions {
    exclude 'META-INF/LICENSE.txt'
    exclude 'META-INF/NOTICE.txt'
  }
}
3. Android Manifest, internet permission
We need to tell the Android system that this app is allowed to access internet. Open the AndroidManifest.xml file, located in the root of the project. Add the user permission android.permission.INTERNET just before the closing /manifest tag.
<?xml version="1.0" encoding="utf-8"?>
<manifest xmlns:android="http://schemas.android.com/apk/res/android"
      package="com.cloudamqp.rabbitmq"
     android:versionCode="1"
     android:versionName="1.0">
     ......
     <uses-permission android:name="android.permission.INTERNET"></uses-permission>
</manifest>
4. Start coding
Layout
Create the view for the application. The .xml layout file can be found under res->layout. What we have here is a root ScrollView containing a
EditText
a
Button
and a
TextView
The EditText will be used as an input field for the text that will be sent. The text will be
published when the button is pressed and all messages received by the subscriber
will be printed to the TextView.
<ScrollView xmlns:android="http://schemas.android.com/apk/res/android"
  ...
  <EditText
  android:id="@+id/text"
  android:layout_width="fill_parent"
  android:background="#ffffff"
  android:hint="Enter a message" />

  <Button
  android:id="@+id/publish"
  android:layout_width="match_parent"
  android:layout_height="wrap_content"
  android:layout_below="@+id/text"
  android:text="Publish message" />

  <TextView
  android:id="@+id/textView"
  android:layout_width="match_parent"
  android:layout_height="wrap_content"
  android:layout_below="@+id/publish"
  android:textColor="#000000" />
  ...
</ScrollView>
Publish
Create an internal message queue. In this case is a
BlockingDeque
used.
Blockingqueues
implementations are designed to be used primarily for producer-consumer queues.
private BlockingDeque<String> queue = new LinkedBlockingDeque>String>();
void publishMessage(String message) {
  try {
    Log.d("","[q] " + message);
    queue.putLast(message);
  } catch (InterruptedException e) {
    e.printStackTrace();
  }
}
Create a setup function for the
ConnectionFactory
The connection factory encapsulates a set of connection configuration parameters,
in this case the CLOUDAMQP_URL. The URL can be found in the control panel for
your instance.
ConnectionFactory factory = new ConnectionFactory();
private void setupConnectionFactory() {
  String uri = "CLOUDAMQP_URL";
  try {
    factory.setAutomaticRecoveryEnabled(false);
    factory.setUri(uri);
  } catch (KeyManagementException | NoSuchAlgorithmException | URISyntaxException e1) {
    e1.printStackTrace();
}
Create a publisher that publish messages from the internal queue. Messages are added back to the queue if an exception is catched. The publisher will try to reconnect every 5 seconds if the connection is broken.
A thread ("background" or "worker" threads or use of the AsyncTask class) is needed when we have operations to perform that are not instantaneous, such as network access when connecting to rabbitMQ.
We will use a fanout exchange. A fanout exchange routes messages to all of the queues that are bound to it and the routing key is ignored. If N queues are bound to a fanout exchange, will a new message that is published to that exchange, be copied and delivered to all N queues. Fanout exchanges are ideal for the broadcast routing of messages.
public void publishToAMQP()
{
  publishThread = new Thread(new Runnable() {
    @Override
    public void run() {
      while(true) {
        try {
          Connection connection = factory.newConnection();
          Channel ch = connection.createChannel();
          ch.confirmSelect();

          while (true) {
            String message = queue.takeFirst();
            try{
              ch.basicPublish("amq.fanout", "chat", null, message.getBytes());
              Log.d("", "[s] " + message);
              ch.waitForConfirmsOrDie();
            } catch (Exception e){
              Log.d("","[f] " + message);
              queue.putFirst(message);
              throw e;
           }
         }
       } catch (InterruptedException e) {
         break;
       } catch (Exception e) {
         Log.d("", "Connection broken: " + e.getClass().getName());
         try {
           Thread.sleep(5000); //sleep and then try again
         } catch (InterruptedException e1) {
           break;
         }
       }
     }
   }
  });
  publishThread.start();
}
Subscriber
We have now created the publisher, and it is time to create the subscriber. The subscriber will take a handler as parameter. The handler will print the messages to the screen when the messages arrives. The subscribe thread will try to reconnect every 5 seconds when the connection gets broken.
void subscribe(final Handler handler)
{
  subscribeThread = new Thread(new Runnable() {
    @Override
    public void run() {
      while(true) {
        try {
          Connection connection = factory.newConnection();
          Channel channel = connection.createChannel();
          channel.basicQos(1);
          DeclareOk q = channel.queueDeclare();
          channel.queueBind(q.getQueue(), "amq.fanout", "chat");
          QueueingConsumer consumer = new QueueingConsumer(channel);
          channel.basicConsume(q.getQueue(), true, consumer);

          while (true) {
            QueueingConsumer.Delivery delivery = consumer.nextDelivery();
            String message = new String(delivery.getBody());
            Log.d("","[r] " + message);
            Message msg = handler.obtainMessage();
            Bundle bundle = new Bundle();
            bundle.putString("msg", message);
            msg.setData(bundle);
            handler.sendMessage(msg);
          }
        } catch (InterruptedException e) {
          break;
        } catch (Exception e1) {
          Log.d("", "Connection broken: " + e1.getClass().getName());
          try {
            Thread.sleep(5000); //sleep and then try again
          } catch (InterruptedException e) {
            break;
          }
        }
      }
    }
  });
  subscribeThread.start();
}
Call all functions listed above from function
onCreate
The handler used by the subscribe functions is also created in onCreate.
A handler has to be used because it is only possible to write to
the GUI from the main tread.
@Override
public void onCreate(Bundle savedInstanceState) {
super.onCreate(savedInstanceState);
  setContentView(R.layout.activity_main);

  setupConnectionFactory();
  publishToAMQP();
  setupPubButton();

  final Handler incomingMessageHandler = new Handler() {
    @Override
    public void handleMessage(Message msg) {
      String message = msg.getData().getString("msg");
      TextView tv = (TextView) findViewById(R.id.textView);
      Date now = new Date();
      SimpleDateFormat ft = new SimpleDateFormat ("hh:mm:ss");
      tv.append(ft.format(now) + ' ' + message + '\n');
    }
  };
  subscribe(incomingMessageHandler);
}

void setupPubButton() {
  Button button = (Button) findViewById(R.id.publish);
  button.setOnClickListener(new OnClickListener() {
    @Override
    public void onClick(View arg0) {
      EditText et = (EditText) findViewById(R.id.text);
      publishMessage(et.getText().toString());
      et.setText("");
   }
  });
}
The subscribe and the publish tread can both be interrupted
when the application is destroyed by adding following code in
onDestroy
Thread subscribeThread;
Thread publishThread;
@Override
protected void onDestroy() {
  super.onDestroy();
  publishThread.interrupt();
  subscribeThread.interrupt();
}
The full code can be seen and downloaded from github, github.com/cloudamqp/android-example.