The previous post in this series explored the use cases where Streams shine. This article will focus on how to set up communication between consumers and producers with a RabbitMQ Stream. But how– you might ask?
Client applications could talk to a Stream via an AMQP client library, just as they do with queues. However, it is recommended to use the dedicated Streams protocol plugin and its associate client libraries. Read on to explore both options.
Note: RabbitMQ client libraries abstract the low-level details of connecting to a queue or stream in RabbitMQ. Think of them as the packages that simplify image processing, or making http requests in your favorite programming languages.
Using RabbitMQ Streams with an AMQP Client Library
Like queues, there are three steps to working with RabbitMQ Streams via an AMQP client library:
- Declare/Instantiate a Stream
- Publish(write) messages to the Stream
- Consume(read) messages from the Stream
The code snippets in this section are based on Pika, the RabbitMQ Python client library.
Declaring a RabbitMQ Stream
Streams are declared with the AMQP client libraries the same way queues are
created. Set the
x-queue-type
queue argument to stream (the default is
classic), and provide this argument at declaration time. See the code snippet
below:
import pika, os

# Access the CLODUAMQP_URL environment variable and parse it (fallback to localhost)
rabbitmq_url = os.environ.get(
'CLOUDAMQP_URL', 'amqp://guest:guest@localhost:5672/%2f'
)

params = pika.URLParameters(rabbitmq_url)
connection = pika.BlockingConnection(params)
channel = connection.channel() # start a channel

# Declare a Stream, named test_stream
channel.queue_declare(
  queue='test_stream',
      durable=True,
  arguments={"x-queue-type": "stream"}
)
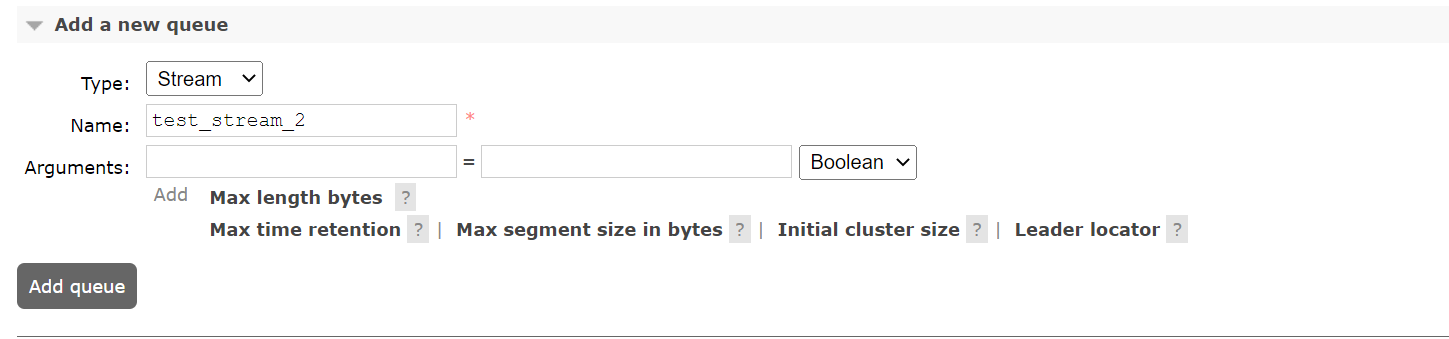
Alternatively, a Stream can be created using the Rabbitmq Management UI. In that case, the Stream type must be specified using the queue type drop-down menu.
Publishing a Message to a RabbitMQ Stream
Publishing messages to a Stream is no different from publishing messages to a
queue. As an example, below, the previous snippet has been extended to
publish a message to the
test_stream
declared.
import pika, os

# Access the CLODUAMQP_URL environment variable and parse it (fallback to localhost)
rabbitmq_url = os.environ.get(
'CLOUDAMQP_URL', 'amqp://guest:guest@localhost:5672/%2f'
)
params = pika.URLParameters(rabbitmq_url)

connection = pika.BlockingConnection(params)
channel = connection.channel() # start a channel

# Declare a Stream, named test_stream
channel.queue_declare(
  queue='test_stream',
      durable=True,
  arguments={"x-queue-type": "stream"}
)

# Publish a message to the test_stream
channel.basic_publish(
  exchange='',
  routing_key='test_stream',
  body='Welcome email message'
)
To summarize, the script above declared a RabbitMQ Stream,
test_stream
then published a message to it with the
basic_publish
function. Next, an explanation of how to consume this message.
Assume the message published is a welcome email that needs to be forwarded to a user after signup.
Consuming a Message from a RabbitMQ Stream
Messages can be consumed from a Stream the same way queues accomplish this task, more or less, but with two major differences.
- Consuming messages in RabbitMQ Streams requires setting the QoS prefetch.
- You can specify an offset to start reading/consuming from any point in the log stream. If unspecified, the consumer starts reading from the most recent offset written to the log stream after it starts.
QoS prefetch?
When RabbitMQ delivers a message from a Stream to a consumer, the consumer returns an acknowledgment confirming that it has received the message. Learn about the low-level details of how this confirmation is done here.
Generally, this is a data safety measure designed to ensure that no message is lost while in flight. For example, a message could fail to reach its destination (a consumer) due to a network issue. But how is this related to QoS prefetch?
Oversimplified, a consumer processes one message at a time by lining up incoming messages while processing the current one (for ease of access). Let’s call these lined-up messages “in progress” messages. The QoS prefetch setting specifies the maximum number of “in-progress” messages that a specific consumer could accommodate at a time.
Let’s take the case of a consumer whose QoS prefetch is set to 3. Imagine this
consumer currently having 3 “in-progress” messages(the currently executing
message not included):
message-1
,
message-2
, and
message-3
.
Because this consumer’s
QoS prefetch
is set to 3 and it already has 3 “in-progress” messages, RabbitMQ will not
push a fourth message,
message-4
,
until one of the “in-progress” messages has been resolved. RabbitMQ implements
this check to ensure that consumers are not overwhelmed with messages.
In the below example, a consumer subscribing to test_stream is declared, then its QoS prefetch is set. Note that even though test_stream is declared from the publishing side, it's good practice to declare it from the consuming side as well.
import pika, os, time

def send_welcome_email(msg):
  print("Welcome Email task processing")
  print(" [x] Received " + str(msg))
  time.sleep(5) # simulate sending email to a user --delays for 5 seconds
  print("Email successfully sent!")
  return

# Access the CLODUAMQP_URL environment variable and parse it (fallback to localhost)
url = os.environ.get('CLOUDAMQP_URL', 'amqp://guest:guest@localhost:5672/%2f')
params = pika.URLParameters(url)

connection = pika.BlockingConnection(params)
channel = connection.channel() # start a channel

# Declare our stream
channel.queue_declare(
  queue='test_stream',
  durable=True,
  arguments={"x-queue-type": "stream"}
)

# create a function which is called on incoming messages
def callback(ch, method, properties, body):
  send_welcome_email(body)

# Set the consumer QoS prefetch
channel.basic_qos(
  prefetch_count=100
)

# Consume messages published to the stream
channel.basic_consume(
  'test_stream',
  callback,
)

# start consuming (blocks)
channel.start_consuming()
connection.close()
The script above declared
test_stream
again, setting the QoS prefetch to 100 using the
basic_qos
function. The consumer triggers the
callback
function when it processes a new
message. The
callback
function, in turn, invokes the
send_welcome_email
function that simulates sending an email to a user.
Notice how an
offset
isn’t specified in our
basic_consume
# Consume messages published to the stream
channel.basic_consume( 'test_stream', callback)
As a result, the consumer would start reading from the most recent offset written to
test_stream
after the consumer starts. “After” has been deliberately emphasized here to
allow for the cross-examination of an interesting behavior of Streams.
RabbitMQ Streams can receive and buffer messages even before any consumer is bound. When a consumer is eventually bound to such a Stream, it is expected that the Stream will automatically deliver all existing messages to this new consumer. At least queues behave that way.
However, RabbitMQ Streams behave differently. The only messages that would be automatically delivered to a consumer from the Stream it’s bound to are the messages published to the Stream after the consumer starts.
For example, Imagine a Stream, stream_a, that already has one message,
message_1
. Assume
stream_a
currently has no consumers bound to it. Five minutes later,
however, a new consumer,
consumer_a
connects to
stream_a
.
Because
consumer_a
connected after
message_1
had already been delivered to
stream_a
,
RabbitMQ won’t automatically deliver
message_1
to this new consumer.
But this begs the question: how can
consumer_a
grab
message_1
,
an old message?
By using the message’s offset. For example, if the ID of
message_1
or the published timestamp is known,
consumer_a
can start reading from that message by passing the
x-stream-offset
argument to the
basic_consume
function as shown in the snippet below.
channel.basic_consume(
  'test_stream',
  callback,
  arguments={"x-stream-offset": 5000}
)
In the snippet above, it is assumed that the message to start reading from has the ID of 5000.
By passing “first” or “last” to the
x-stream-offset
argument, the consumer would start reading from the first message in the log stream or from the last written chunk of messages, respectively. See the snippet below.
# Grabbing the first message
channel.basic_consume(
  'test_stream',
  callback,
  arguments={"x-stream-offset": "first"}
)

# Grabbing the last message
channel.basic_consume(
  'test_stream',
  callback,
  arguments={"x-stream-offset": "last"}
)
Using RabbitMQ Streams with the Binary Stream Protocol
There are four steps to working with Streams using the binary stream protocol:
- Enable the Stream plugin on the RabbitMQ instance
- Create/Declare a Stream
- Publish a message to the Stream
- Consume a message from the Stream
Enable the Stream Plugin
In the previous steps we connected to a RabbitMQ instance on CloudAMQP. Here, we’d be spinning up a local RabbitMQ instance with docker. This is because enabling a plugin on CloudAMQP isn’t supported for users on the free plan at this time.
Start a RabbitMQ docker container with the command below
docker run -it --rm --name rabbitmq -p 5552:5552 \\
-e RABBITMQ_SERVER_ADDITIONAL_ERL_ARGS='-rabbitmq_stream advertised_host localhost' \\
rabbitmq:3.9
Next, enable the Stream Plugin on the RabbitMQ instance
docker exec rabbitmq rabbitmq-plugins enable rabbitmq_streamCreate/Declare a RabbitMQ Stream
The rstream Python client will be used to interact with Streams. Alternatively, check out the stream java client.
Note: the stream Python client is still a work in progress and not yet officially approved. The Java stream client, on the other hand, has been approved. The Python client is used here to visualize what working with RabbitMQ Streams might look like in Python.
To create a Stream, first create a Producer(that will serve as the interface for creating streams and publishing messages to the stream). See the code snippet below:
from rstream import Producer

# Create a producer
producer = Producer(
  host='localhost',
  port=5552,
  username='guest',
  password='guest'
)

# Create a Stream named 'mystream'
producer.create_stream('mystream')
Publish a Message to the RabbitMQ Stream
Next, extend the previous snippet to publish a message to
mystream
.
See snippet below:
from rstream import Producer, AMQPMessage

# Create a producer
producer = Producer(
  host='localhost',
  port=5552,
  username='guest',
  password='guest'
)

# Create a Stream named 'mystream'
producer.create_stream('mystream')

# Construct the message
message = AMQPMessage(
  body='hello world'
)

# Publish the message
producer.publish('mystream', amqp_message)
Consume a Message from the Stream
Next, consume the message published to
mystream.
See snippet below
from rstream import Consumer, amqp_decoder, AMQPMessage

# Create a consumer
consumer = Consumer(
      host='localhost',
      port=5552,
      username='guest',
      password='guest',
)

# More like a callback
def on_message(msg: AMQPMessage):
  print('Got message: {}'.format(msg.body))

consumer.start()
consumer.subscribe('mystream', on_message, decoder=amqp_decoder)
consumer.run()
Summary
This article illustrated two approaches to setting up communication between consumers and producers with a RabbitMQ Stream:
- With AMQP client libraries
- Or with the binary stream protocol
Even though working with the AMQP client libraries is easier, the RabbitMQ documentation recommends connecting consumers and producers to Streams with the binary stream protocol. This usually yields better performance.
To take the understanding of RabbitMQ streams a step further, the next article in this series will dive into the limitations of Streams and custom configurations.
Ready to start using RabbitMQ in your architecture? CloudAMQP is one of the world’s largest RabbitMQ cloud hosting providers. In addition to RabbitMQ, we also created our in-house message broker, LavinMQ with a throughput of around 1,000,000 messages/sec.
Easily create a free RabbitMQ or free LavinMQ instance on CloudAMQP. All available after a quick and easy signup.
Email us at contact@cloudamqp.com with any suggestions, questions, or feedback.