The previous article covered two use cases where Message Queues would come in handy. However, the subsequent posts in this series will focus on just one of the use cases – How Message Queues are used in a microservice architecture. But first, this article will cover the basics of RabbitMQ, the message queueing technology we will be working with.
As stated already, RabbitMQ is a Message Queueing service. You’d also hear people refer to Message Queueing services as message brokers. RabbitMQ does pretty much what every message broker does – It sits between two services or processes and allows them to communicate asynchronously.
Even though all message brokers fundamentally do the same thing– Accept messages from one service/module and forward them to another service/module, they differ in their implementations.
For example, while Kafka persists messages in logs, RabbitMQ adopts a queue-based approach. To understand this, let’s explore the details of RabbitMQ’s messaging model.
RabbitMQ messaging model
The messaging model in RabbitMQ is straightforward. On the one hand, we have applications called producers that connect to the message broker, RabbitMQ. And on the other hand, we have other applications called the consumers that also connect to RabbitMQ.
Note that the producers and consumers could be processes on the same computer modules of the same application, services that might be running on different computers, or even technology stacks.
The producers connect to RabbitMQ and publish messages to the broker. RabbitMQ then stores the messages and eventually forwards them to the consumers that have subscribed to the specific queue.

Figure 1 - Producers and consumers in RabbitMQ
But how does RabbitMQ store and eventually forward the messages to the consumer, you might ask?
Enter queues and exchanges
At the core of RabbitMQ is the queue data structure. The queue accepts messages from producers and lines them up in the order they arrive. Consumers connect to these queues in the message broker to retrieve messages and process them.
The action where a Producer sends a message to the Queue is often referred to as Publish . When a Consumer connects to the broker and asks to listen for messages from a specific Queue, this action may be called Subscribe . The broker allows many consumers (and producers for that matter) to be connected to the same queue. This patterns is commonly called Publish/Subscribe (pub-sub).
In other words, every RabbitMQ instance has one or more queues that store messages sent to the broker from producers. Usually, queues are created programmatically from either the producer application, the consumer application, or both.
Even though, so far, we’ve made it seem like producers publish messages directly to the queues in RabbitMQ, that’s not accurate. In fact, one of the central ideas in RabbitMQ’s messaging model is never to send messages directly to the queues. Instead, producers can only send messages to an Exchange. Hold on, an Exchange?
Think of Exchanges in RabbitMQ as message routers – They accept messages from producers and then push them to queues. An exchange must know exactly what to do with a message it receives. For example, what queue(s) should it push its messages to?
Before an exchange could know what queues to push its messages to, it must, first of all, know all the queues that are available. In other words, all the queues that are interested in receiving its messages. An exchange knows all the queues that are interested in receiving its messages through Bindings.
A Binding is simply the connection between a Queue and an Exchange. For example, when you bind Queue A to Exchange X, you are essentially telling Exchange X that Queue A is interested in its messages. You can bind multiple queues to an exchange.
With this knowledge of queues and exchanges in RabbitMQ we can now describe the flow of messages in RabbitMQ to be in this order:
- The producer establishes a connection to a RabbitMQ instance
- The producer creates exchanges and queues
- The producer binds queues to exchanges
- The producer publishes a message to an exchange
- The exchange routes the message to one or more available queues. Sometimes it discards the message altogether
- The consumer connects to one of the queues in the broker and consumes the available message
We will show what these steps look like in code in the subsequent section of this article. For now, the image below visualizes this flow of messages in RabbitMQ.
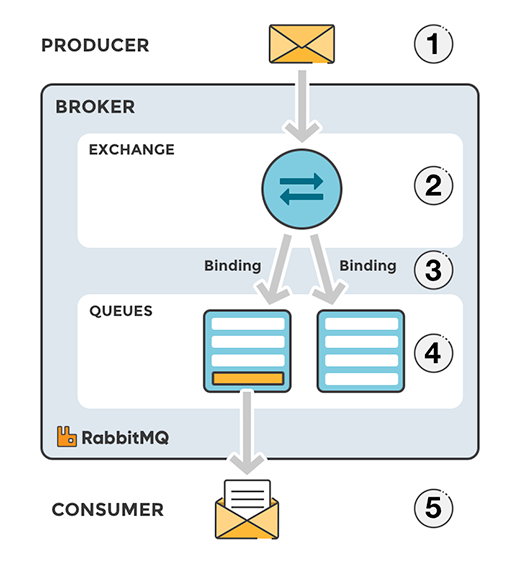
Figure 2 - Queues and exchanges in RabbitMQ
We mentioned that a binding allows an exchange to know what queues are interested in its messages, but knowing what queues are available is just the first step. An exchange must also know what exact queue to push its message to from the list of available queues.
For example, if queues B, C, and D are bound to Exchange X, and the exchange receives a message, M, the exchange has to decide which of the three queues to push its message. Does it push its message to just one of the queues or all three queues?
Which queue an exchange pushes its message to would depend on the rules defined by the type of exchange. A few exchange types are available: direct, topic, fanout, and headers. Before we proceed to cover what rules these exchange types use to route messages to the queues they are bound to, let’s first briefly cover the concepts of routing and binding keys.
When you bind a queue to an exchange, you can assign it a key, called the binding key, that identifies the relationship– More like a tag. A routing key, on the other hand, is assigned to messages at the time of publishing. The routing key specifies the destination of the message.
Types of exchanges
As mentioned earlier, the common exchange types available are
Direct Exchange in RabbitMQ
This exchange routes the message it receives to the queue whose binding key perfectly matches the message’s routing key.
For example, if a queue (Q1) is bound to an exchange (X) with the binding key logging, then a message published to the exchange with a routing key, logging will be routed to Q1.
Fanout Exchange in RabbitMQ
A fanout exchange broadcasts all the messages it receives to all the available queues to which it is bound. Routing and binding keys don’t come into play in fanout exchanges.
Topic Exchange in RabbitMQ
Instead of performing exact matching, topic exchanges do a wildcard match between the routing key and the routing pattern specified in the binding key.
The routing key is usually a list of words delimited by a dot. E.g.:
- logs.error.warning
- logs.error.critical
- logs.useraction.signup
The binding key is also a list of words delimited by a dot. However, the binnding key may contain two special characters for wildcard matching:
- * Matches exactly one word.
- # Matches zero or more words.
queue.a with a binding key set to logs.error.* would collect all error messages with the routing keys logs.error.warning and logs.error.critical . But it will not receive messages with routing keys: logs.useraction.signup , nor logs.error.warning.compile .
queue.b with the binding key set to logs.# would receive messages for all routing keys mentioned above.
Headers Exchange in RabbitMQ
The headers exchanges are rarely used, yet it's good to know they exist in case you ever need them. They are quite similar to the direct exchange but with one key exception – Instead of doing a match between the routing key and the binding key, the match is done between a value provided in the message’s header and the binding key.
Note that this article gave an overview of these exchange types. To take your understanding of these concepts a step further, you can explore our post on exchanges, routing keys, and bindings that covers these concepts in more detail.
Now that we understand the basics of RabbitMQ and how a message flows through it, let’s see what working with RabbitMQ looks like in code.
Getting started with RabbitMQ and CloudAMQP
The first step to working with RabbitMQ is to download and install RabbitMQ on your machine or server, as the case may be. But we understand that managing your own RabbitMQ instance and especially in production scenarios, could be tedious.
To simplify working with RabbitMQ, we created our RabbitMQ-as-a-service offering at CloudAMQP. This service allows you to spin up your own RabbitMQ instance on the cloud. CloudAMQP takes away the need for you to install or manage your own RabbitMQ instance. We allow you to focus on creating value for your customers instead.
CloudAMQP can be used for free with the plan Little Lemur. Go to the CloudAMQP Customer Portal to create an account. From there you will be able to create a new free RabbitMQ instance.
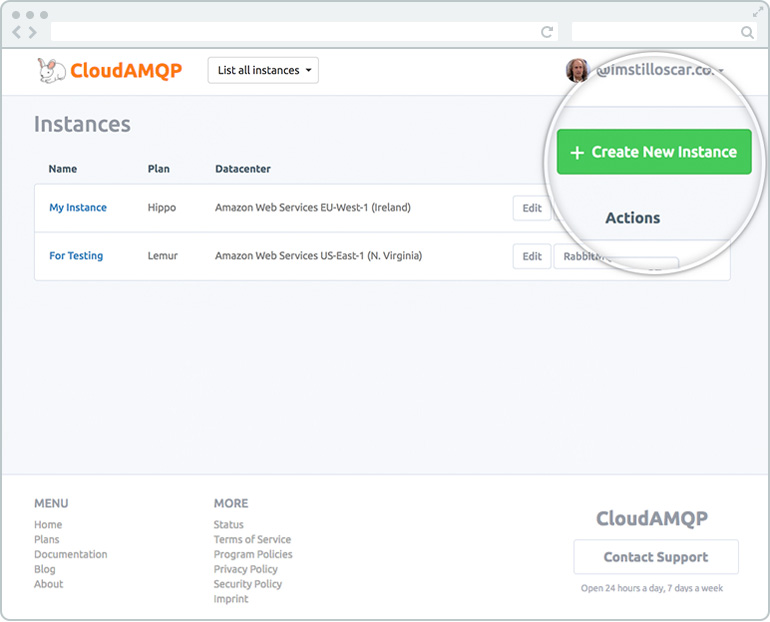
Figure 3 - Creating a RabbitMQ instance on CloudAMQP
With your instance created, click on the instance’s name to go to its page. You will be taken to the instance’s overview page. On the page, go to the AMQP details sub-section and copy the URL. Keep the copied URL somewhere, we’d be needing it soon. See the image below.
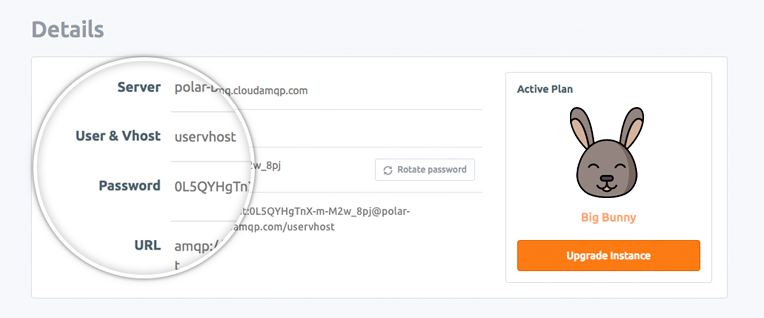
Figure 4 - RabbitMQ instance details
With your new instance up and running, you can now connect to it on CloudAMQP, set up a producer that publishes a message to the broker, then set up a consumer that consumes the published message.
We will implement our consumer and producer in Python using Pika, the recommended Python client library for RabbitMQ. There are client libraries for other programming languages like Ruby and Node.js.
Essentially, these client libraries abstract the low-level intricacies of communicating with a RabbitMQ instance.
In our producer and consumer code that we’ll soon implement, we are going to simulate an email-sending task, where the producer publishes an email that needs to be sent to some user, and then the consumer retrieves the task for processing.
Creating the producer
Below are the steps we took to create a producer that publishes an email-sending task to our RabbitMQ instance. Follow along by taking the following steps:
Step 1: Set up environment variables and project dependencies
Put
pika==1.1.0
in your
requirement.txt
file.
Step 2: Create a producer and connect to RabbitMQ
Next, create a file producer.py and add the snippet below to the file.
# example_producer.py
import pika, os, logging

url =  “paste the url copied from cloudAMQP here”
params = pika.URLParameters(url)

connection = pika.BlockingConnection(params) # Connect to CloudAMQP
channel = connection.channel() # start a channel
In the snippet above, remember to update the value of the variable url with the URL you copied on CloudAMQP in the previous step.
Next, we created a connection to our RabbitMQ instance on CloudAMQP. A connection is literally a TCP connection to our RabbitMQ instance.
Lastly, we created a channel. Usually, a connection is made up of one or more channels. Producers and consumers talk to RabbitMQ via a channel.
Step 3: Create an exchange, a queue and a binding
Remember that messages move from an exchange to a queue. So now it's time to create an exchange and a queue and then bind them. Copy and paste the snippet below in your producer.py file, right below the previous snippet.
EXCHANGE = 'email_sending_exchange'
EXCHANGE_TYPE = 'direct'
QUEUE_NAME = ‘email_sending_queue’
ROUTING_KEY = ‘email_message’

# Create an exchange
channel.exchange_declare(
  exchange=EXCHANGE,
  exchange_type=EXCHANGE_TYPE
)
# Create a queue
channel.queue_declare(queue=QUEUE_NAME)

# Bind queue with exchange
channel.queue_bind(
  QUEUE_NAME,
  EXCHANGE,
  ROUTING_KEY # The routing key here is the binding key
)
In the snippet above, we first declared a direct exchange named
email_sending_exchange,
a queue named
email_sending_queue,
and we bound the two with the binding key
email_message.
Because we are working with direct exchange and our queue has the binding key ‘email_message’, any message published to the exchange with the routing key ‘email_message’ will be routed to that queue.
Step 4: Publish a message
Now we have a connection and a channel set up as well as an exchange and a queue that are bound to each other. Now we can publish a message to our exchange. Copy and paste the snippet below in the producer.py file, right below the previous snippet.
channel.basic_publish(
  exchange=EXCHANGE,
  routing_key=ROUTING_KEY, # The routing key here is message’s routing key
  body='Email to be sent to the user'
)
print ("[x] Message sent to consumer")
connection.close()
The code snippet above is pretty self-explanatory: we published a message and closed our RabbitMQ connection.
Creating the consumer
We are bundling the code for consuming and processing the published message into one step because we will be repeating a lot of the things we have already done on the producer side.
For example, we will set up a connection and a channel with the consumer again. We will also declare the exchange and the queue we have already created on the producer side. It is safe to repeat the creation of exchanges and queues because the action is idempotent; the queues and exchanges can only be created once.
To begin, create a file
consumer.py
in the same folder as the
producer.py
file. Copy and paste the snippet below into the newly created
consumer.py
file.
# example_consumer.py
import pika, os, time

def email_sending_function(msg):
  print(" Sending the email")
  print(" [x] Received " + str(msg))

  time.sleep(5) # Simulates connecting to an external server and sending an email
  print(" Email sent !");
  return;

url = 'CLODUAMQP URL here'
params = pika.URLParameters(url)
connection = pika.BlockingConnection(params)
channel = connection.channel() # start a channel

# Declare constants
EXCHANGE = 'email_sending_exchange'
EXCHANGE_TYPE = 'direct'
QUEUE_NAME = ‘email_sending_queue’
ROUTING_KEY = ‘email_message’

# Create an exchange
channel.exchange_declare(
  exchange=EXCHANGE, exchange_type=EXCHANGE_TYPE
)
# Create a queue
channel.queue_declare(queue=QUEUE_NAME)
# Bind queue with exchange
channel.queue_bind(
  QUEUE_NAME,
  EXCHANGE,
  ROUTING_KEY # The routing key here is the binding key
)

# create a function which is called on incoming messages
def callback(ch, method, properties, body):
  email_sending_function(body)

# set up subscription on the queue
channel.basic_consume(
  QUEUE,
  callback,
  auto_ack=True
)

# start consuming (blocks)
channel.start_consuming()
connection.close()
The new element we’ve introduced here is the
channel.basic_consume
function. The function subscribes the consumer to the queue we declared
earlier. On every message received, the function triggers a callback
that, in turn, calls the
email_sending_function.
The email_sending_function simulates connecting to an email server and
sending an email.
Conclusion
In this article, we covered the basics of RabbitMQ and how CloudAMQP simplifies the task of managing a RabbitMQ instance. We explored how messages from producers end up in queues. Queues in RabbitMQ persist messages until a consumer consumes them.
Because this series, in general, is about seeing firsthand how to work with a message broker like RabbitMQ in a microservice, we will build a demo project in the subsequent posts. The next post will introduce this demo project we will be working on.
To learn more about RabbitMQ, check out our popular RabbitMQ Beginner Guide - series. For any suggestions, questions, or feedback, get in touch with us at contact@cloudamqp.com