This blog series is a living document that is continually updated. Last updated October 2025.
RabbitMQ is a message-queueing software also known as a message broker or queue manager. In simple terms, RabbitMQ is a software where queues are defined, to which applications connect in order to send messages to each other.
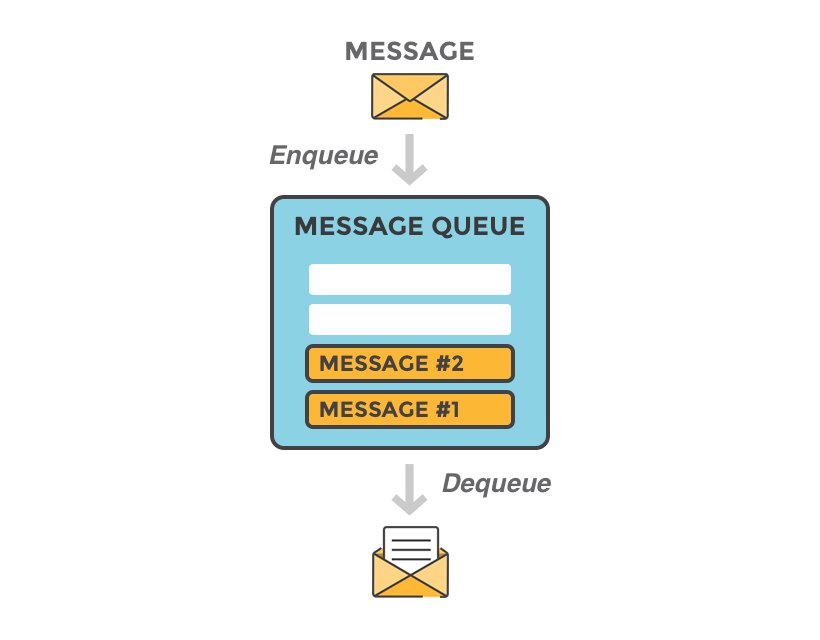
A message can contain various types of information. It could, for example, include information about a process or task that should start on another application (which could even be on another server), or it could be just a simple text message.
The queue-manager software (message broker) stores messages until a receiving application connects to the queue and takes the messages off the queue for processing.
All articles from Getting Started with RabbitMQ can be downloaded as a free ebook here.
An online training tool for RabbitMQ created by CloudAMQP can be found at: https://training.cloudamqp.com/
Table of Contents
-
RabbitMQ for beginners - What is RabbitMQ?
Gives a brief overview of messaging and defines important RabbitMQ concepts
-
RabbitMQ step-by-step coding instructions
Step-by-step instructions which show how to set up a connection, how to publish messages to a queue, and how to subscribe messages from the queue
-
The management interface
Describes how to monitor and handle your RabbitMQ server from a web browser
-
Exchanges, routing keys and bindings
Explains the different types of exchanges in RabbitMQ and how exchanges and queues are associated with each other
Psst! I think you should check out LavinMQ...
RabbitMQ Example
A message broker acts as a middleman for various services (e.g., a web application, as in this example). They can be used to reduce loads and delivery times of web application servers by delegating tasks that would normally take up a lot of time or resources to a third party that has no other job.
In this guide, we follow a scenario where a web application allows users to upload information to a website. The site will handle this information, generate a PDF, and email it back to the user. This process will, in this example, take several seconds and is one of the good reasons why a message queue will be used to perform the task.
When the user enters information into the web interface, the web application will create a "PDF processing" message that includes all of the important information needed to perform the task. That message is then placed onto a queue defined in RabbitMQ.

The basic architecture of a message queue is simple. There are client applications called producers that create messages and deliver them to the broker (the message queue). Other applications, called consumers, connect to the queue and subscribe to the messages for processing. Software can act as a producer, a consumer, or both a consumer and a producer of messages. Messages placed onto the queue are stored until the consumer retrieves them.
When and why should you use RabbitMQ?
Message queueing allows web servers to respond quickly to requests instead of being forced to perform resource-heavy procedures on the spot that may delay response time. Message queueing is also useful when you want to distribute messages to multiple consumers or to balance loads among workers.
The consumer takes a message off the queue and starts processing the PDF. At the same time, the producer continues to add new messages to the queue. The consumer can be on a totally different server than the producer, or they can be located on the same server. The request can be created in one programming language and handled in another programming language. The point is, these two applications will only communicate through the messages they are sending to each other, which means the sender and receiver have low coupling.
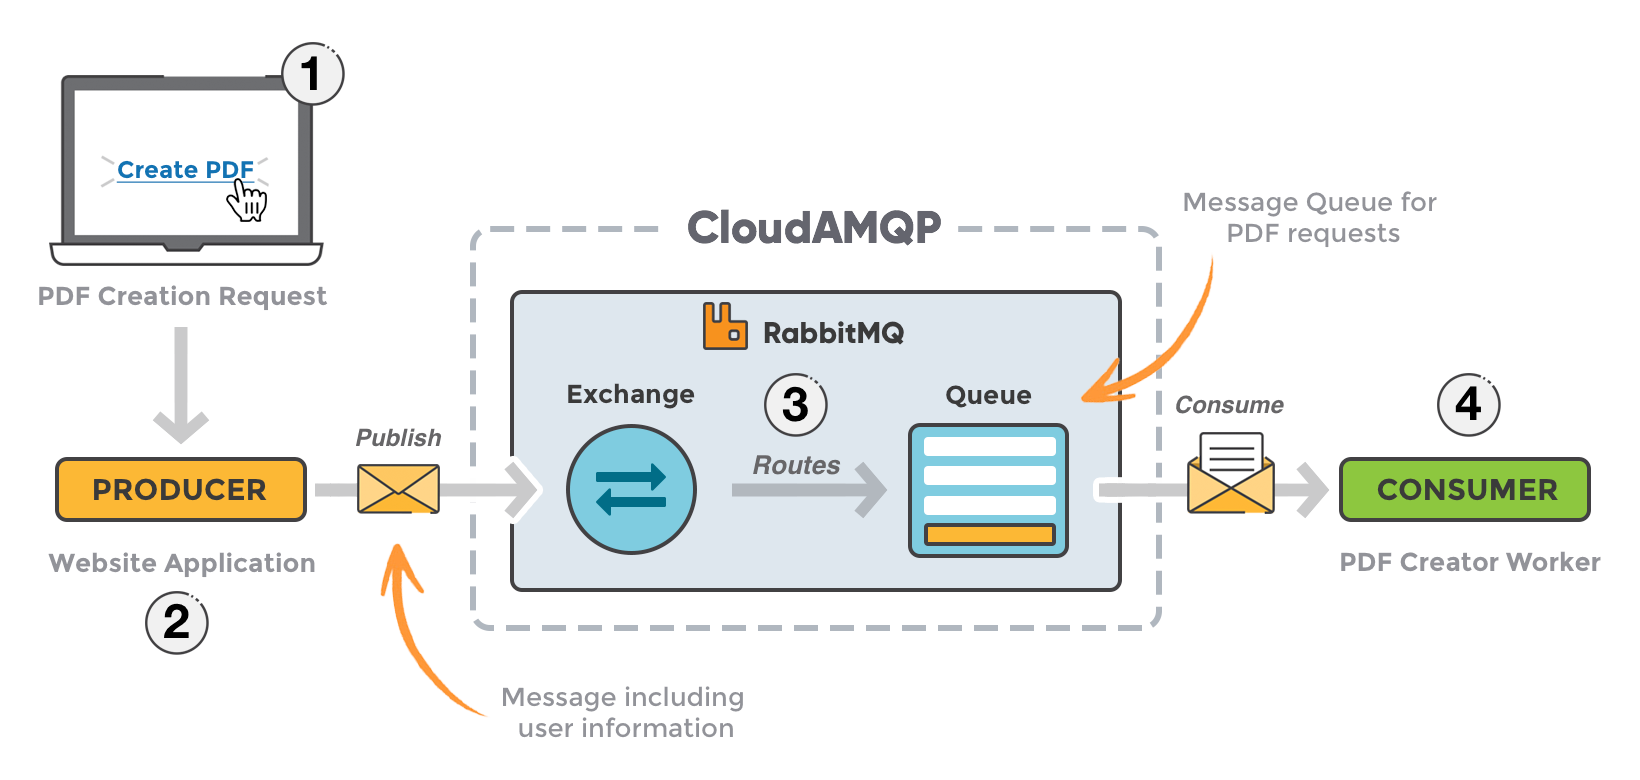
- The user sends a PDF creation request to the web application.
- The web application (the producer) sends a message to RabbitMQ that includes data from the request such as name and email.
- An exchange accepts the messages from the producer and routes them to the correct message queues for PDF creation.
- The PDF processing worker (the consumer) receives the task message and starts processing the PDF.
Exchanges
In RabbitMQ, messages are not published directly to a queue. Instead, the producer sends messages to an exchange. The exchange is responsible for routing messages to different queues using bindings and routing keys. A binding is a link between a queue and an exchange.
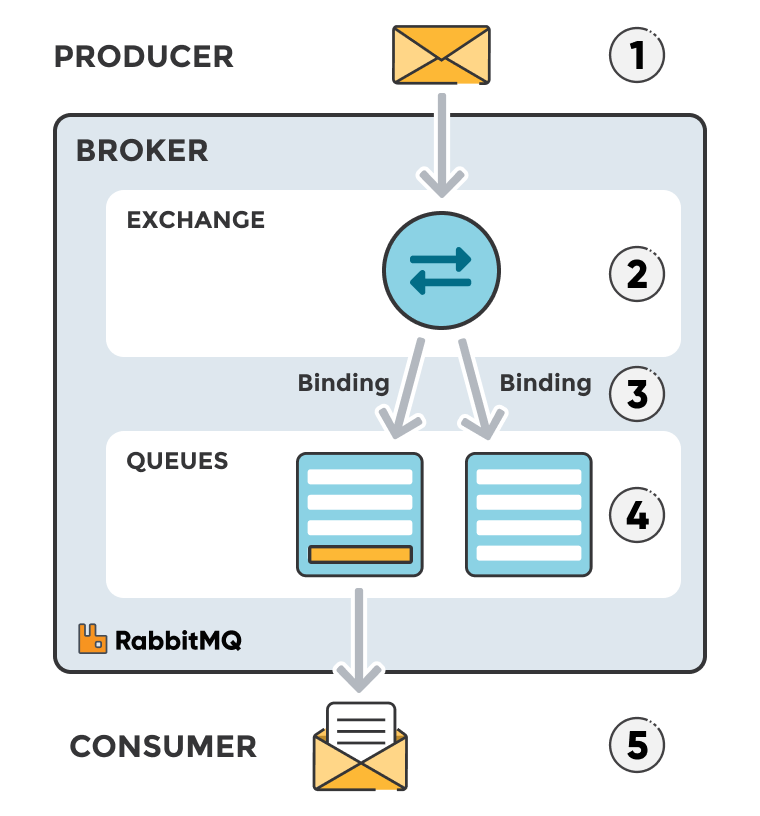
Message flow in RabbitMQ
- The producer publishes a message to an exchange. When creating an exchange, the type must be specified. This topic will be covered later.
- The exchange receives the message and is now responsible for routing it. The exchange takes different message attributes into account, such as the routing key, depending on the exchange type.
- Bindings must be created from the exchange to queues. In this case, there are two bindings to two different queues. The exchange routes the message into the queues depending on message attributes.
- The messages stay in the queue until they are handled by a consumer.
- The consumer handles the message.
Types of exchanges
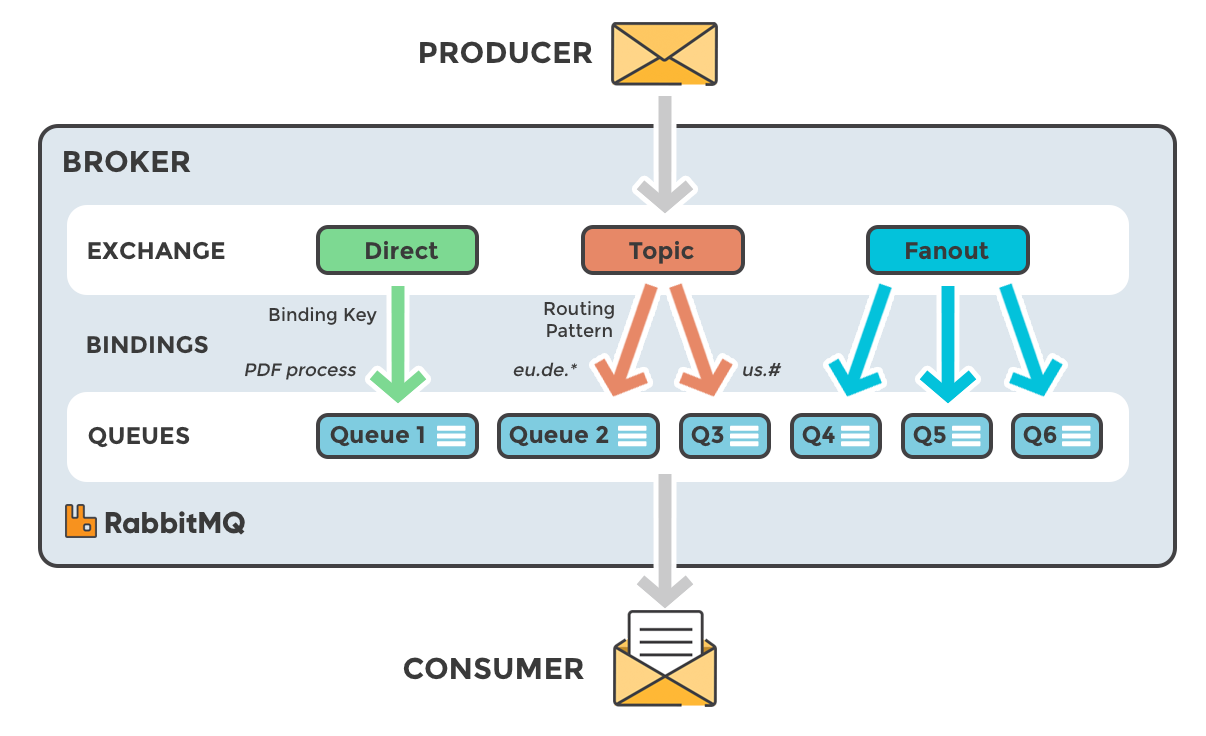
These are the four exchange types in RabbitMQ
- Direct: The message is routed to the queues whose binding key exactly matches the routing key of the message. For example, if the queue is bound to the exchange with the binding key pdfprocess, a message published to the exchange with a routing key pdfprocess is routed to that queue.
- Fanout: A fanout exchange routes messages to all of the queues bound to it.
- Topic: The topic exchange does a wildcard match between the routing key and the routing pattern specified in the binding.
- Headers: Headers exchanges use the message header attributes for routing.
In part 2, you will get familiar with exchange type: direct exchange. A deeper understanding of the different exchange types, binding keys, routing keys and how or when you should use them can be found in Part 4: RabbitMQ for beginners - Exchanges, routing keys and bindings.
RabbitMQ and server concepts
Before digging deeper into RabbitMQ, let's go over the elements and concepts. The default virtual host, the default user, and the default permissions are used in the examples:
- Producer: Application that sends the messages to the broker.
- Consumer: Application that receives the messages from the broker.
- Queue: Buffer within the broker that stores messages.
- Message: Information that is sent from the producer to a consumer through the broker.
- Connection: A TCP connection between your application and the broker.
- Channel: A virtual connection inside a connection. When publishing or consuming messages from a queue - it's all done over a channel.
- Exchange: Receives messages from producers and routes them to queues depending on rules defined by the exchange type. To receive messages, a queue needs to be bound to at least one exchange.
- Binding: A binding is a link between a queue and an exchange.
- Routing key: A key that the exchange uses to decide how to route the message to queues. Think of the routing key like an address for the message.
- AMQP: Advanced Message Queuing Protocol is the core protocol used by RabbitMQ for messaging.
- Users: It is possible to connect to RabbitMQ with a given username and password. Every user can be assigned permissions such as rights to read, write and configure privileges within the instance. Users can also be assigned permissions for specific virtual hosts.
- Vhost, virtual host: Provides a way to segregate applications using the same RabbitMQ instance. Users can have different permissions to different vhost and queues and exchanges can be created, so they only exist in one vhost.
At the beginning of this article, we had one producer (the website application) and one consumer (the PDF processing application). If the PDF processing application crashes, or if many PDF requests are coming at the same time, messages would continue to stack up in the queue until the consumer restarts. Once active again, it would then process all the messages, one by one in a sequiental order.
Set up a RabbitMQ instance
To follow this guide you need to set up a CloudAMQP instance or download and install RabbitMQ. CloudAMQP offers a hosted RabbitMQ solution, meaning that all you need to do is sign up for an account and create an instance. You do not need to set up and install RabbitMQ or care about cluster handling, CloudAMQP will do that for you. CloudAMQP can be used for free with the plan "little lemur".
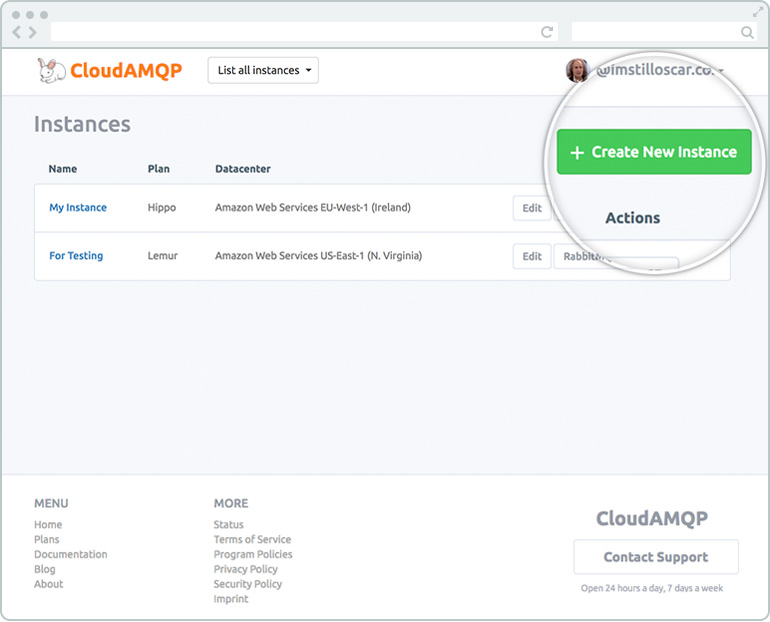
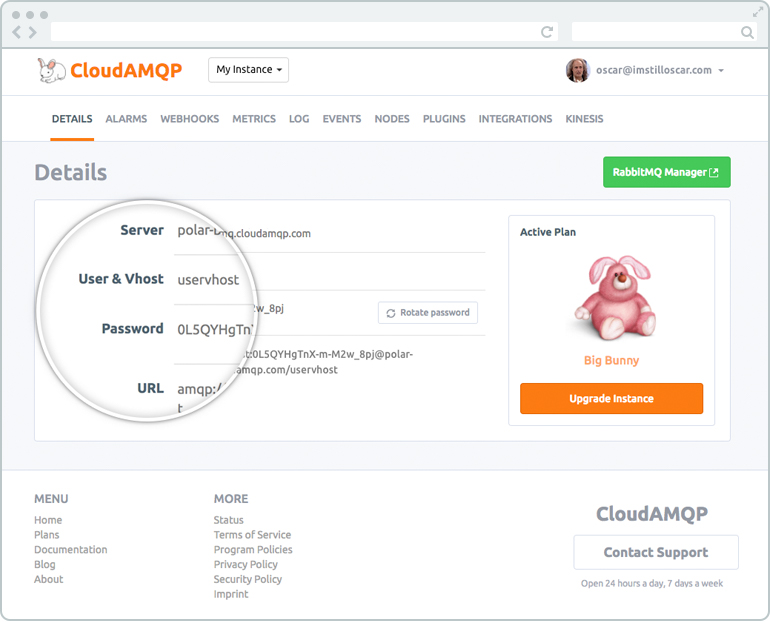
After your instance is created, click on your instance details to find your username, password, and connection URL for your cloud-hosted RabbitMQ instance.
Getting started with RabbitMQ
Immediately after creating a RabbitMQ instance you can send messages using different languages, platforms, and operating systems. This way of handling messages decouples your processes and creates a highly scalable system.
To get started, open the management interface to get an overview of your RabbitMQ server.
The Management Interface - Management and Monitoring
RabbitMQ offers a web-based user interface (UI) for the management and monitoring of your RabbitMQ server. The RabbitMQ management interface is enabled by default in CloudAMQP and a link can be found on the details page for your CloudAMQP instance.
From the management interface, it is possible to handle, create, delete and list queues. It is also possible to monitor queue length, check message rate, or change and add users permissions and much more.
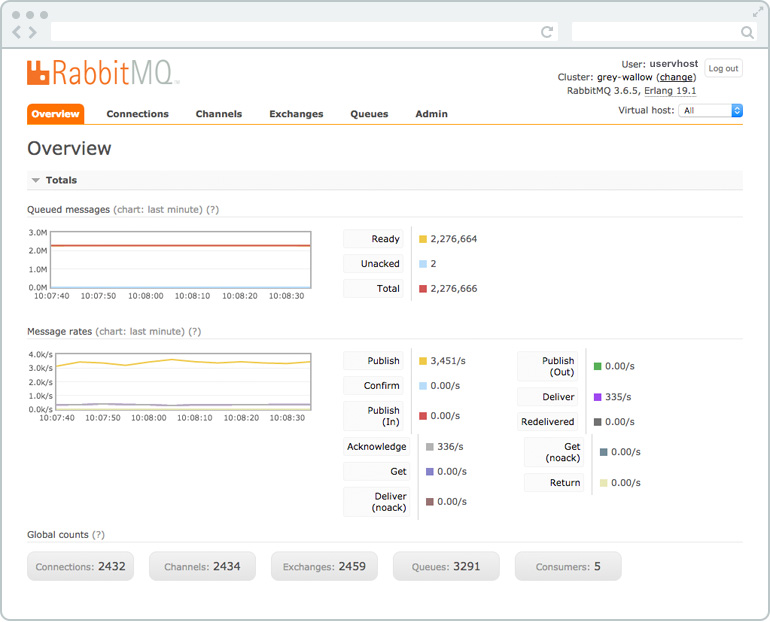
More information about the management interface can be found in Part 3 - The management interface.
How to publish and subscribe messages with RabbitMQ
RabbitMQ uses the Advanced Message Queueing Protocol AMQP by default. To be able to communicate with RabbitMQ you need a library that understands the same protocol as RabbitMQ. Download the client library for the programming language that you intend to use for your applications.
A client library is an application programming interface (API) for use in writing client applications. A client library has several methods - in this case, to communicate with RabbitMQ. The methods should be used when you connect to the RabbitMQ broker (using the given parameters, hostname, port number, etc.) or when you declare a queue or an exchange. There is a choice of libraries for almost every programming language.
Steps to follow when setting up a connection and publishing a message/consuming a message:
-
Set up/create a connection object.
The username, password, connection URL, port, etc., will need to be specified. A TCP connection will be set up between the application and RabbitMQ when the start method is called. -
Create a channel within the TCP connection.
This channel serves as a pathway for sending and receiving messages through the connection interface. -
Declare/create a queue.
Declaring a queue will cause it to be created if it does not already exist. All queues need to be declared before they can be used. -
Set up exchanges and bind a queue to an exchange in subscriber/consumer.
All exchanges must be declared before they can be used. An exchange accepts messages from a producer application and routes them to message queues. To route messages to queues, bind the queues to an exchange. -
In publisher:
Publish a message to an exchange.
In subscriber/consumer: Consume a message from a queue. - Close the channel and the connection.
Sample code
Sample code will be given in part 2, starting with Part 2.1 - Ruby, followed by Part 2.2 - Node.js, and Part 2.3 Python, Having different programming languages on different parts of the system is possible - for example, the publisher could be written in node.js and the subscriber in Python.

Enjoy RabbitMQ? Take a look at LavinMQ, a fast and easy-to-use AMQP message broker with great performance.
Try LavinMQ for free
Please email us at contact@cloudamqp.com if you have any suggestions or feedback.
