How to activate VPC on CloudAMQP
This page is available on dedicated instances with VPC enabled
A Virtual Private Cloud (VPC) is a public cloud environment that allows users or companies to set up private clouds in a shared cloud infrastructure. It is possible to set up a peering connection between your VPC and a CloudAMQP VPC with AWS, Azure, and Google Cloud Platform.
Pricing
VPC is $99 per month
How to launch a CloudAMQP cluster in a VPC
-
Create a plan in a dedicated VPC
A dedicated VPC is only available for dedicated plans. See our Plans & Pricing for more information.
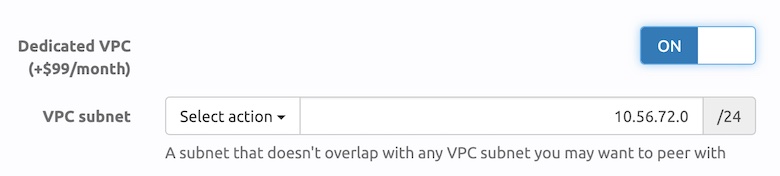 Shown: Part of the configuring step when creating a new instance in CloudAMQP
-
Select a VPC subnet
When creating a VPC, the VPC subnet must be selected. Ensure that it does not overlap with any VPC subnets needed for peering.
-
Create a peering request to CloudAMQP
Open the details for the new instance as soon as it is created and navigate to the VPC view. At the top of the page, find the information needed to create the peering request.
Note that you can enable dedicated VPC for existing instances by going to the CloudAMQP Console and the list of instances. Click Edit next to an instance and then Enable VPC Features.
Launch a CloudAMQP cluster in Amazon AWS VPC
-
Create Peering Connection in AWS
Log in to the AWS account, go to VPC and click Peering Connections. Click Create Peering Connection and create a request from the VPC to the CloudAMQP VPC. Ensure the DNS Resolution configures correctly; see section DNS Resolution below for more information.
-
Accept the peering request
To accept the peering request, go to the VPC tab in the CloudAMQP Console and click the Accept button for the pending request.
-
Create a route to CloudAMQP VPC
In AWS, navigate to VPC, and select the VPC for which the peering request was created. Click on the Route table in the Description tab to go to the routing table associated with the VPC.
Now click the Routes tab, then Edit routes, and finally Add route. Enter the subnet for the CloudAMQP VPC, select Peering connection in the target dropdown, and select the peering connection just created.
Click Save routes button, and it is done!
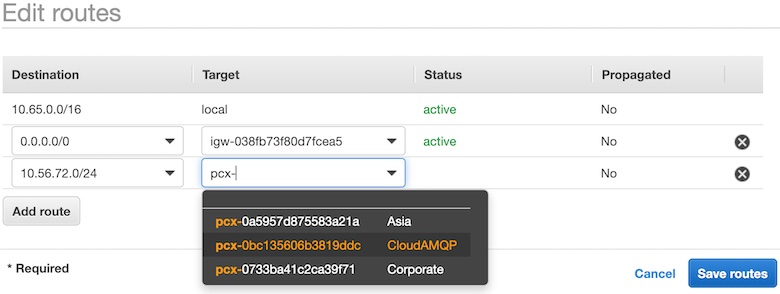 Shown: Adding routes to a VPC route table in AWS.
For further information see AWS Documentation for routing table.
DNS Resolution for Amazon AWS VPC
When peering a CloudAMQP cluster with a VPC, two different hostnames are provided, for example, amusing-teddybear.in.cloudamqp.com and amusing-teddybear.rmq.cloudamqp.com . The first one is for internal communication between servers in the VPC, and the second one is for public communication, e.g, to access the management UI. In our blog post "Amazon VPC Peering with CloudAMQP" you can learn more about how the public hostname can be set to resolve to the internal IP address, if the requester is located inside the VPC.
Launch a CloudAMQP cluster in Google Cloud Platform VPC
-
Create peering request to CloudAMQP
Create a peering request from your GCP account to your CloudAMQP VPC network. More information on how to do this is available in the Google Cloud Docs:
Using VPC Network Peering. -
Accept the peering request
To accept the peering request, go to the VPC tab in the CloudAMQP Console and create a peering request from the CloudAMPQ VPC to your GCP account.
Note that only "subnet peering routes" get imported by default, i.e. static and dynamic routes are not exchanged.
Set Up a CloudAMQP Cluster in Azure Platform VPC
-
Grant "Network contributor" access for the CloudAMQP VNet.
Access can be granted to either a Microsoft user or a multi-tenant service principal from the VPC Peering tab in the CloudAMQP Console. For a user, send an invitation and accept the invitation email from Microsoft. For a service principal, register a multi-tenant application in your Azure AD and provide its Application (client) ID in the console.
The same user or service principal must also be granted "Network contributor" on your own VNet so it can create the reverse peering in the next steps.
-
Establish a Peering Connection from your VNet to the CloudAMQP VNet.
For details on how to establish the peering connection, refer to the Azure VNet Peering Documentation. The resource ID for the CloudAMQP VNet can be found in the VPC Peering tab of your VPC in the CloudAMQP console.
-
Establish a Peering Connection from the CloudAMQP VNet to your VNet.
To complete the peering process, you need to establish the peering connection from both VNets. Log in as the user with "Network contributor" access to the CloudAMQP VNet and establish a peering connection from the CloudAMQP VNet to your VNet. For details on how to establish the peering connection, refer to the Azure VNet Peering Documentation.
-
Configure your CloudAMQP firewall to allow traffic from your VNet.
Navigate to the Firewall tab for your cluster in the CloudAMQP Console and modify the firewall settings to allow traffic from the peered subnet.